Traditional Danish pastry recipe – Sweet, Soft & Flaky
Master the art of the perfect Danish pastry recipe. Learn how to create flaky, buttery layers with our easy homemade guide at thenextrecipes.com now!
Flaky, Buttery, and Utterly Dreamy: Homemade Danish Pastries that Whisper Sweet Comfort
⭐️⭐️⭐️⭐️⭐️ (4.9 from 1,900 fans)
📸 700+ photo shares | ☀️ Updated [October 2025]

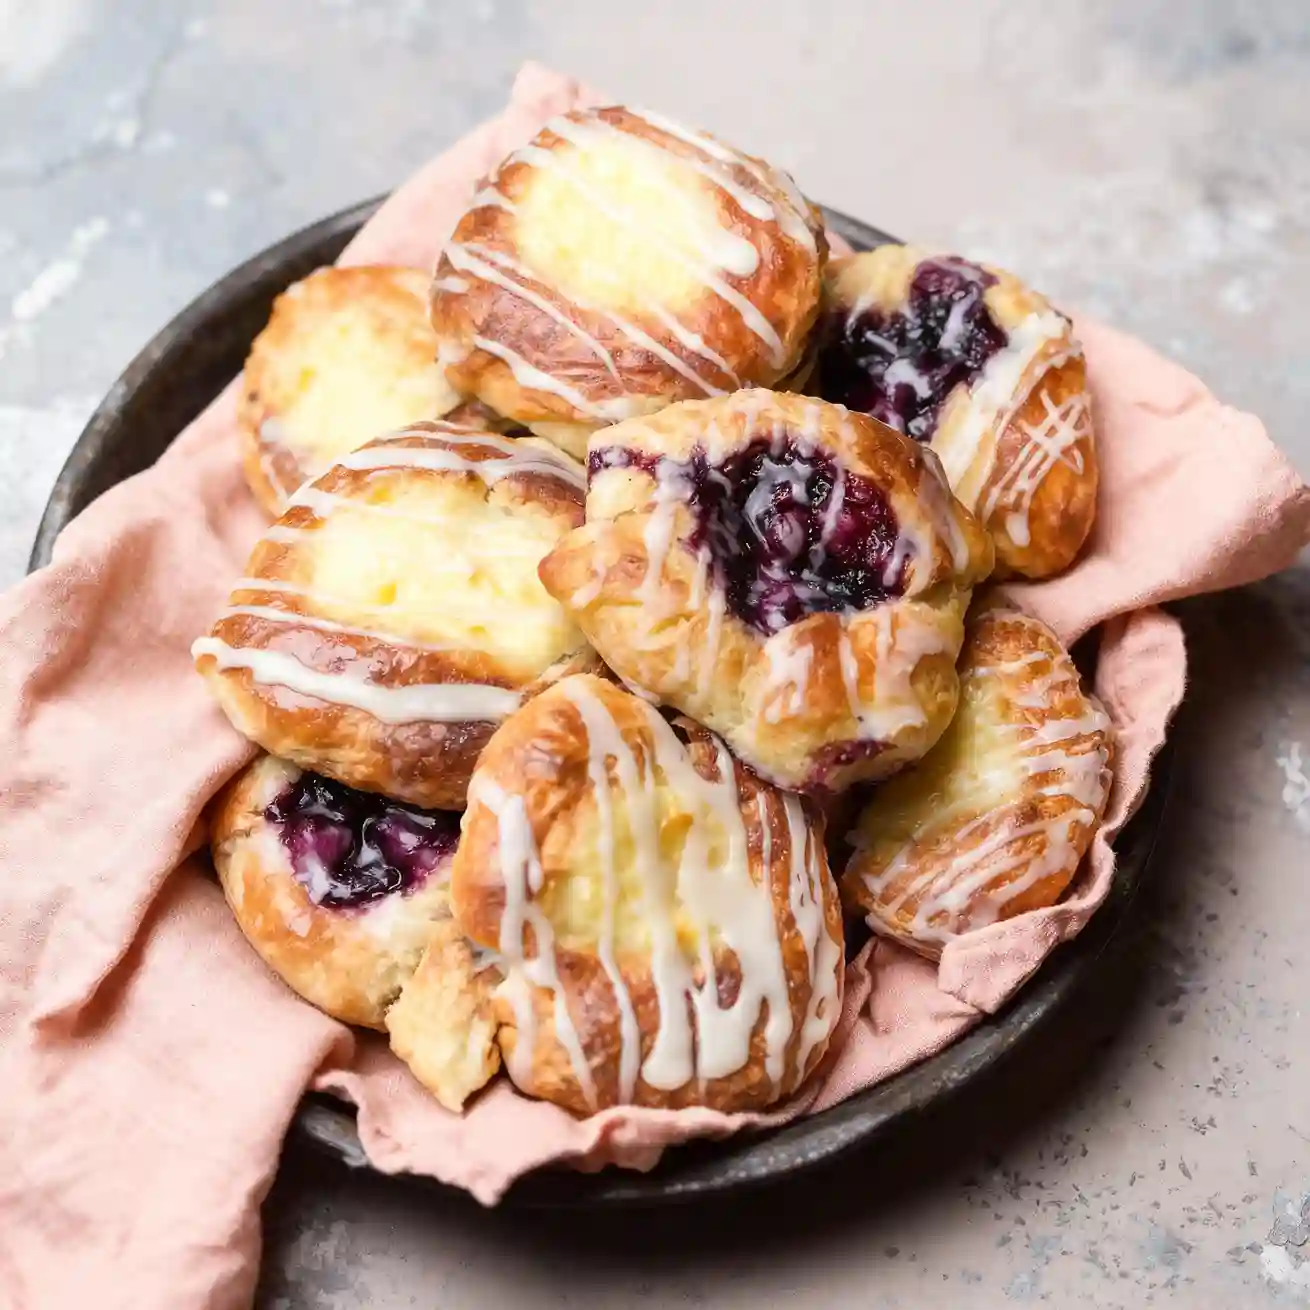
Danish pastries are more than just a treat; they are a sensory experience that transports you with every buttery, golden bite. Whether filled with tangy berries or smooth cream cheese, these flaky pastries bring joy to any weekend brunch or quiet coffee break. At thenextrecipes.com, we believe this homemade Danish pastry recipe is the perfect way to slow down and savor the love baked into every layer.
Quick Glance Danish pastry recipe
⏱️ Prep Time: 3 hours (active time 45 minutes)
🍽️ Servings: 12-16 pastries
💥 Vibe: Flaky, Buttery, Dreamy
Table of Contents
What You’ll Need Danish pastry recipe

Gathering your ingredients is the first step on our delicious journey to perfect Danish pastries. Fresh, quality ingredients are key to unlocking those incredible layers and rich flavors we’re after. Have everything measured and ready to go for a smooth baking experience!
- For the Dough:
- 3 ½ cups (420g) all-purpose flour, plus more for dusting
- ½ cup (100g) granulated sugar
- 1 teaspoon salt
- 1 packet (2 ¼ teaspoons) active dry yeast
- ½ cup (120ml) warm milk (105-115°F / 40-46°C)
- 2 large eggs, lightly beaten
- ½ cup (113g) unsalted butter, melted and cooled slightly
- 1 ½ cups (340g) unsalted butter, cold, for laminating
- For the Cream Cheese Filling:
- 8 oz (226g) cream cheese, softened
- ¼ cup (50g) granulated sugar
- 1 large egg yolk
- ½ teaspoon vanilla extract
- For the Egg Wash:
- 1 large egg, beaten with 1 tablespoon water
- For the Glaze:
- 1 ½ cups (180g) powdered sugar
- 2-3 tablespoons milk
- ½ teaspoon vanilla extract
How to Make Danish pastry recipe
How to Make Danish pastry recipe
Prepare the Enriched Dough
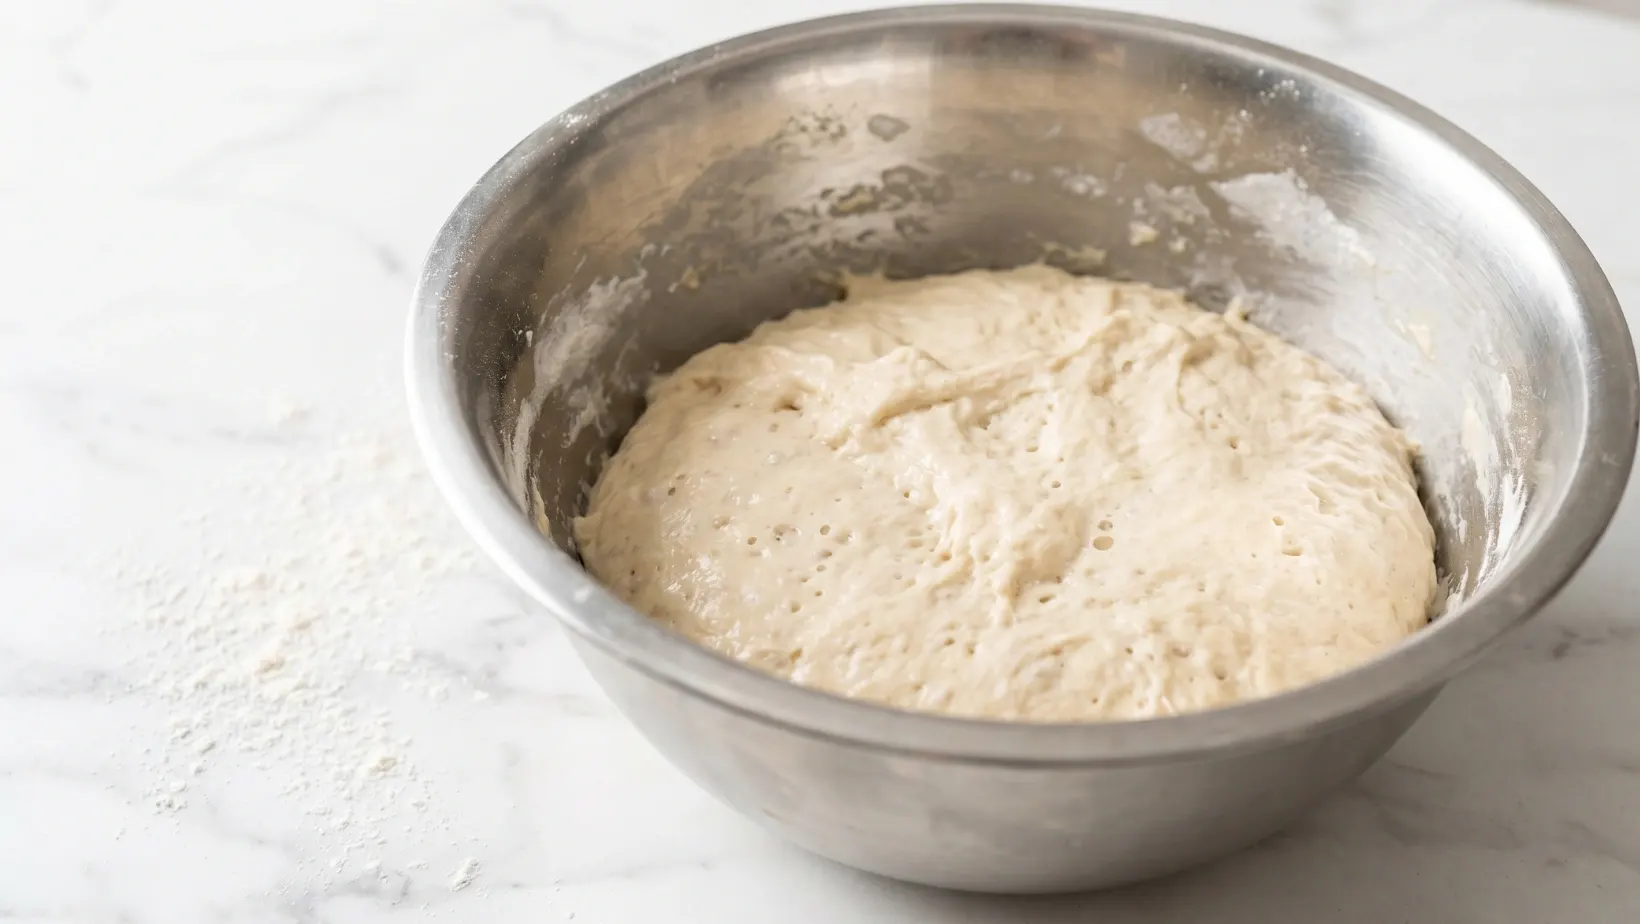
In a large stainless steel bowl, mix your flour, yeast, sugar, and milk to create a soft, supple dough. Knead until smooth, then let it rise until doubled in size. You should see healthy air bubbles forming in the dough, which is the key to a light, airy pastry.
Prepare the Butter Block
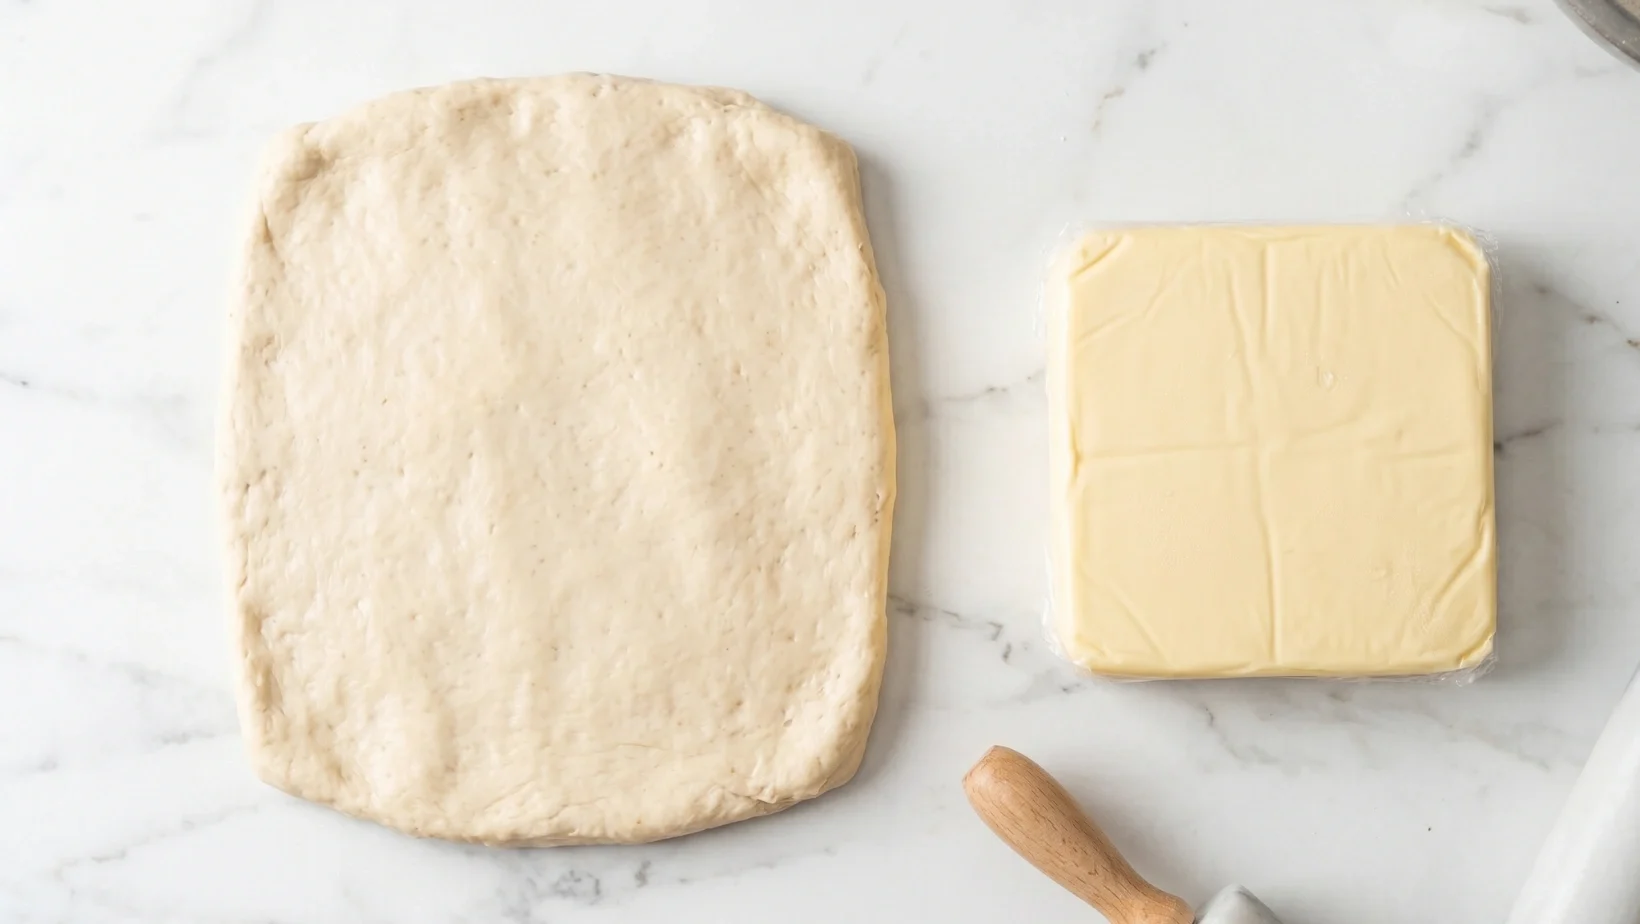
While the dough rests, create your butter block. Place high-quality, cold unsalted butter between sheets of plastic wrap and pound/roll it into a consistent square. Your dough should be rolled into a slightly larger rectangle. It is vital that both the dough and the butter are at a similar cool temperature to prevent the butter from melting or shattering.
The Envelope Fold (Lamination)
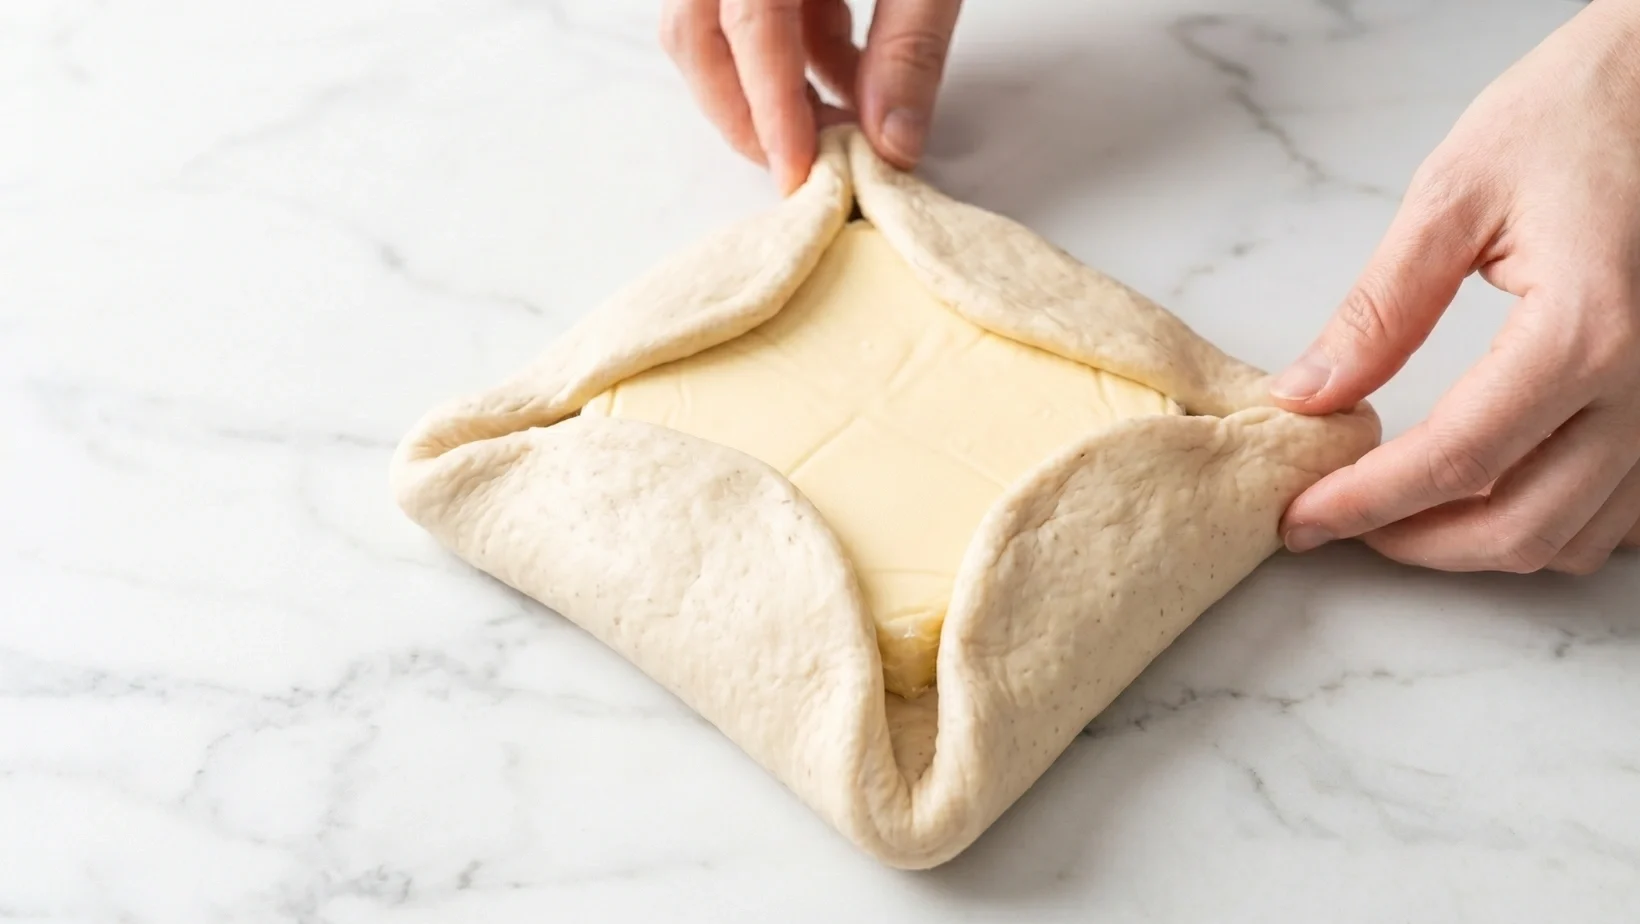
Place the butter block in the center of your dough rectangle. Fold the corners of the dough over the butter like an envelope, sealing it completely. This is the beginning of the lamination process that creates those famous flaky layers.
Rolling and Turning
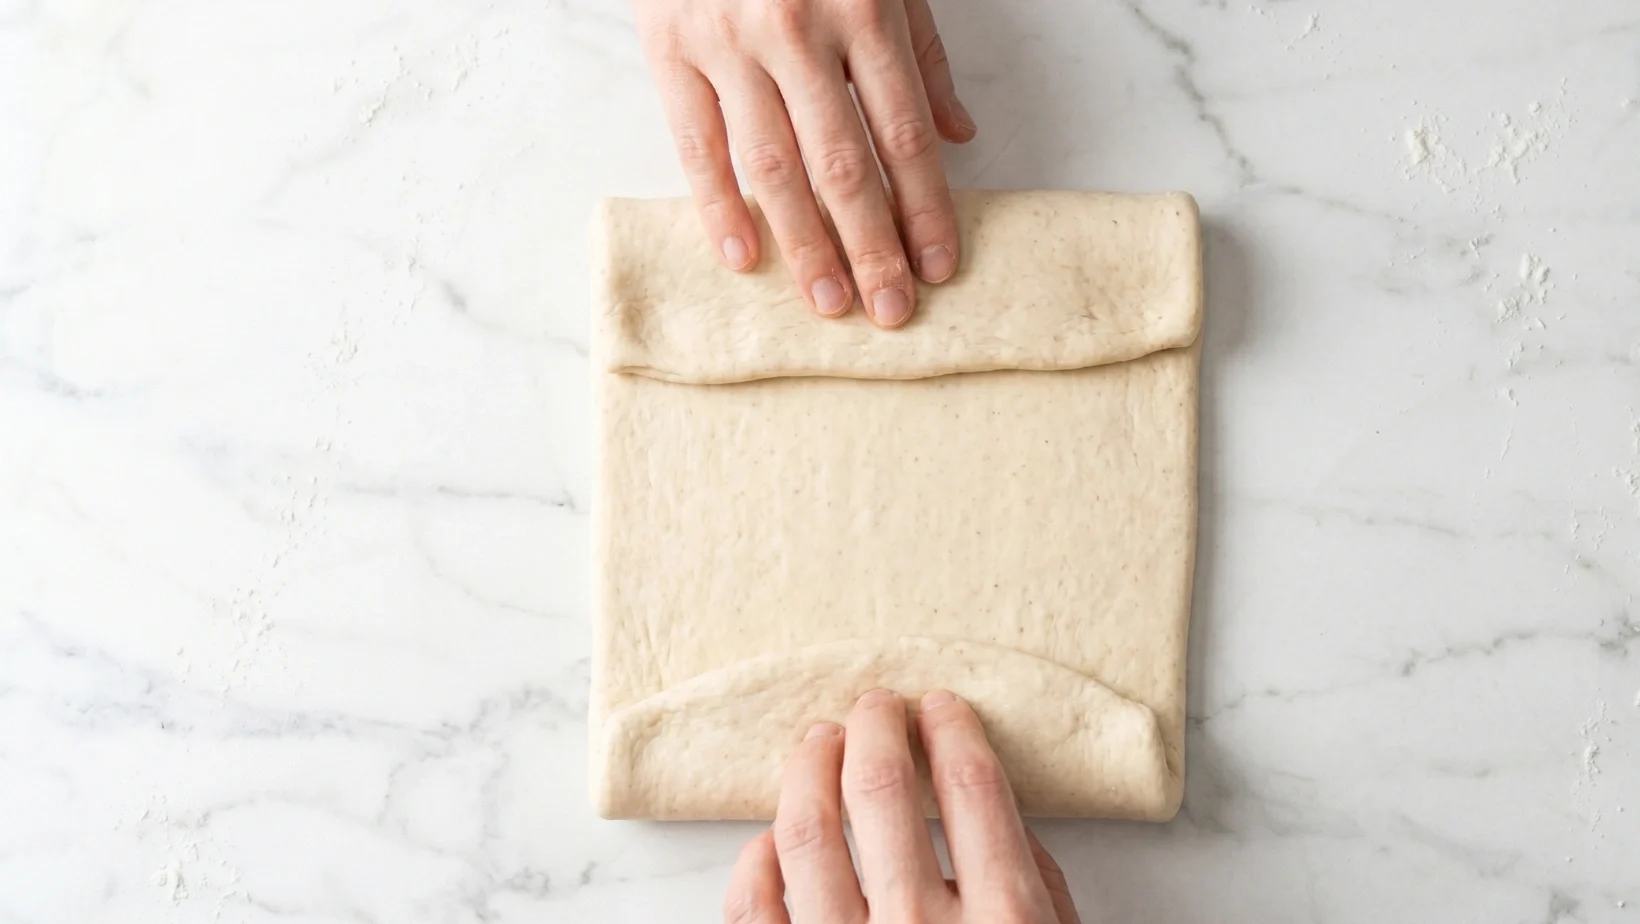
Gently roll the dough out into a long rectangle, then fold it into thirds (like a letter). Rotate the dough 90 degrees and repeat. This creates hundreds of alternating layers of dough and butter. If the dough feels too soft, chill it immediately.
The Cold Proof

Wrap your laminated dough tightly in plastic wrap and place it in the refrigerator. Use a thermometer to ensure your fridge is around 4°C (40°F). Let the dough chill for at least 2 hours (or overnight) to relax the gluten and solidify the butter layers.
Shape and Cut
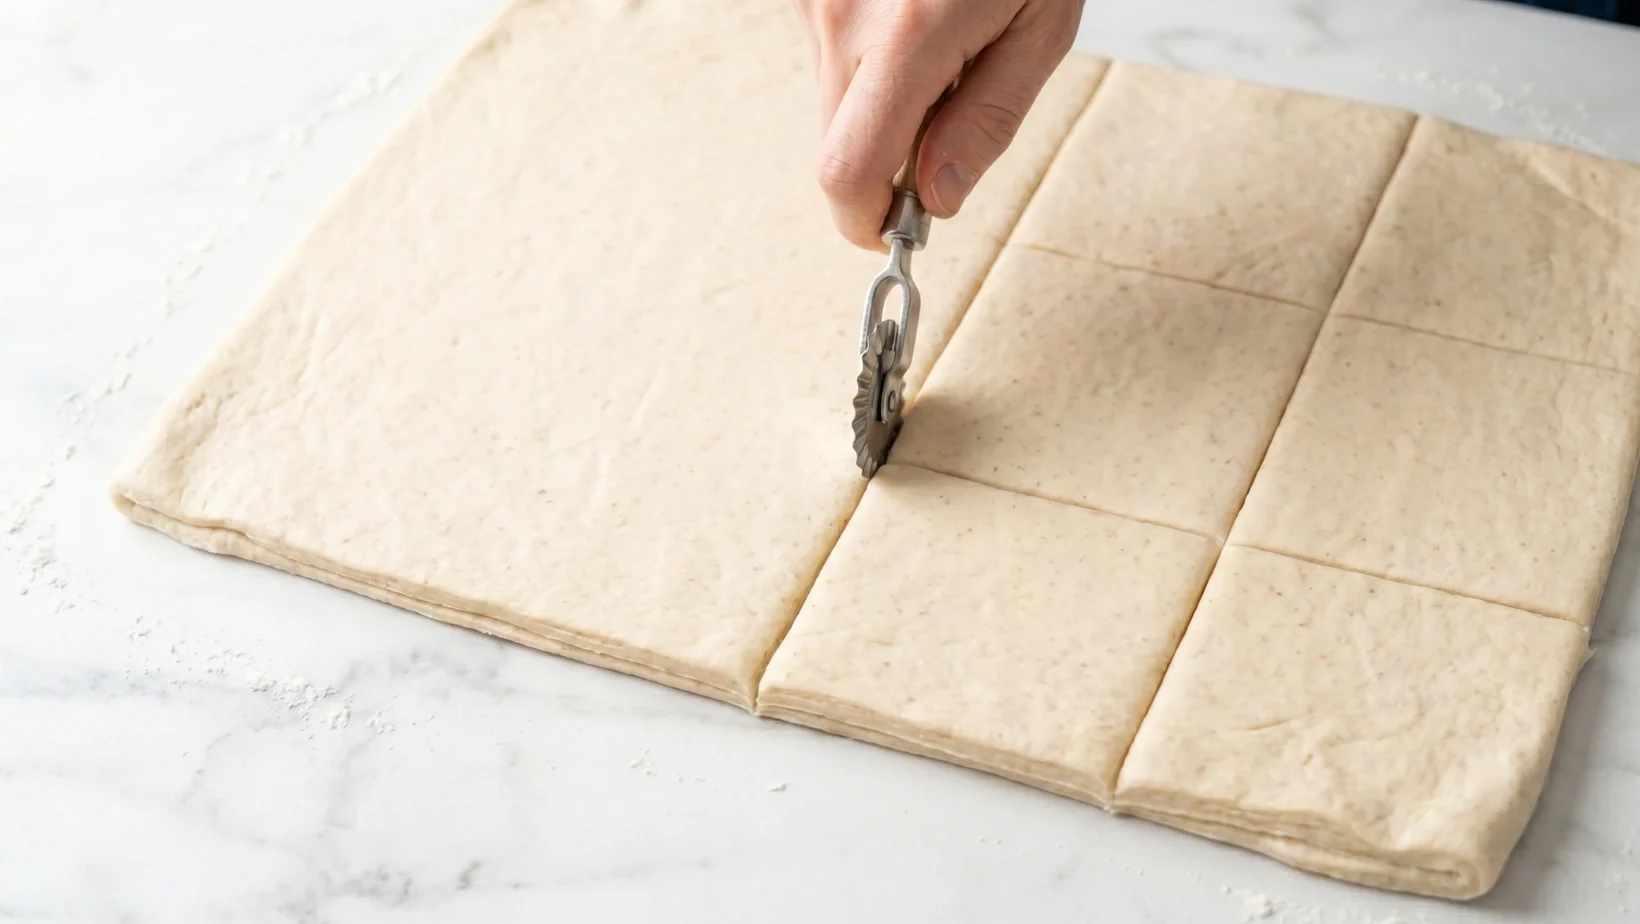
On a lightly floured surface, roll the chilled dough out to about 1/4 inch thickness. Use a pastry wheel to cut the dough into squares or strips. For classic shapes, you can create pinwheels, coils, or folded pockets.
Final Rise and Filling
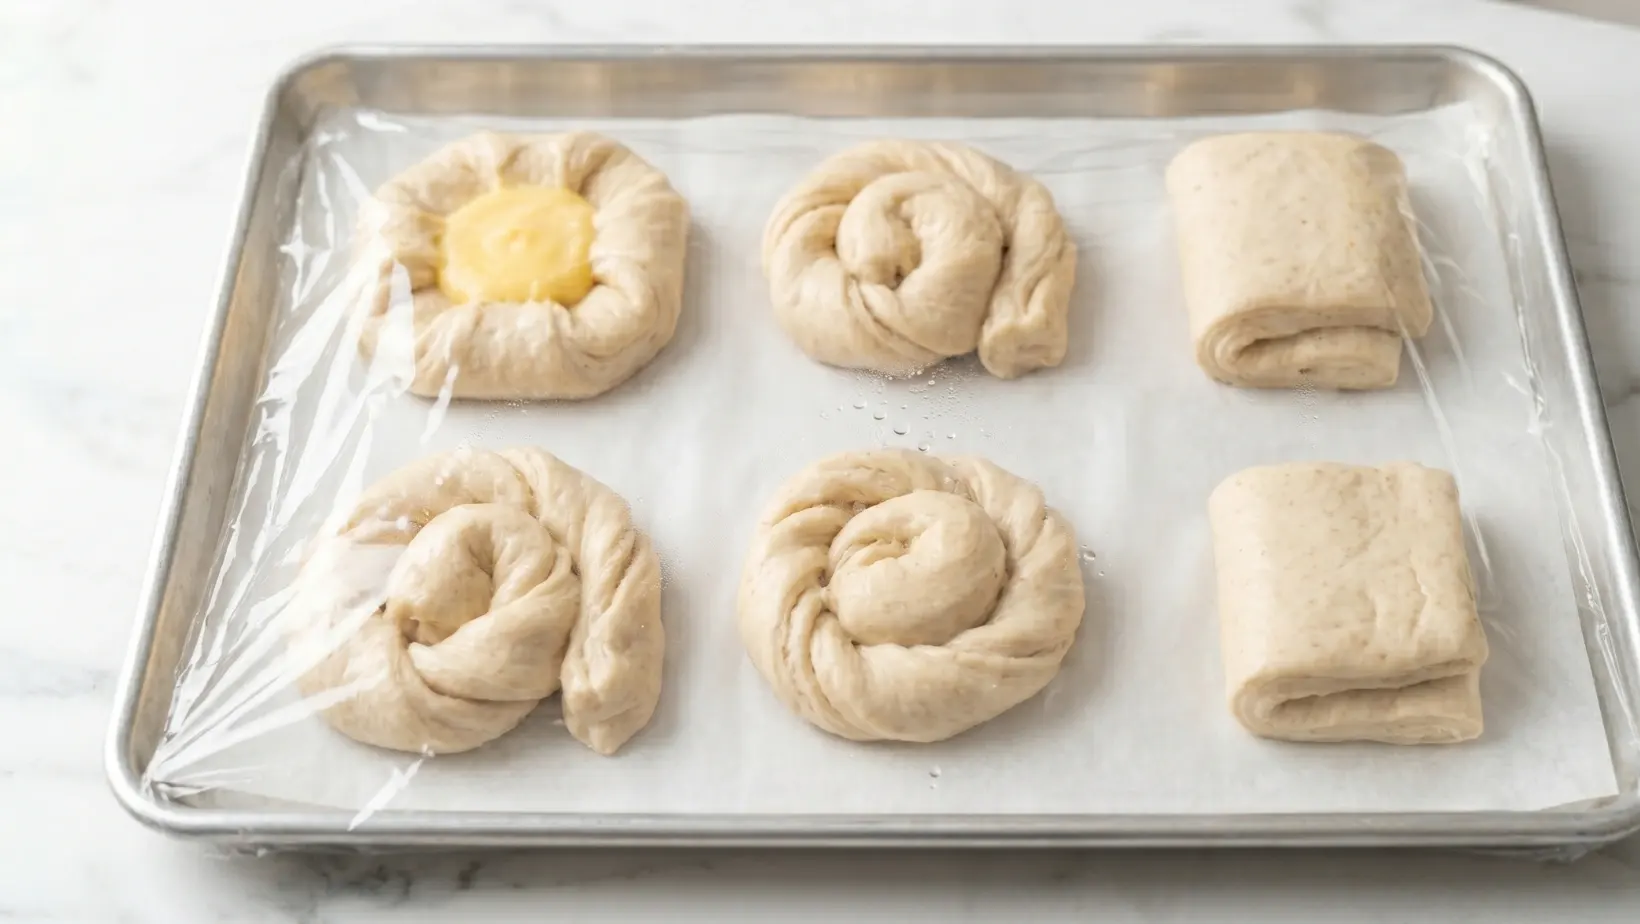
Place your shaped pastries on a baking sheet lined with parchment paper. Add your desired fillings, such as lemon curd or almond cream, to the center. Cover loosely with plastic wrap and let them rise in a cool area until they look puffy.
Bake to Golden Perfection

Preheat your oven and bake until the pastries are a deep, golden brown. The high heat will cause the water in the butter to turn to steam, lifting the layers. Once out of the oven, brush with a simple sugar glaze or top with pearl sugar for that professional bakery finish.
Fun Twists & Serving Ideas
Danish pastry recipe are wonderfully versatile! Here are a few ideas to spark your creativity and make them even more special:
- Fruity Burst: Add a teaspoon of your favorite fruit preserve (raspberry, apricot, or blueberry are divine!) on top of the cream cheese filling before baking. The fruit will get wonderfully jammy and warm.
- Nutty Crunch: Before baking, sprinkle a little chopped almond or pecan on top of the filling for added texture and a lovely roasted nut flavor. A light dusting of cinnamon sugar can also be added to the dough before its final fold.
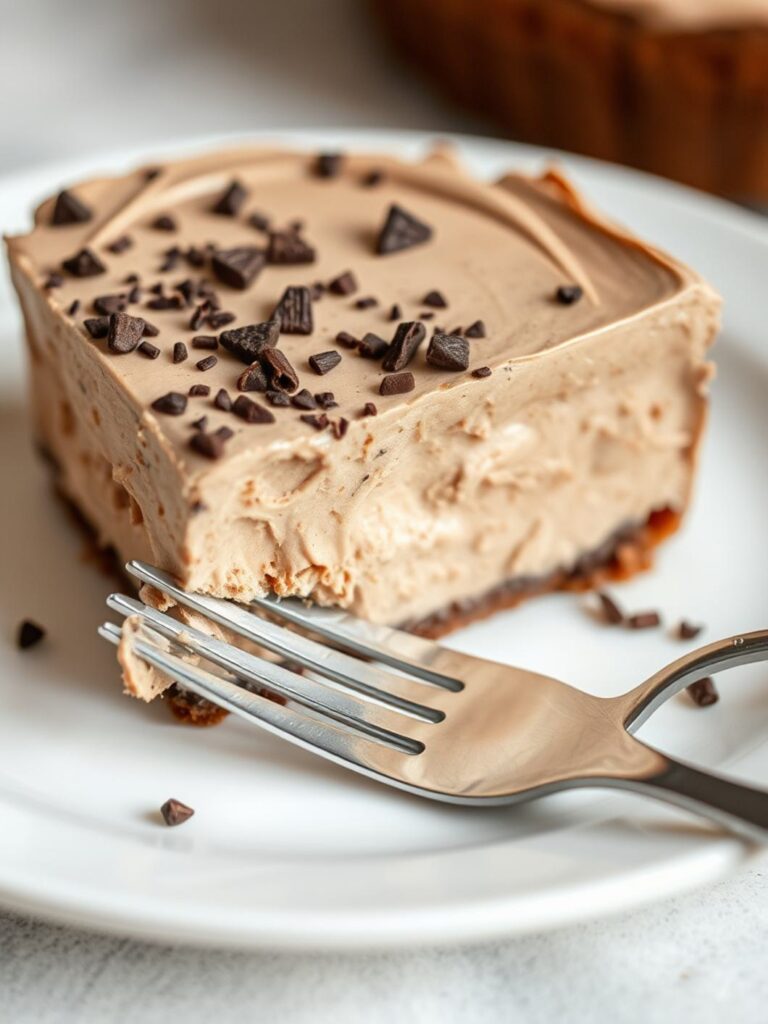
- Chocolate Lover’s Dream: Swap some of the cream cheese filling for a spoonful of rich chocolate ganache or a few chocolate chips. The melted chocolate in the warm pastry is pure bliss.
- Lemon Zest Brightness: Stir a teaspoon of fresh lemon zest into your cream cheese filling for a bright, zesty counterpoint to the sweetness.
- Savory Surprise (for the adventurous!): While traditionally sweet, you could experiment with a savory filling like herbed cream cheese with sun-dried tomatoes, or even a pesto and mozzarella blend.
Reviews
It’s always a joy to hear how much you’re loving these recipes! Here are some sweet words from fellow fans:
Sarah L. ⭐️⭐️⭐️⭐️⭐️“I was intimidated by making Danish pastries, but this recipe made it so approachable! The instructions were clear, and the results were absolutely stunning. My family devoured them. Thank you for this perfect weekend treat!”
Mark T. ⭐️⭐️⭐️⭐️⭐️“These are better than any bakery Danish I’ve ever had. The layers are incredible, and the cream cheese filling is just right. It’s a bit of work, but every minute is worth it for that first bite. A new favorite for sure!”
Jessica R. ⭐️⭐️⭐️⭐️⭐️“The smell filling my kitchen while these were baking was heavenly! I used cherry pie filling on some, and the classic cream cheese on others. Both were fantastic. This recipe is a keeper!”
FAQ for Danish pastry recipe
Got questions? We’ve got answers to help you bake with confidence!
Can I make the dough ahead of time?
Absolutely! The dough can be prepared up to the final shaping step and refrigerated for up to 2 days, or even frozen for up to 2 weeks. If frozen, thaw in the refrigerator overnight before proceeding with shaping.
What if my butter breaks through the dough during rolling?
Don’t panic! This sometimes happens if the butter isn’t cold enough or the dough isn’t elastic enough. Gently patch the dough with a small piece of unworked dough or extra flour. If it’s severe, quickly pop the dough back in the fridge for 15-20 minutes to firm up both the butter and dough.
Can I use different fillings?
Yes, be creative! Besides cream cheese, you can use fruit jams, almond paste, pastry cream, or even a simple cinnamon-sugar mixture. Just ensure your chosen filling isn’t too wet, which could make the pastry soggy.
How do I store leftover Danish pastries?
Store cooled pastries in an airtight container at room temperature for up to 2 days. For longer storage, refrigerate for up to 4 days. You can gently warm them in a toaster oven for a few minutes before serving to bring back some of their fresh-baked glory.
Conclusion
There’s something truly magical about bringing a tray of homemade Danish pastry recipe to the table. It’s not just the incredible taste or the beautiful layers; it’s the joy of creation, the shared moments around the breakfast table, and the quiet satisfaction of mastering something so seemingly intricate. This recipe isn’t just about baking; it’s about making memories, filling your home with warmth, and treating yourself and your loved ones to a little slice of heaven. So go on, roll up your sleeves, embrace the process, and get ready to fall head over heels for your very own, utterly dreamy Danish Pastries!
Recipe Note
For the flakiest results, ensure both your dough and the laminating butter are very cold throughout the lamination process. If the butter starts to soften and seep, pop the dough back into the refrigerator for 15-20 minutes to firm up before continuing.
Danish Pastry Recipe
Ingredients
Method
- Prepare dough
- Mix yeast with warm milk and let activate. Combine flour, sugar, salt, egg, and vanilla. Add yeast mixture and knead until smooth. Chill 1 hour.
- Prepare butter block
- Flatten cold butter between parchment into a square.
- Laminate dough
- Roll dough, place butter inside, fold, and roll out. Fold into thirds (like a letter). Chill 30 minutes. Repeat folding 2–3 times.
- Shape pastries
- Roll dough out and cut into squares or shapes. Add filling in the center.
- Proof
- Let pastries rest for 30–45 minutes until slightly puffy.
- Bake
- Brush with egg wash and bake at 190°C (375°F) for 15–18 minutes until golden.
- 🍯 Tips
- Keep butter cold for flaky layers
- Don’t skip chilling between folds
- Avoid overfilling to prevent leaks