Dark Chocolate Peanut Butter Cups – Smooth, Sweet & Easy to Make
Master the ultimate dark chocolate peanut butter cups with our homemade, easy cooking guide on thenextrecipes.com. This quick recipe uses simple ingredients to create a decadent dish that is much better than store-bought. Perfect for a sweet meal finisher or snack, our step-by-step guide ensures professional results every time.
⭐️⭐️⭐️⭐️⭐️ (4.9 from 1,900 fans)
📸 700+ photo shares | ☀️ Updated [October 2025]

Table of Contents
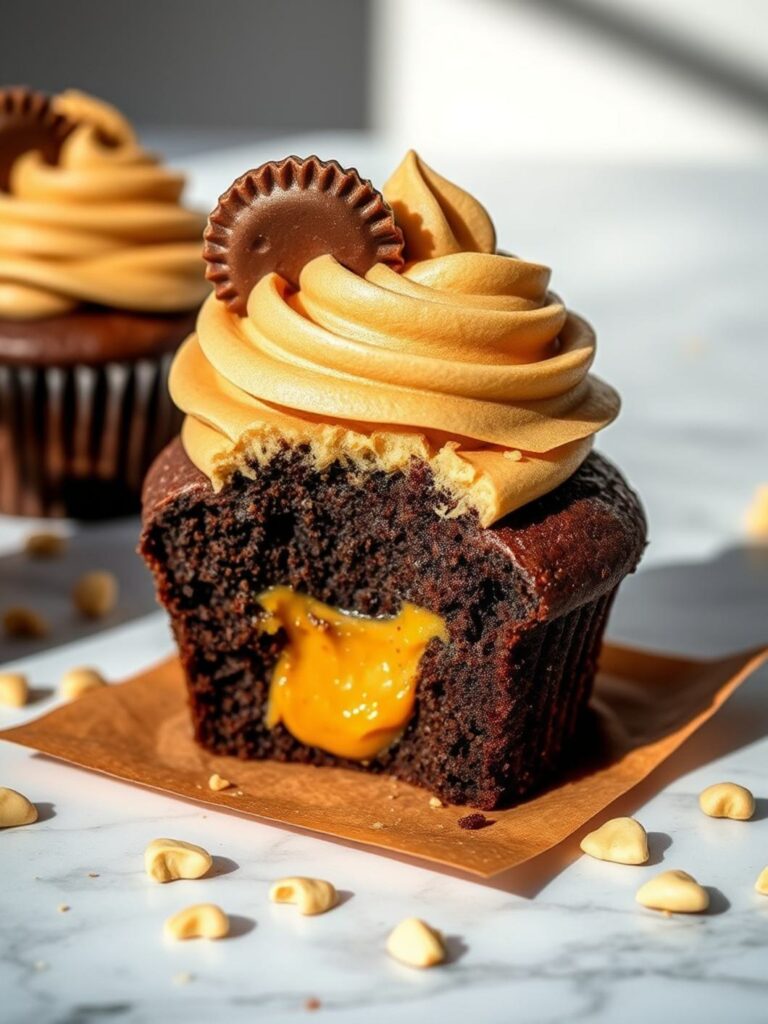
dark chocolate peanut butter cups: Decadent, Dreamy, and So Easy to Make
Oh, sweet friends, get ready to embark on a journey of pure, unadulterated bliss! Imagine biting into a perfectly crafted cup, where the rich, velvety embrace of chocolate melts away to reveal a creamy, dreamy peanut butter filling that’s just a little bit salty, a little bit sweet, and utterly irresistible. These aren’t just any treats; they are homemade dark chocolate peanut butter cups, a nostalgic hug for your taste buds, bursting with that iconic flavor pairing we all adore. They’re perfect for surprising loved ones, adding a touch of magic to your dessert table, or simply indulging in a moment of quiet joy after a long day. So much more satisfying than store-bought, these beauties are a testament to how simple ingredients can create something truly extraordinary.
Quick Glance
- ⏱️ Prep Time: 20 minutes
- 🍽️ Servings: 12-16 cups
- 💥 Vibe: Rich, Sweet, Satisfying
What You’ll Need
Gather your treasures, sweet bakers! Creating these delightful dark chocolate peanut butter cups requires just a handful of simple ingredients, most of which you probably already have in your pantry. Each one plays a vital role in building that perfect, balanced flavor and texture.
- Dark Chocolate Chunks: One large bowl of premium dark chocolate (the rich base of your recipe).
- Creamy Peanut Butter: One bowl of smooth nut butter (the heart of your dark chocolate peanut butter cups).
- Sea Salt Flakes: Two small jars of flaky salt (essential for balancing the richness and garnishing the final dish).
- Paper Liners: Nine white liners placed in a muffin tin (to ensure easy removal and a professional look).
How to Make dark chocolate peanut butter cups
Follow these expert steps to create a decadent dish that perfectly balances rich cocoa with creamy nut butter.
How to Make dark chocolate peanut butter cups
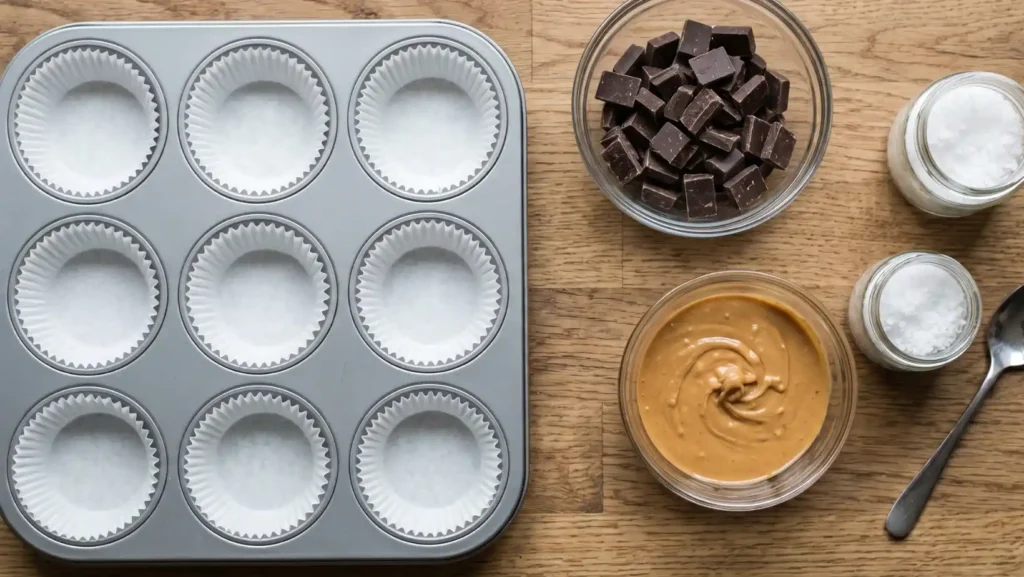
Mise en Place

Start by organizing your ingredients on a clean wooden workspace. You will need high-quality dark chocolate chunks, creamy peanut butter, sea salt, and powdered sugar. Line a muffin tin with paper liners to ensure your dark chocolate peanut butter cups are easy to remove once set.
Melt the Chocolate and Prep the Filling
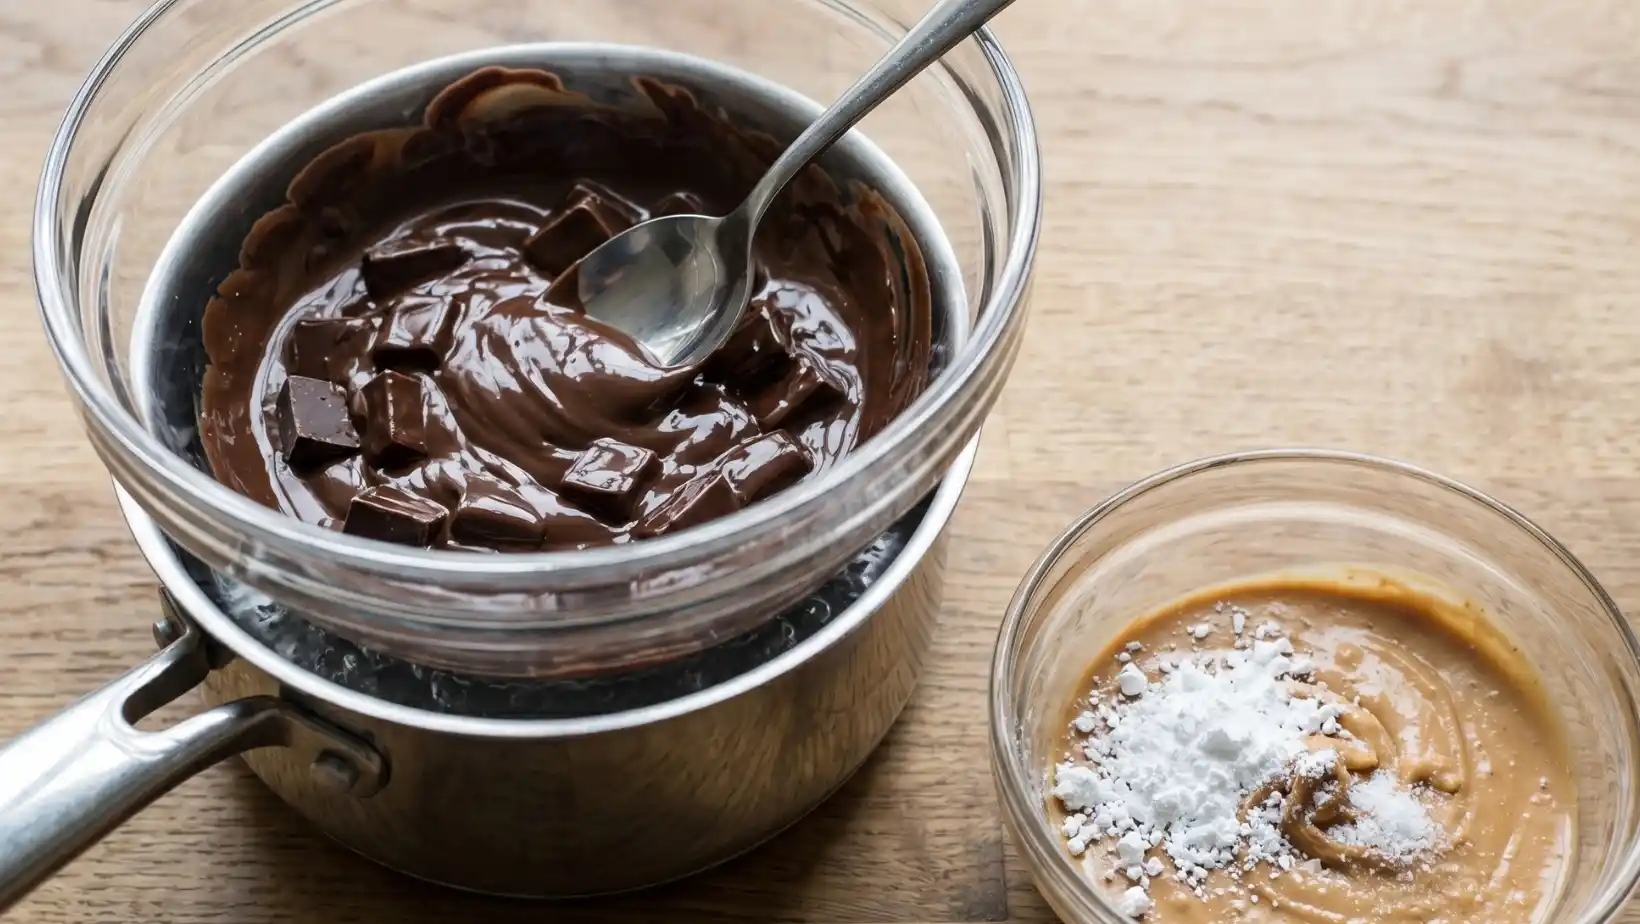
Using a double boiler, gently melt your dark chocolate chunks until smooth and glossy. While the chocolate melts, mix your peanut butter with a touch of powdered sugar and a pinch of salt in a separate bowl. This creates a stable, professional-grade filling for your recipe.
Create the Bottom Layer
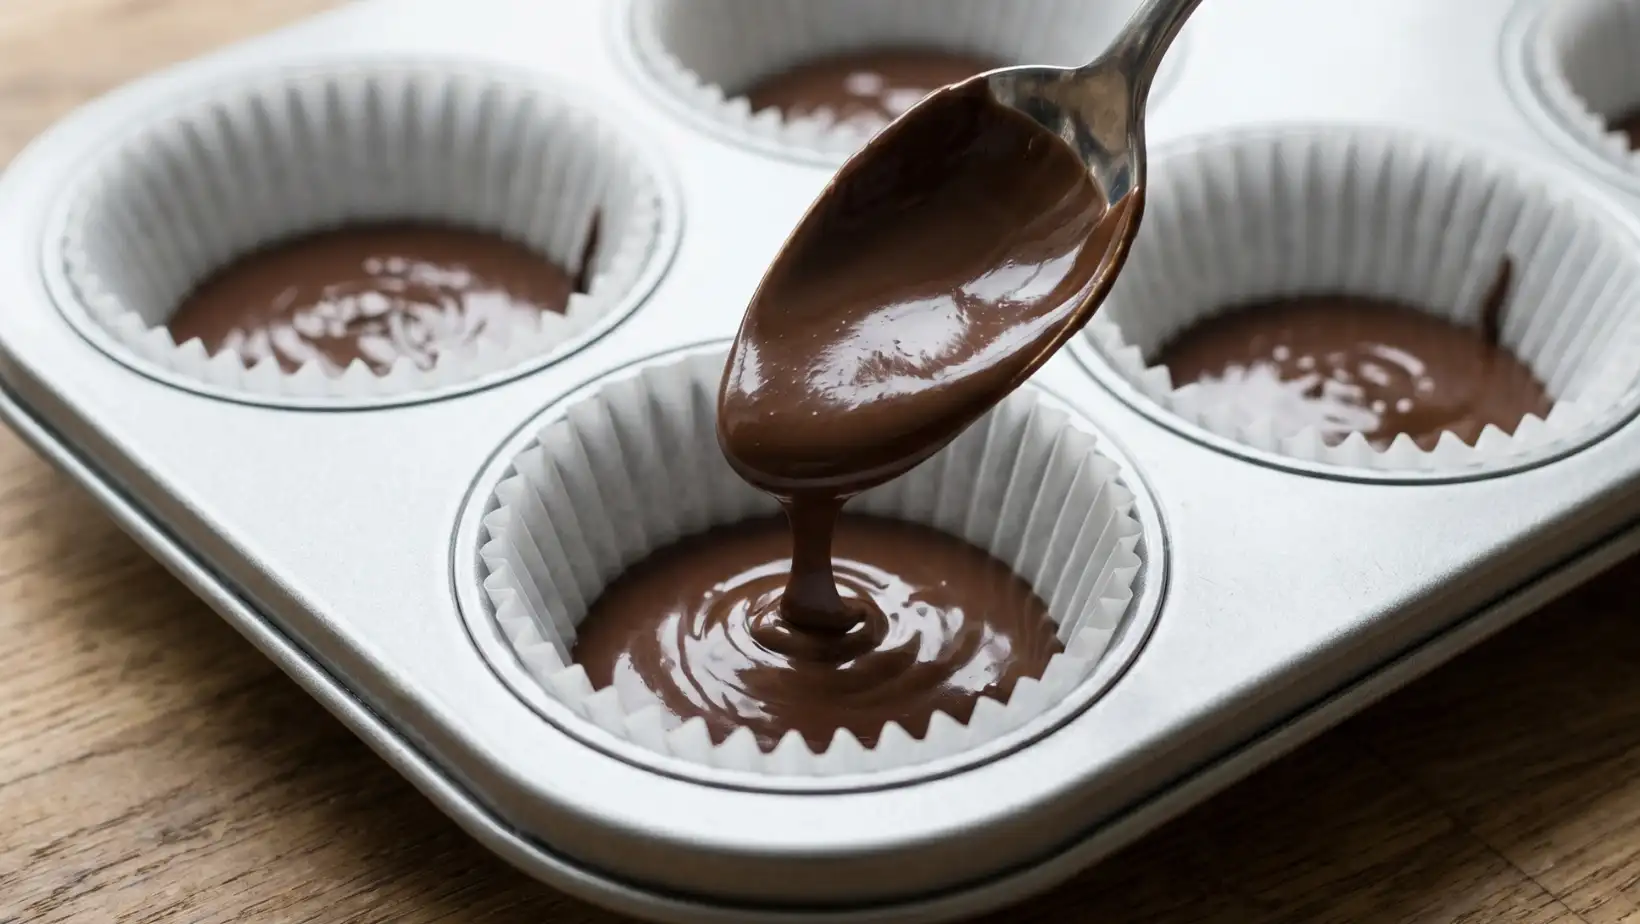
Spoon a small amount of the melted dark chocolate into the bottom of each paper liner. Use the back of the spoon to push the chocolate slightly up the sides of the liner. Place the tray in the refrigerator for 5 to 10 minutes to allow this base layer to set.
Add the Peanut Butter Center
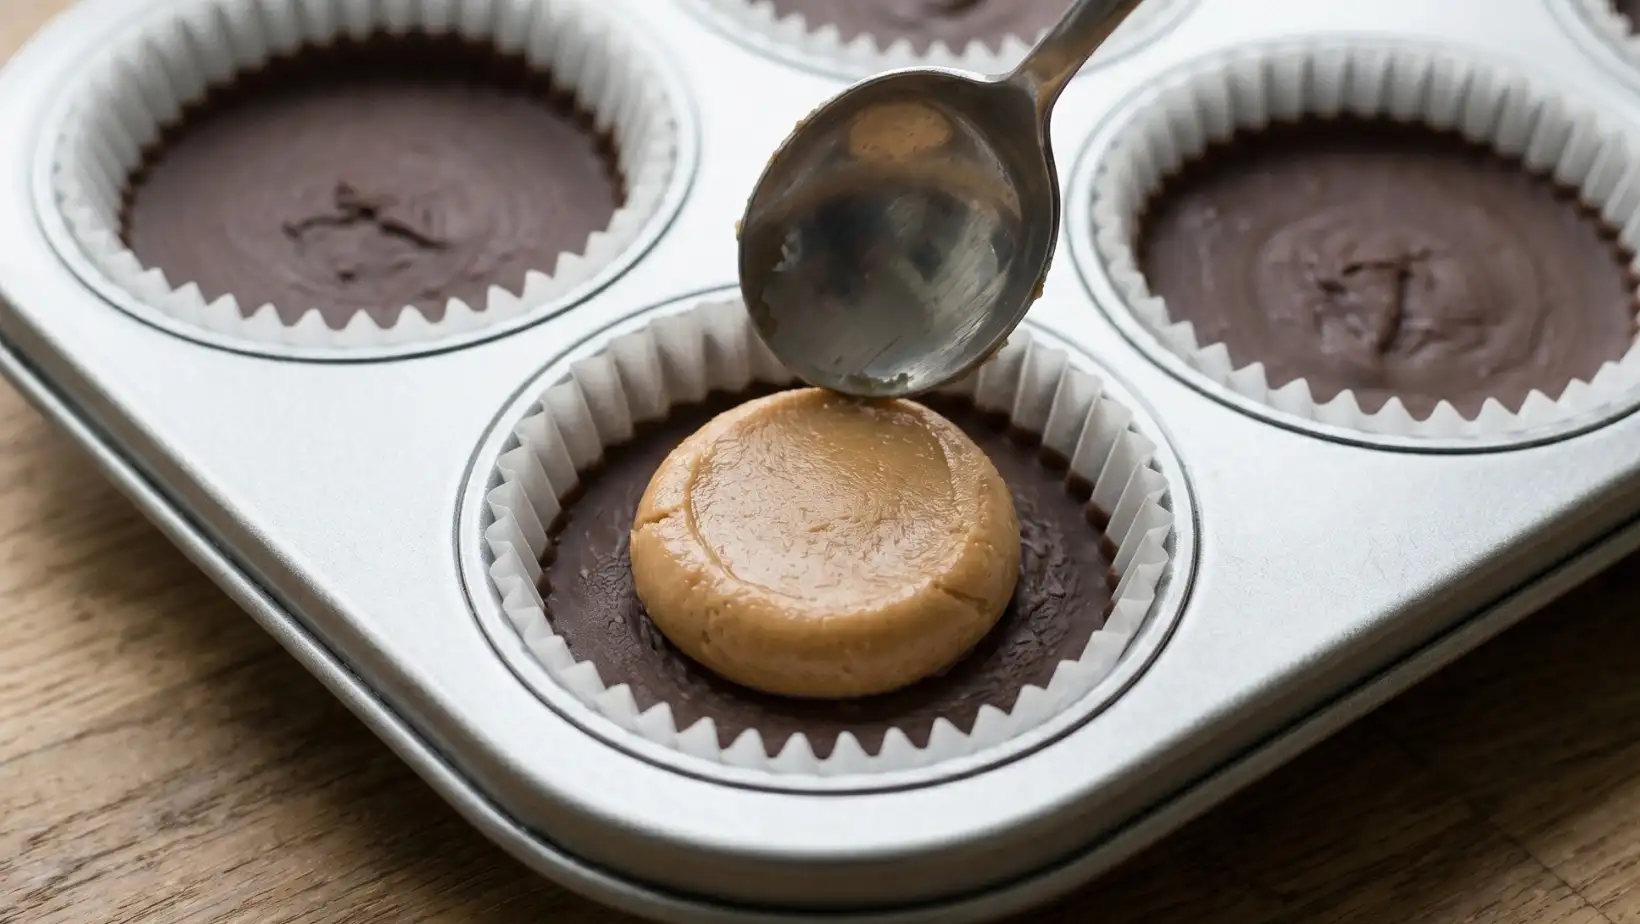
Once the bottom layer is firm, scoop a small disc of the peanut butter mixture and place it directly into the center of each cup. Press it down gently with a spoon so it sits flat. This ensures every bite of your homemade treat has the perfect ratio of chocolate to peanut butter.
Seal with Top Layer
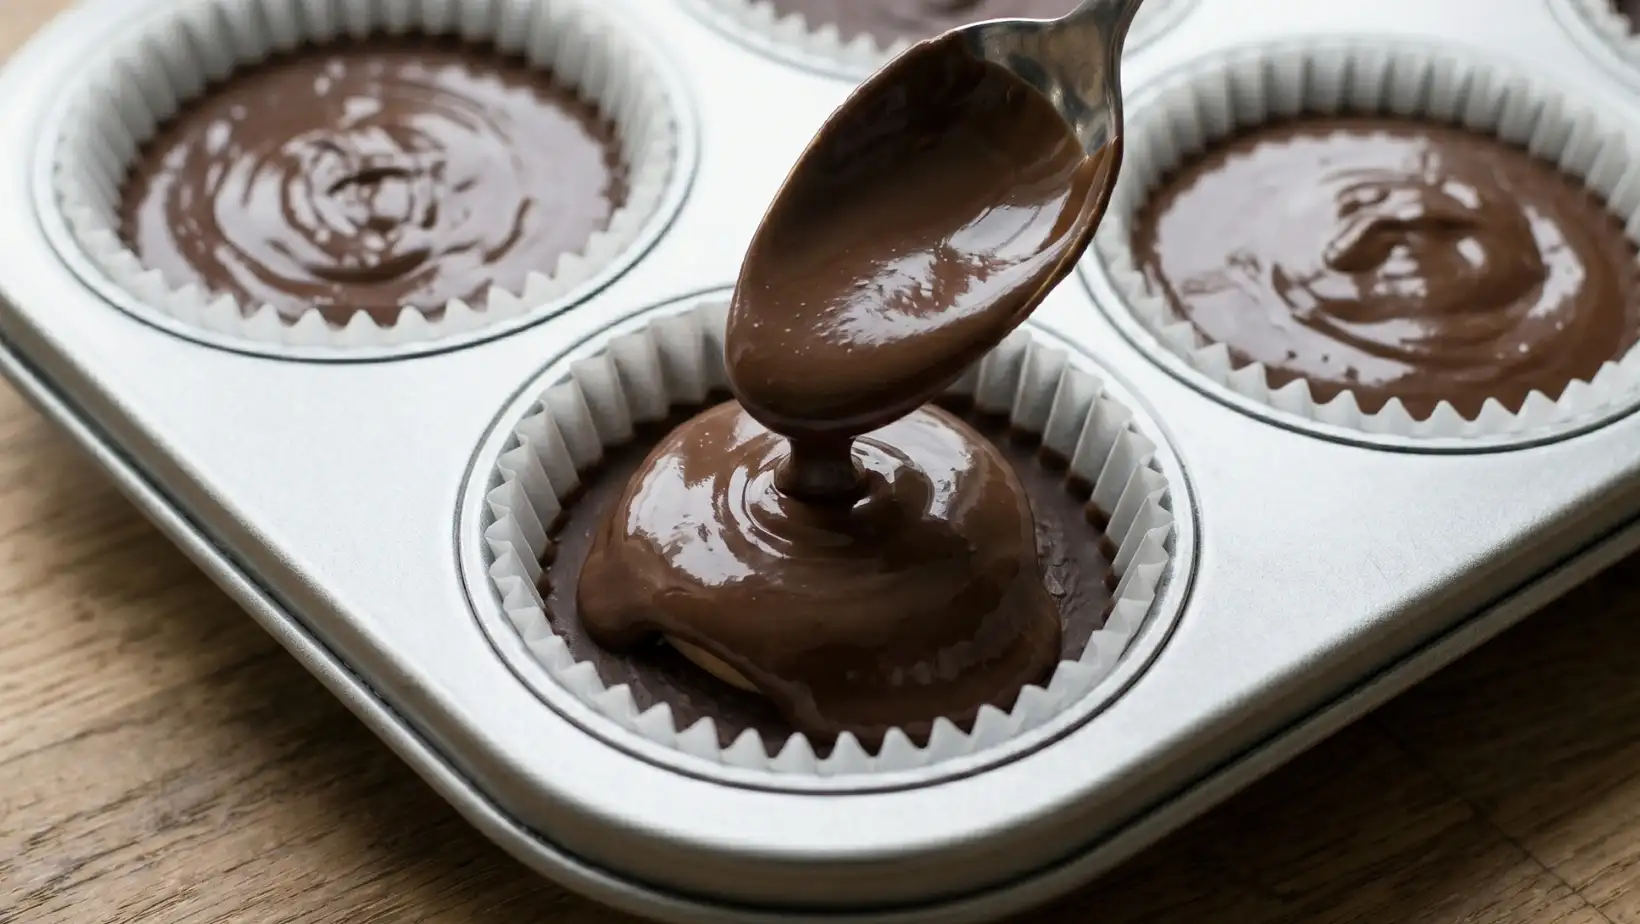
Spoon more melted dark chocolate over the peanut butter center, spreading it to the edges until the filling is completely covered. Tap the tray gently on the counter to smooth out the top and remove any air bubbles for a professional finish.
Garnish and Set
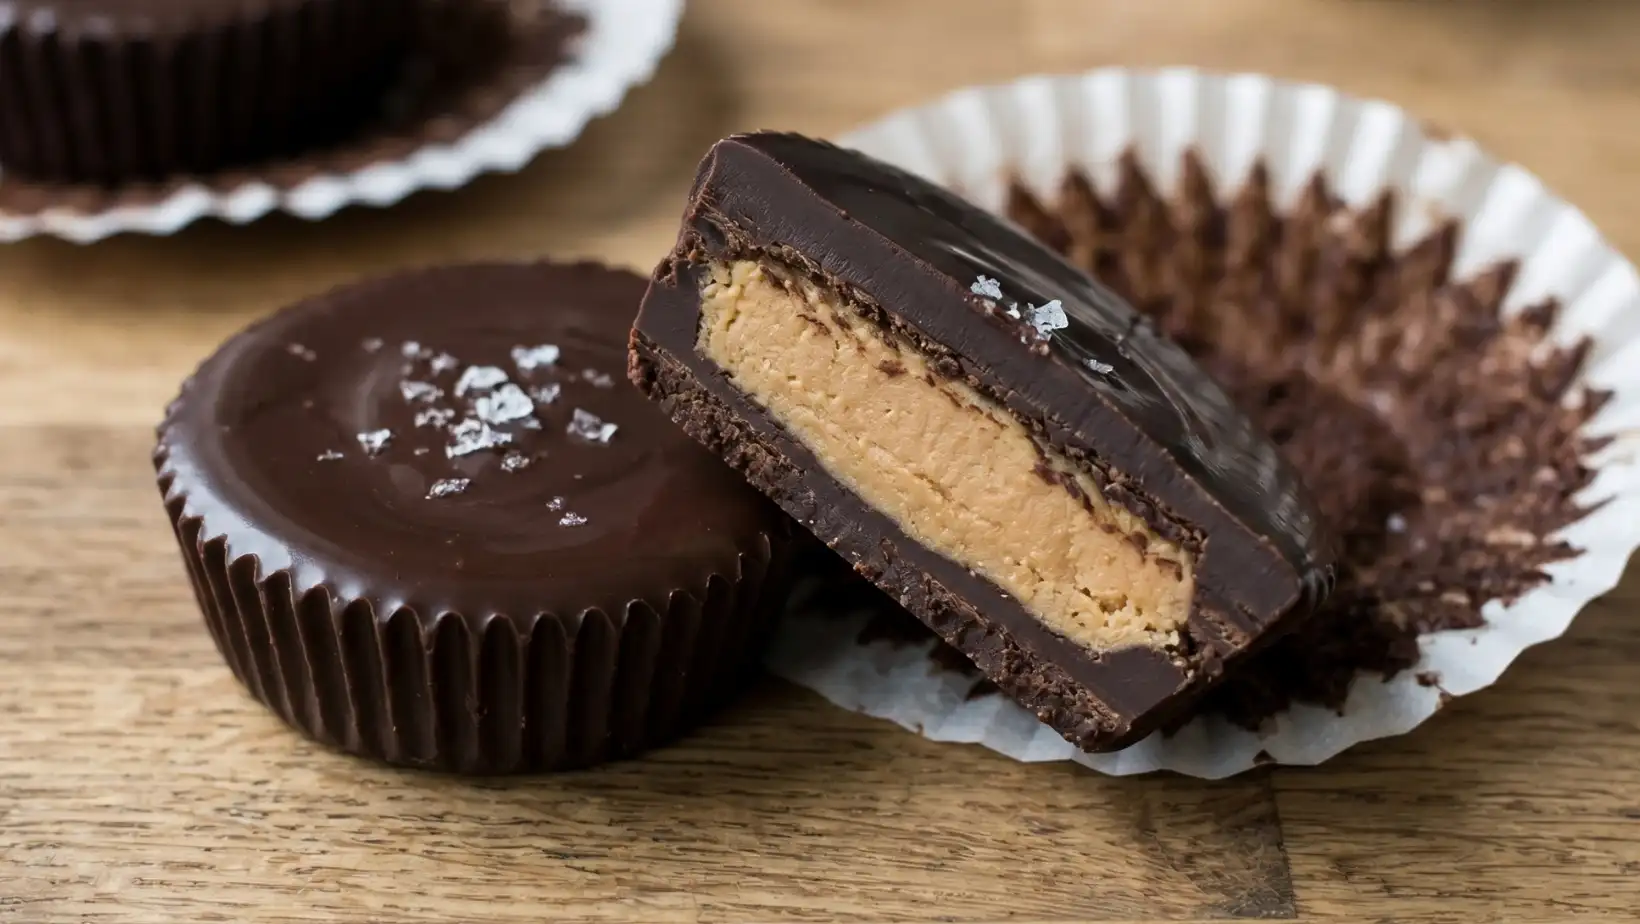
While the chocolate is still wet, sprinkle a few flakes of sea salt on top to enhance the flavors. Return the tray to the refrigerator for at least 30 to 60 minutes. Once fully hardened, peel away the liners to reveal your perfect dark chocolate peanut butter cups.
Fun Twists & Serving Ideas
These little cups of joy are wonderful on their own, but why not get creative?
- Salty Sweet Sensations: Sprinkle a pinch of flaky sea salt on top of the wet chocolate layer before chilling for an elevated flavor profile.
- Chocolate Duos: Use a mix of dark and milk chocolate for an interesting depth of flavor. Or, try a white chocolate drizzle on top!
- Crunchy Surprises: Mix finely crushed pretzels or Rice Krispies into your peanut butter filling for an exciting textural contrast.
- Nutty Affairs: For extra nuttiness, sprinkle finely chopped roasted peanuts or almonds on the chocolate before it sets.
- Dessert Toppers: Crumble these cups over ice cream, use them as a garnish for milkshakes, or chop them to mix into brownie batter for an ultimate treat!
Reviews
These are what our wonderful community members are saying!
- Jessica L. ⭐️⭐️⭐️⭐️⭐️:”My absolute favorite recipe for dark chocolate peanut butter cups! They are so much better than anything from the store. The peanut butter filling is perfectly smooth and the chocolate coating just snaps beautifully. A huge hit with my family!”
- Mark T. ⭐️⭐️⭐️⭐️⭐️:”I made these for a potluck and they vanished in minutes! Everyone wanted the recipe. Simple to make, incredibly delicious, and they look so professional. I used dark chocolate and a sprinkle of sea salt. Perfection!”
- Sarah K. ⭐️⭐️⭐️⭐️⭐️:”As a busy mom, I appreciate recipes that deliver big on flavor without a ton of fuss. These dark chocolate peanut butter cups are exactly that! My kids adore them, and I feel good knowing what goes into them. Thank you for this gem!”
FAQ
Got questions? We’ve got answers!
Can I use natural peanut butter for the filling?
Yes, you absolutely can! However, natural peanut butter tends to be a bit runnier, so you might need to add a little extra powdered sugar to achieve a firm enough consistency for rolling into discs. Chill it briefly if it’s too soft.
How should I store these dark chocolate peanut butter cups?
Store them in an airtight container in the refrigerator. They will keep well for up to 2 weeks. You can also freeze them for longer storage (up to 2-3 months); just let them thaw for a few minutes before enjoying.
Can I make these without butter in the peanut butter filling?
While butter adds a lovely richness and helps create that creamy, pliable texture, you can experiment with omitting it. The filling might be a bit drier or crumblier, so you might need to add a touch more peanut butter or a very small amount of coconut oil to bind it.
What if my chocolate gets too thick or seizes while melting?
If your chocolate seems too thick, you can stir in about half a teaspoon of vegetable oil or coconut oil to thin it slightly. If it seizes (becomes grainy and clumpy), it likely got overheated or came into contact with water. Unfortunately, seized chocolate is difficult to rescue for coating purposes, so it’s best to start with a fresh batch, melting slowly and carefully.
Conclusion
And there you have it, dear friends! A recipe born from the simple joy of two classic flavors coming together in perfect harmony. These homemade dark chocolate peanut butter cups aren’t just a dessert; they’re a little act of love, a moment of indulgence, and a sweet reminder that the best things in life are often created right in our own kitchens. So go ahead, whip up a batch, share them with those you cherish, or simply savor every single bite all by yourself. May your days be filled with warmth, happiness, and plenty of delicious homemade treats!
Recipe Note
For the cleanest peel, make sure your chocolate cups are thoroughly chilled and firm before removing the paper liners. If they are too soft, they may stick. You can also lightly grease the paper liners if you anticipate sticking issues.
Dark Chocolate Peanut Butter Cups
Ingredients
Method
- Prepare the Pan: Line a standard 12-cup muffin tin with paper or silicone cupcake liners.
- Melt the Chocolate: In a microwave-safe bowl, combine the dark chocolate chips and 1 tablespoon of the coconut oil. Microwave in 30-second increments, stirring well after each interval, until the chocolate is completely melted and smooth.
- Create the Base Layer: Spoon about 1 tablespoon of the melted chocolate into the bottom of each muffin liner. Tilt the pan slightly or use the back of a spoon to ensure the chocolate coats the entire bottom evenly. Place the muffin tin in the freezer for 10 minutes to allow the base layer to set. Keep the remaining melted chocolate at room temperature.
- Mix the Filling: While the bases are freezing, prepare the filling. In a separate bowl, mix the creamy peanut butter, powdered sugar, vanilla extract, and the remaining 1 tablespoon of coconut oil. Stir until the mixture is completely smooth and thick.
- Add the Peanut Butter Center: Remove the muffin tin from the freezer. Spoon about 2 teaspoons of the peanut butter mixture onto the center of each hardened chocolate base. Gently flatten the peanut butter slightly, making sure it does not quite touch the edges of the liner.
- Top with Chocolate: Spoon the remaining melted chocolate over the peanut butter centers, making sure the peanut butter is completely covered and the chocolate reaches the edges of the liner to seal the cup.
- Garnish and Chill: Sprinkle a tiny pinch of flaky sea salt over the top of each cup. Return the muffin tin to the freezer for at least 20 minutes, or until the cups are completely solid.
- Serve: Remove the paper liners before serving. Enjoy cold straight from the fridge or freezer!
Notes
Coconut Oil Substitution: The coconut oil helps the chocolate melt smoothly and gives it a slightly softer bite so it doesn’t crack apart when you eat it. If you have an allergy, you can omit it or substitute it with vegetable shortening.
Storage: Store these peanut butter cups in an airtight container in the refrigerator for up to 2 weeks, or in the freezer for up to 3 months.