Easy Spring Cake Pops: Better (and Cheaper) than Starbucks
Easy Spring Cake Pops: Better (and Cheaper) than Starbucks
⭐️⭐️⭐️⭐️⭐️ (4.9/5 Rating) | 🍽️ Servings: 36 | ⏱️ Total Time: 3 hours | 📸 Updated [March 2026]
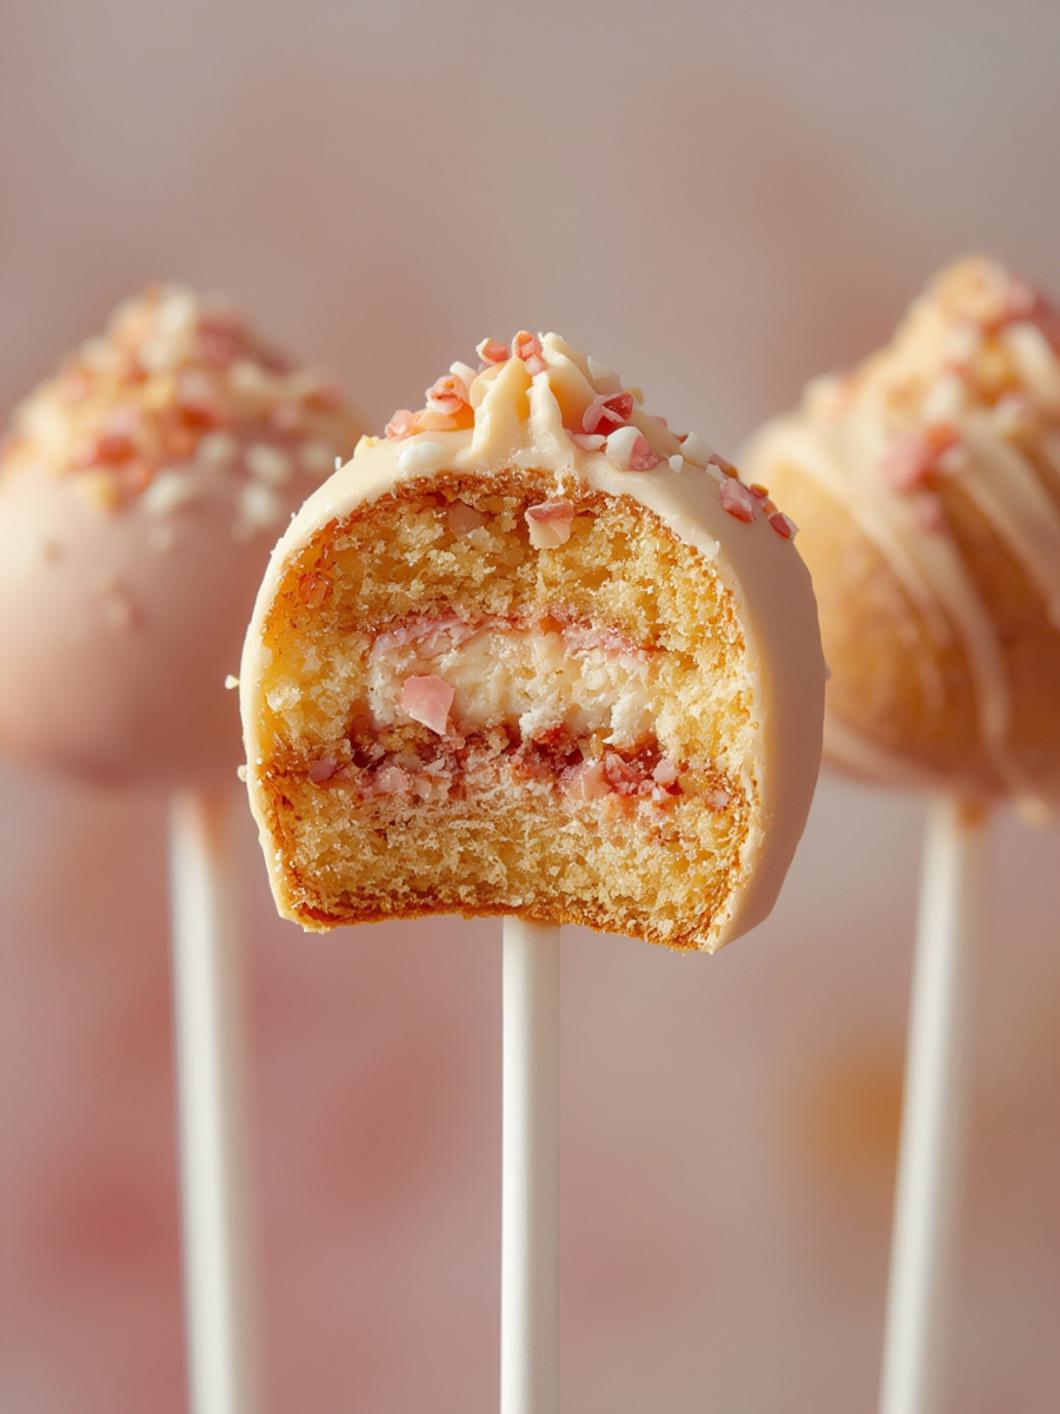
Table of Contents
Brighten your table with these incredibly easy Spring Cake Pops! Forget those expensive coffee shop treats; our recipe guides you to creating adorable pastel delights that are perfect for Easter, charming baby showers, or elegant garden parties. This step-by-step guide ensures you make the moistest, most delicious cake pops, complete with beautiful spring decorations. Master these delightful spring cake pops today and you’ll have everyone asking for your secret for amazing Easter cake pop ideas!
The Science of Easter Cake Pop Ideas
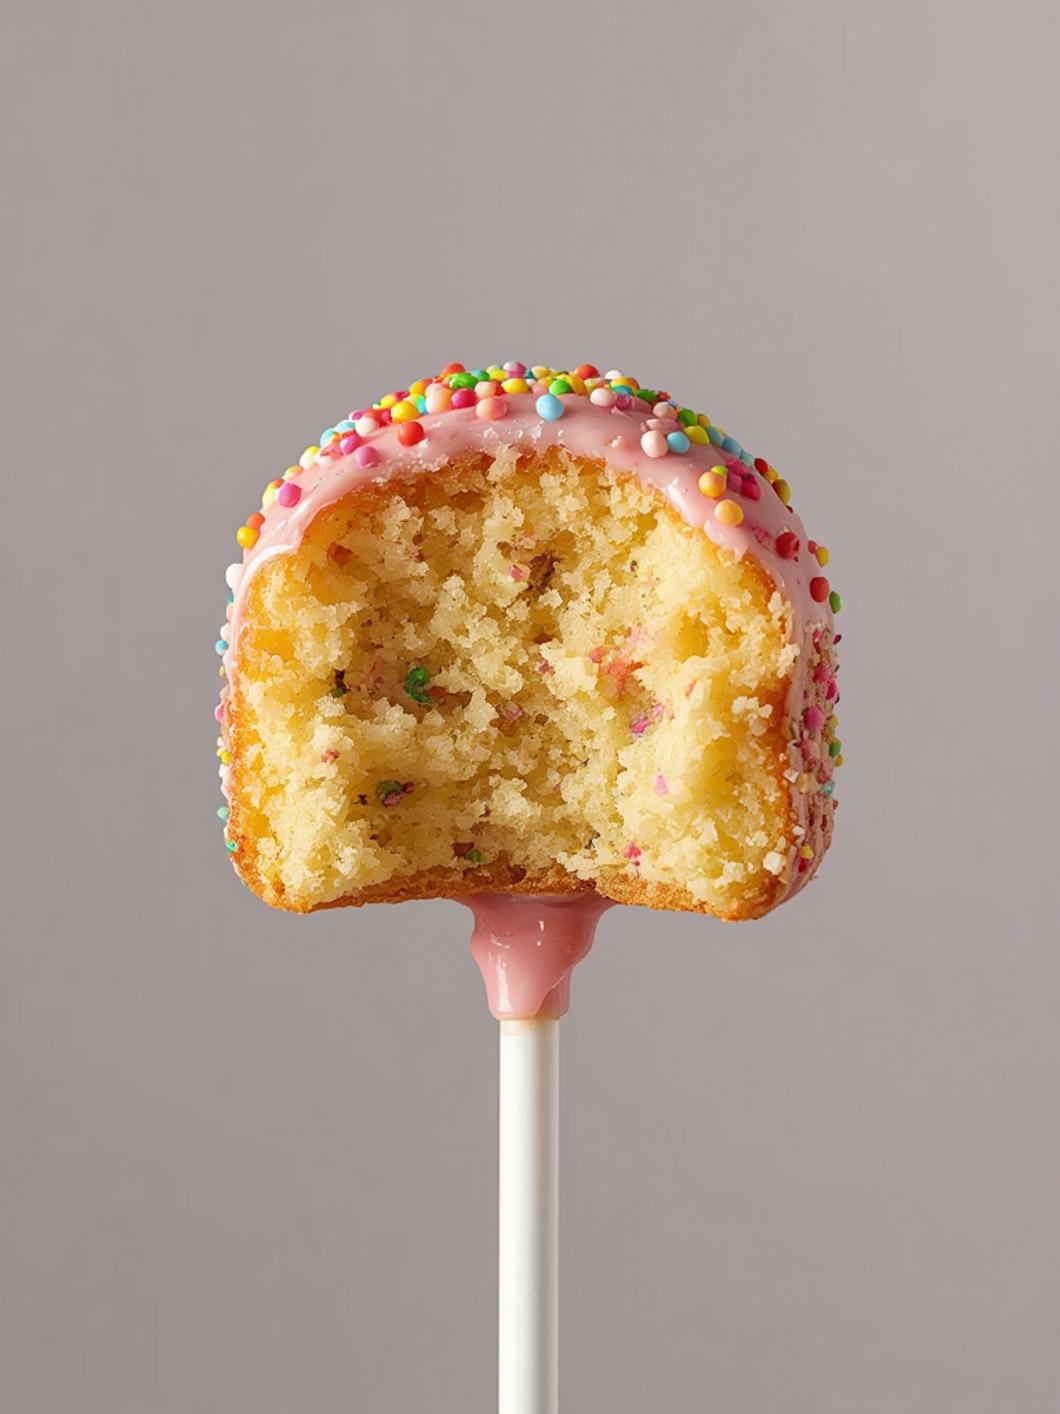
There’s a reason why Easter cake pop ideas capture hearts and taste buds alike. The “science” behind their irresistible appeal lies in their unique texture and presentation. Unlike a traditional slice of cake, cake pops offer a concentrated burst of flavor and moisture, thanks to the combination of crumbled cake and frosting. The outer candy shell provides a satisfying snap and seals in that delicious goodness, preventing them from drying out. This small, portable format is not just cute; it’s also portion-controlled and mess-free, making them ideal for gatherings. The act of decorating these mini masterpieces also taps into our visual appreciation for food, especially with vibrant spring colors and playful sprinkles that evoke joy and celebration.
What You’ll Need
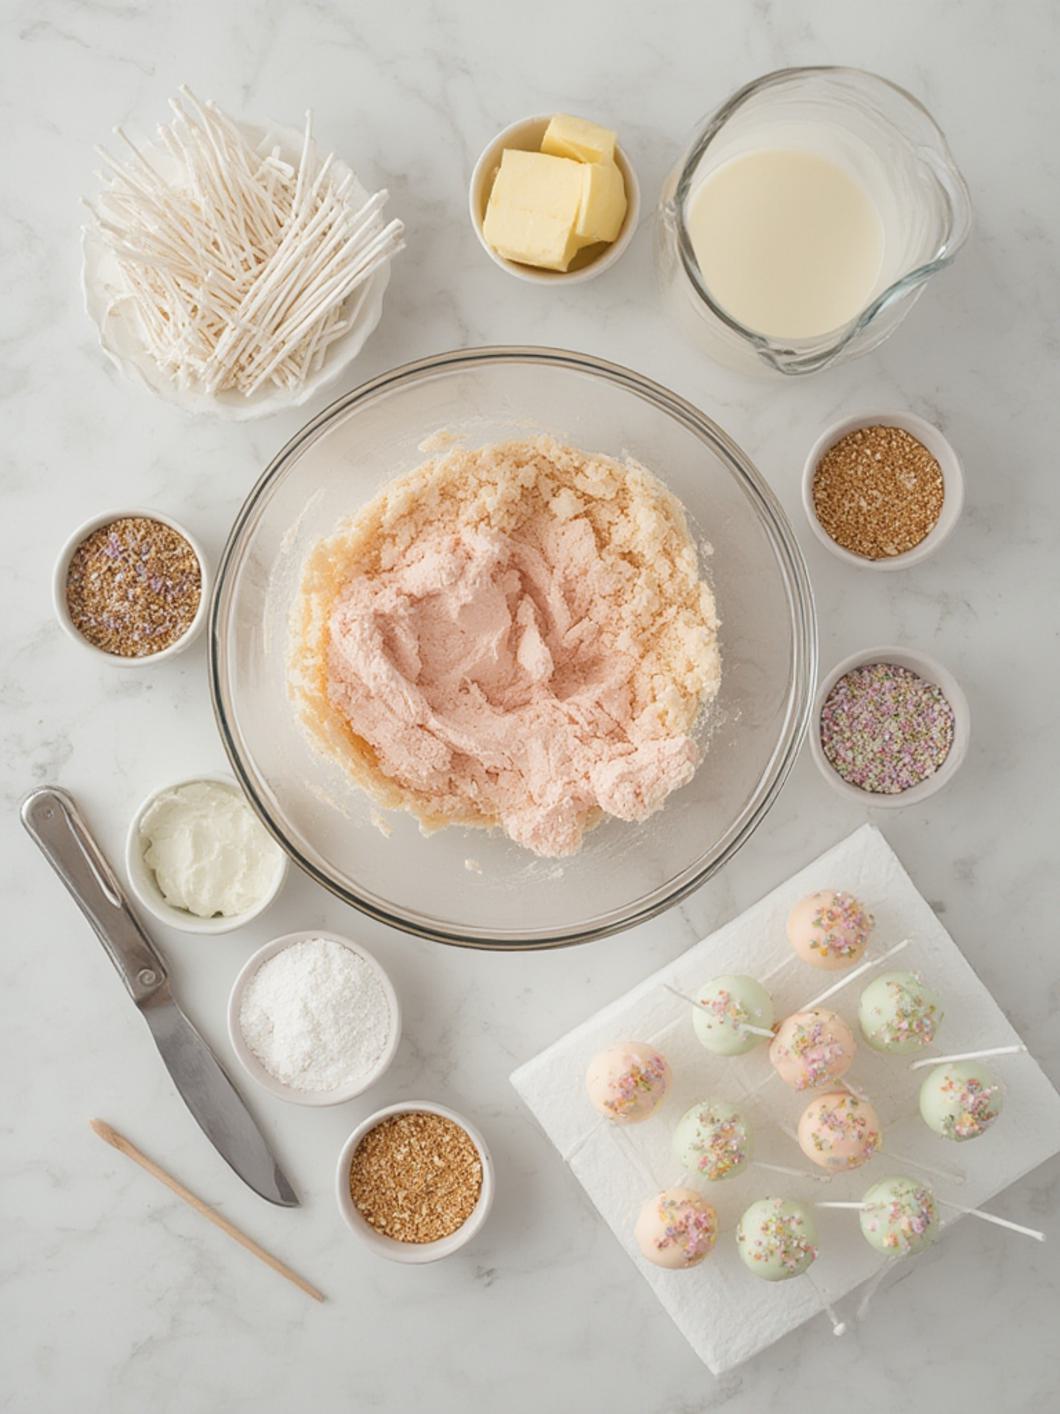
- 1 box (15.25 oz) yellow or white cake mix (plus ingredients called for on box: typically eggs, oil, water) – Choose a high-quality mix for best texture.
- 1 can (16 oz) vanilla frosting – Look for a classic, not whipped, variety for better binding.
- 24 oz (about 1 ½ bags) pastel candy melts (various spring colors like pink, yellow, blue, green, lavender) – Brand matters here; Ghirardelli or Wilton melt smoothly.
- 1 tbsp shortening or coconut oil (optional, for thinning candy melts) – Helps create a smoother, thinner coating.
- 36 lollipop sticks (6-inch) – Sturdy sticks are key for dipping.
- Assorted spring sprinkles – Have fun with flowers, butterflies, nonpareils, or sanding sugar.
- Styrofoam block or cake pop stand – Essential for drying and display.
How to Master spring cake pops
Get ready to create some magic! Follow these detailed steps to craft perfect spring cake pops that will impress every guest, making them fantastic Easter cake pop ideas for any celebration.
- Bake the Cake: Prepare and bake the cake mix according to package directions, using a 9×13 inch baking pan. Once baked, let it cool completely on a wire rack. This is crucial for the cake pop consistency.
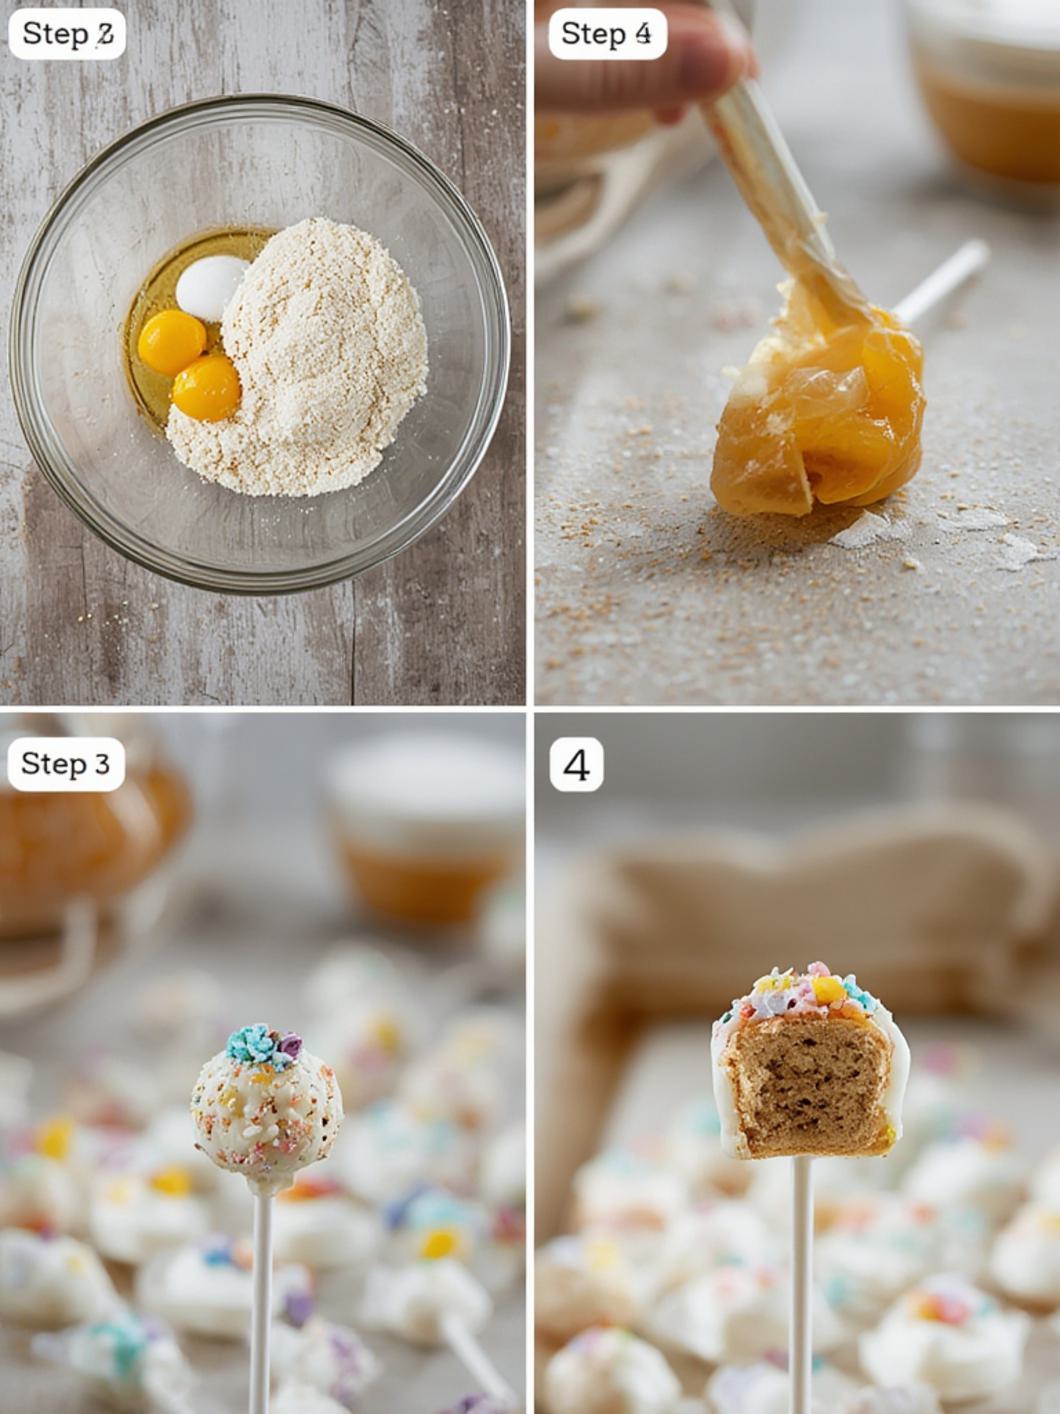
- Crumble the Cake: Once fully cooled, crumble the entire cake into a large mixing bowl. Use your hands or a fork to ensure there are no large lumps.
- Mix with Frosting: Add about 3/4 of the can of vanilla frosting to the crumbled cake. Mix thoroughly with your hands until well combined and the mixture is moist enough to form a ball that holds its shape. Add more frosting, a tablespoon at a time, if needed, but be careful not to make it too wet.
- Roll the Balls: Scoop out spoonfuls of the mixture and roll them into uniform 1.5-inch balls (about 1 oz each). Place them on a parchment-lined baking sheet. This recipe yields approximately 36 cake pops.
- Chill: Cover the baking sheet and refrigerate the cake balls for at least 30 minutes, or freeze for 15 minutes. Chilling prevents them from falling apart during dipping.
- Melt Candy Melts: In separate microwave-safe bowls, melt your pastel candy melts according to package directions. Heat in 30-second intervals, stirring well after each, until smooth and fluid. If too thick, stir in 1/2 tsp of shortening or coconut oil at a time until desired consistency.
- Dip and Decorate:
- Dip the tip of each lollipop stick about 1/2 inch into the melted candy, then insert it about halfway into a chilled cake ball. This acts as “glue.”
- Dip the entire cake pop into the melted candy, twisting gently to ensure full coverage. Tap off any excess candy coating against the side of the bowl.
- Immediately apply your desired sprinkles before the candy coating sets.
- Insert the stick into a Styrofoam block or cake pop stand to dry completely.
- Repeat: Continue with the remaining cake pops, melting more candy melts as needed. Allow all cake pops to set completely (about 15-30 minutes) before serving or storing.
Fun Twists & Serving Ideas
These adorable cake pops are already a hit, but here are some extra Easter cake pop ideas to make them truly unforgettable:
- Flavor Variations: Experiment with different cake mixes (lemon, strawberry) or frosting flavors (cream cheese, strawberry) to create unique combinations. A hint of almond extract in the cake mixture can also elevate the flavor profile.
- Themed Decorations: Beyond spring sprinkles, use edible markers to draw delicate flowers or tiny eggs. For Easter, shape some cake balls into oval “eggs” before dipping, or add tiny edible bunny ears made from fondant.
- White Chocolate Drizzle: After the main candy coating has set, drizzle contrasting melted white chocolate (tinted or plain) over the pops for an elegant finish. Use a piping bag with a tiny hole or a fork for fine lines.
- Gifting & Display: Arrange your finished cake pops in a decorative vase like a bouquet for a stunning centerpiece. They also make wonderful party favors when individually wrapped in clear cellophane bags with a pretty ribbon.
FAQ & Reviews
Q: Can I make the cake balls ahead of time?
A: Absolutely! You can roll the cake balls and store them in an airtight container in the refrigerator for up to 3 days, or freeze them for up to 2 weeks. Thaw in the fridge before dipping.
Q: My candy melts are too thick. What can I do?
A: Stir in 1/2 teaspoon of shortening or coconut oil at a time until the melts reach a smoother, more fluid consistency. Be careful not to add too much, or they will become greasy.
Q: Why are my cake pops falling off the stick?
A: This usually happens if the cake balls aren’t chilled enough, or if you didn’t “glue” the stick in with a bit of melted candy first. Ensure your balls are firm and the candy on the stick has set before dipping the whole pop.
Q: How should I store leftover cake pops?
A: Store them in an airtight container at room temperature for up to 2-3 days, or in the refrigerator for up to a week. They generally don’t need refrigeration unless your kitchen is very warm or your frosting requires it.
Community Reviews:
⭐️⭐️⭐️⭐️⭐️ “Starbucks, Who?” – By HappyBaker88
“These cake pops are a game-changer! So easy to make, and they taste incredibly fresh and moist. My kids devoured them, and my friends couldn’t believe I made them myself. Definitely better (and way cheaper) than anything you’d buy at a coffee shop. Will be making these for every spring event!”
⭐️⭐️⭐️⭐️⭐️ “Easter Table Showstopper!” – By GardenPartyHostess
“I used this recipe for my Easter brunch, and they were the absolute star of the dessert table! The pastel colors were beautiful, and the cake pops were perfectly moist. I loved the tips for thinning the candy melts – made dipping a breeze. Thank you for these amazing Easter cake pop ideas!”
⭐️⭐️⭐️⭐️⭐️ “So Much Fun to Make!” – By SweetToothMama
“I’m not usually a baker, but this guide made making cake pops so approachable. The step-by-step instructions were super clear. It was a fun activity to do with my daughter, and the results were delicious. These spring cake pops are officially a family favorite!”
Conclusion
And there you have it – your complete guide to crafting stunning and delicious spring cake pops! No need for fancy equipment or expensive bakery visits; just a few simple steps stand between you and these adorable, perfectly moist treats. Whether you’re planning for Easter, a spring celebration, or simply want to indulge in a delightful dessert, these cake pops are sure to bring a smile to everyone’s face. Experiment with different colors and sprinkles to truly make these Easter cake pop ideas your own. Happy baking!
Recipe Note:
For an extra burst of flavor and a touch of elegance, consider adding a teaspoon of pure vanilla extract or a complementary citrus zest (like lemon or orange) to your cake mix before baking. This subtle addition can elevate the overall taste profile of your spring cake pops, making them even more irresistible.
spring cake pops
📍 American Cuisine • 🏷️ Dessert
1 hour 30 minutes
20 minutes
24
250
Ingredients
- ▪️ 1 box (15.25 oz) yellow, vanilla, or funfetti cake mix (plus ingredients called for on box: eggs, oil, water)
- ▪️ 1 can (16 oz) vanilla or cream cheese frosting
- ▪️ 16 oz white candy melts
- ▪️ 4 oz pink candy melts (or other spring colors like light blue, green, yellow)
- ▪️ 48 lollipop sticks
- ▪️ Spring-themed sprinkles (e.g., pastel nonpareils, flower shapes)
Preparation
1
Bake the cake according to package directions in a 9×13 inch pan. Let it cool completely.
2
Once cooled, crumble the entire cake into a large mixing bowl.
3
Add about 3/4 of the can of frosting to the crumbled cake. Mix with your hands until well combined and the mixture is moist enough to form a ball that holds its shape. If too dry, add more frosting, a tablespoon at a time.
4
Roll the cake mixture into
5
5-inch balls (about 1 oz each) and place them on a parchment-lined baking sheet.
6
Insert a lollipop stick into each cake ball. You may want to dip the tip of the stick into a tiny bit of melted candy first to help it adhere better.
7
Refrigerate the cake balls for at least 30 minutes, or freeze for 15 minutes, until firm.
8
Melt the white candy melts according to package directions (microwave or double boiler). If the candy melts are too thick, you can add 1/2 to 1 teaspoon of vegetable shortening or paramount crystals to thin it out.
9
Dip each chilled cake pop into the melted white candy, rotating gently to ensure full coverage. Tap off any excess coating.
10
While the white coating is still wet, immediately add sprinkles to decorate.
11
For colored accents: Melt pink (or other colored) candy melts in a separate bowl. Drizzle over some of the finished white cake pops, or dip a portion of the pop into the colored candy for a two-tone effect. Add sprinkles if desired before the colored candy sets.
12
Place the finished cake pops upright in a styrofoam block or a tall glass to set completely. This may take 15-30 minutes at room temperature, or you can refrigerate them for faster setting.
13
Store finished cake pops in an airtight container at room temperature for up to 2 days, or in the refrigerator for up to a week.