No-Bake Oreo Pudding Pie – Creamy & Crowd-Pleasing
No Bake Oreo Pudding Pie
Easy, creamy no-bake pie with an Oreo cookie crust and chocolate pudding filling.
No Bake Oreo Pudding Pie
⭐️⭐️⭐️⭐️⭐️ (4.8 from 2,500 fans)
📸 1100+ photo shares | ☀️ Updated December 2025
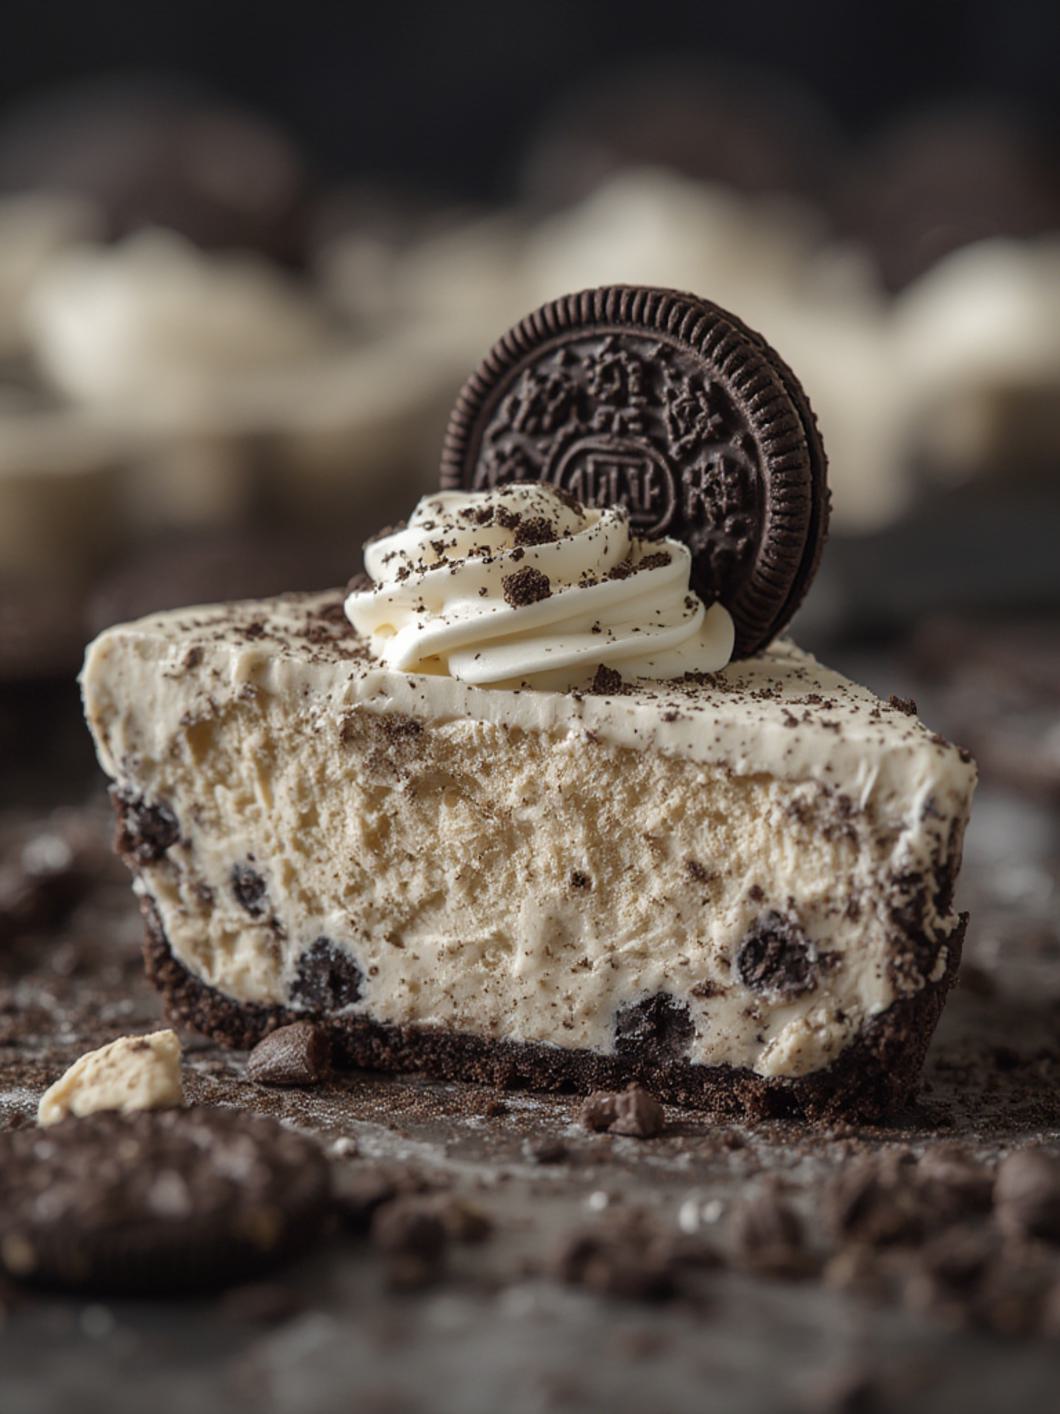
Your New Favorite No-Fuss Dessert: The Ultimate No Bake Oreo Pudding Pie!
Oh, friends, get ready for a dessert that’s about to steal your heart (and your time, but in the best possible way – because it takes almost none!). There’s something truly magical about a No Bake Oreo Pudding Pie. It’s a symphony of crunchy, creamy, and utterly decadent layers, all without ever turning on your oven. This pie embodies pure joy, nostalgia, and effortless entertaining. Whether it’s a scorching summer day, a busy weeknight, or you just crave something sweet without the fuss, this recipe is your golden ticket to dessert heaven. Its rich chocolate flavor, velvety texture, and satisfying crunch make it an instant crowd-pleaser, a dessert that disappears faster than you can say “Oreo!” Trust me, once you make this, it will become a regular in your rotation.
What You’ll Need
This dessert is a testament to how simple ingredients can create extraordinary flavors. You probably have most of these staples in your pantry right now!
- 1 package (14.3 ounces) Oreo cookies
- 6 tablespoons unsalted butter, melted
- 2 packages (3.9 ounces each) instant chocolate pudding mix (or your favorite flavor!)
- 4 cups cold milk (whole milk recommended for creaminess)
- 1 large (16 ounce) container frozen whipped topping, thawed (like Cool Whip)
- Extra Oreos or chocolate shavings for garnish (optional)
How to Make No Bake Oreo Pudding Pie
Get ready for the easiest pie-making experience of your life! No oven required, just a little mixing and a lot of chilling.
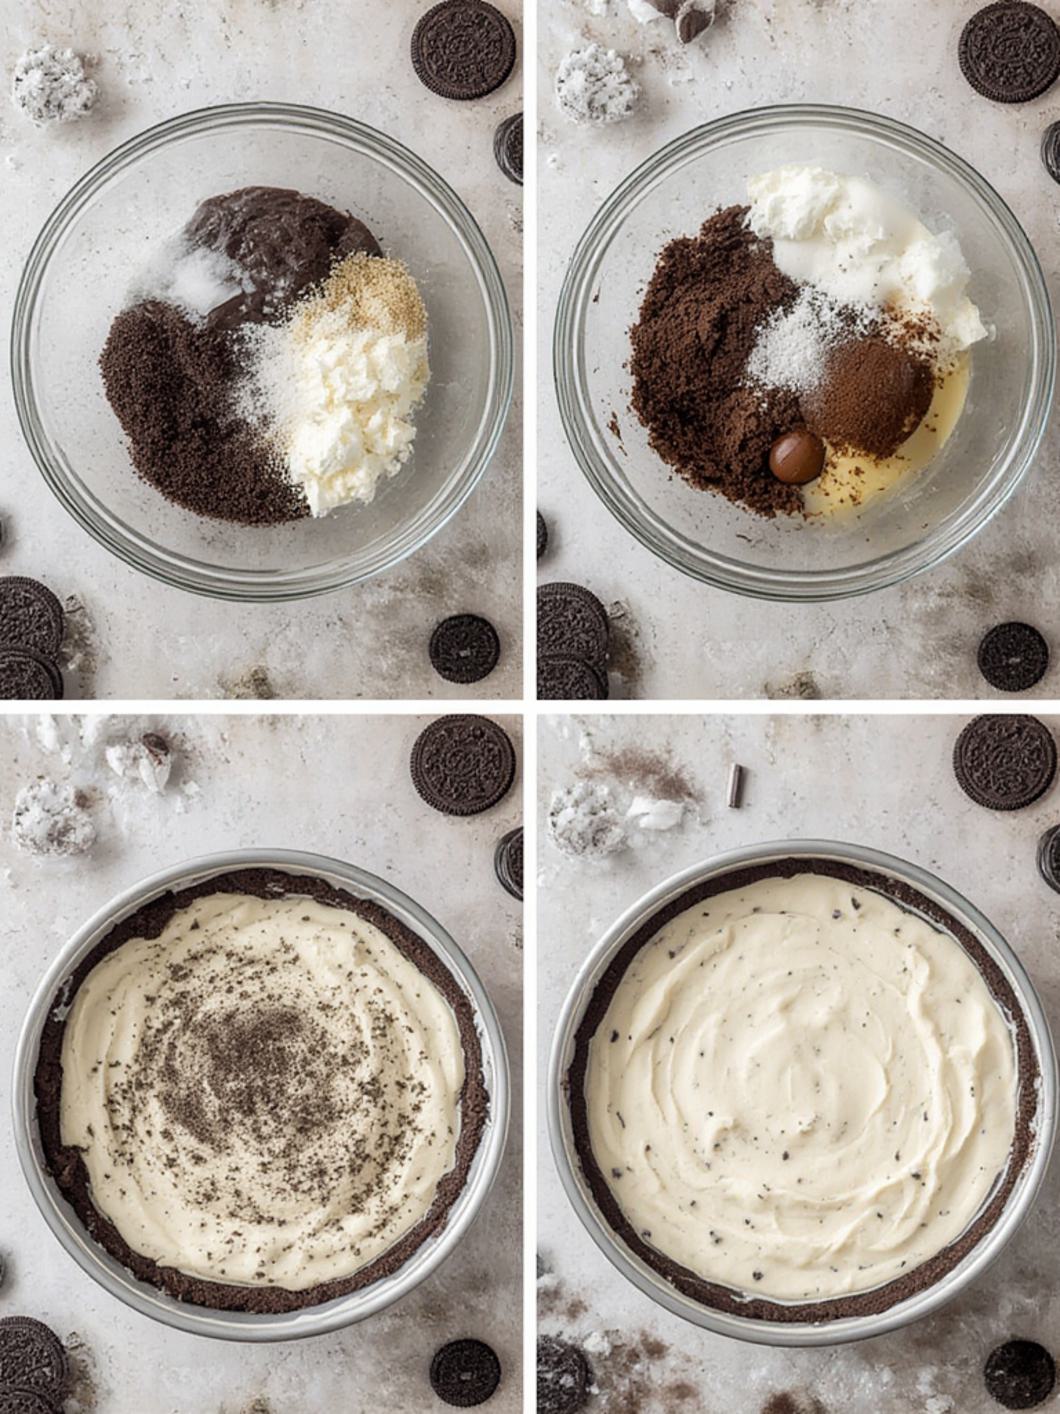
Step 1: Prepare the Oreo Crust
In a food processor, crush the entire package of Oreo cookies (cream filling included!) until fine crumbs form. If you don’t have a food processor, place them in a zip-top bag and crush with a rolling pin. Transfer the crumbs to a medium bowl and pour in the melted butter. Mix well until the crumbs are evenly moistened. Press this mixture firmly into the bottom and up the sides of a 9-inch pie plate. Place the crust in the freezer for 15-20 minutes to set while you prepare the filling.
Step 2: Whisk the Pudding Filling
In a large bowl, combine the two packages of instant chocolate pudding mix with the cold milk. Whisk vigorously for 2-3 minutes until the mixture begins to thicken. It will still be somewhat loose, but don’t worry, it will firm up in the fridge. Let it sit for 5 minutes.
Step 3: Layer the Pie
Remove the chilled Oreo crust from the freezer. Gently spread half of the thawed whipped topping evenly over the bottom of the crust. This creates a delightful, airy layer. Next, carefully pour the slightly thickened chocolate pudding mixture over the whipped topping, spreading it smoothly to the edges. Finally, dollop and spread the remaining whipped topping over the pudding layer. For an extra touch of deliciousness, crumble a few extra Oreos or sprinkle some chocolate shavings on top!
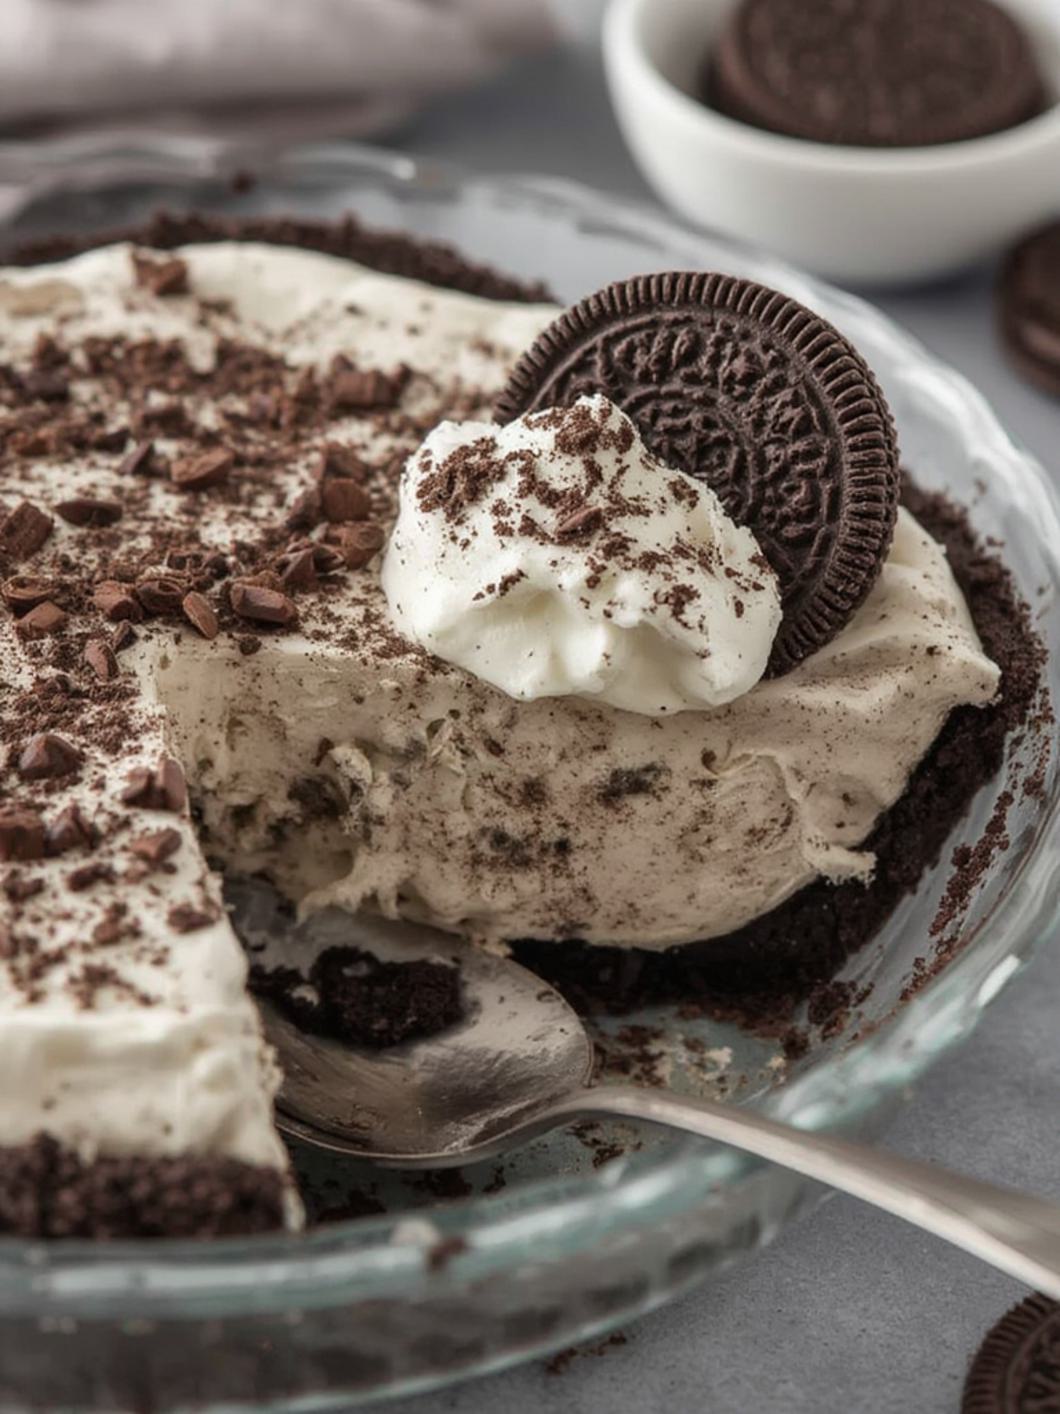
Step 4: Chill and Serve
Cover the pie loosely with plastic wrap and refrigerate for at least 4 hours, or preferably overnight, to allow the pudding to set completely and the flavors to meld. When ready to serve, slice with a sharp knife (running it under hot water between slices helps with clean cuts). Get ready for applause!
Fun Twists & Serving Ideas
This No Bake Oreo Pudding Pie is fantastic as is, but don’t be afraid to get creative!
- Flavor Swaps: Experiment with different instant pudding flavors! Vanilla, cheesecake, banana cream, or even coconut cream would be incredible.
- Add-ins: Fold mini chocolate chips, chopped nuts, or even a swirl of caramel or fudge sauce into the pudding layer before chilling.
- Fruity Twist: Add a layer of sliced bananas or fresh raspberries on top of the pudding before adding the final whipped topping layer.
- Cookie Crusts: Not an Oreo fan? (Gasp!) Try a graham cracker or Nilla wafer crust for a different base.
- Garnish Galore: Beyond extra Oreos, try chocolate curls, sprinkles, a drizzle of chocolate syrup, or fresh berries for an elegant touch.
- Mini Pies: Make individual pies in ramekins or muffin tins lined with paper cups for perfect portion control.
Reader Reviews
Sarah L. (⭐️⭐️⭐️⭐️⭐️): “This pie is an absolute dream! So easy to make and tastes like pure heaven. My family devours it every time I make it. The no-bake aspect is a lifesaver!”
Mark T. (⭐️⭐️⭐️⭐️⭐️): “I’m usually terrible at baking, but this recipe made me feel like a pro! The Oreo crust is perfect, and the chocolate pudding is so rich and creamy. A definite hit at our last potluck.”
Jessica P. (⭐️⭐️⭐️⭐️): “Delicious! I used vanilla pudding mix for a change, and it was still fantastic. The only reason it’s not 5 stars is because I wish I had made two pies – it disappeared so fast!”
Frequently Asked Questions
Q: Can I use homemade whipped cream instead of store-bought whipped topping?
A: Yes, you absolutely can! Just make sure it’s stabilized or whipped very stiffly to hold its shape well, especially for the top layer.
Q: How long does this pie last in the refrigerator?
A: When properly covered, the pie will last for 3-4 days in the refrigerator. The crust may soften slightly over time.
Q: Can I freeze No Bake Oreo Pudding Pie?
A: While technically possible, the texture of the pudding and whipped topping can change when frozen and thawed, sometimes becoming a bit watery. It’s best enjoyed fresh and chilled from the fridge.
Q: What if my pudding doesn’t thicken?
A: Ensure you are using instant pudding mix and very cold milk. Whisk vigorously for the full 2-3 minutes. If it’s still too thin after resting, try adding a tablespoon more of pudding mix and whisking again, then giving it more time to chill.
Recipe Note:
Prep time: 20 minutes (plus 4 hours chilling)
Servings: 8-10 servings