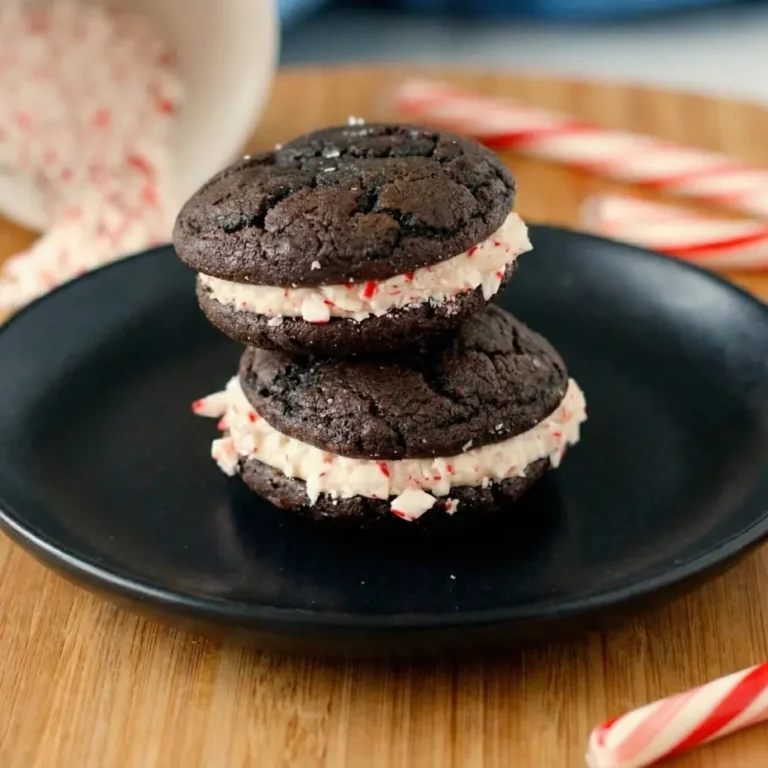
New York Black and White Cookies – Soft & Frosted
🍪 Black and White Cookies: A Taste of Nostalgia in Every Bite
⭐️⭐️⭐️⭐️⭐️ (4.9 from 1,400 fans)
📸 500+ photo shares | ☀️ Updated [October 2025]
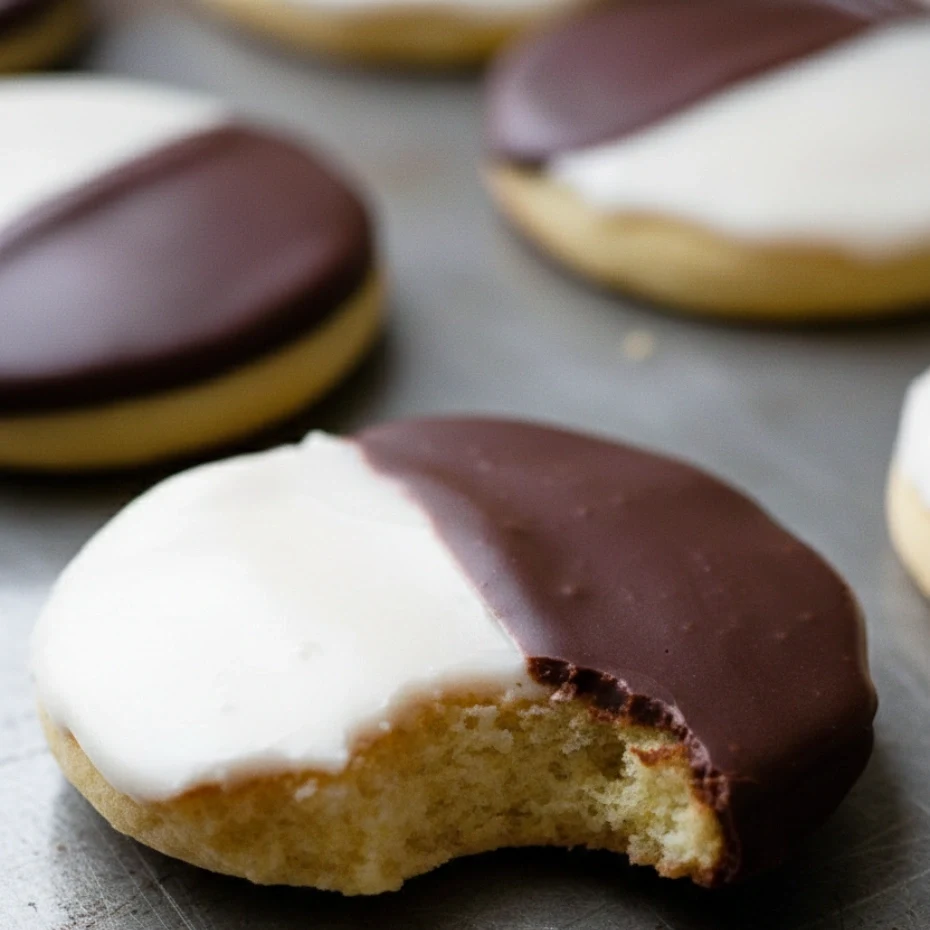
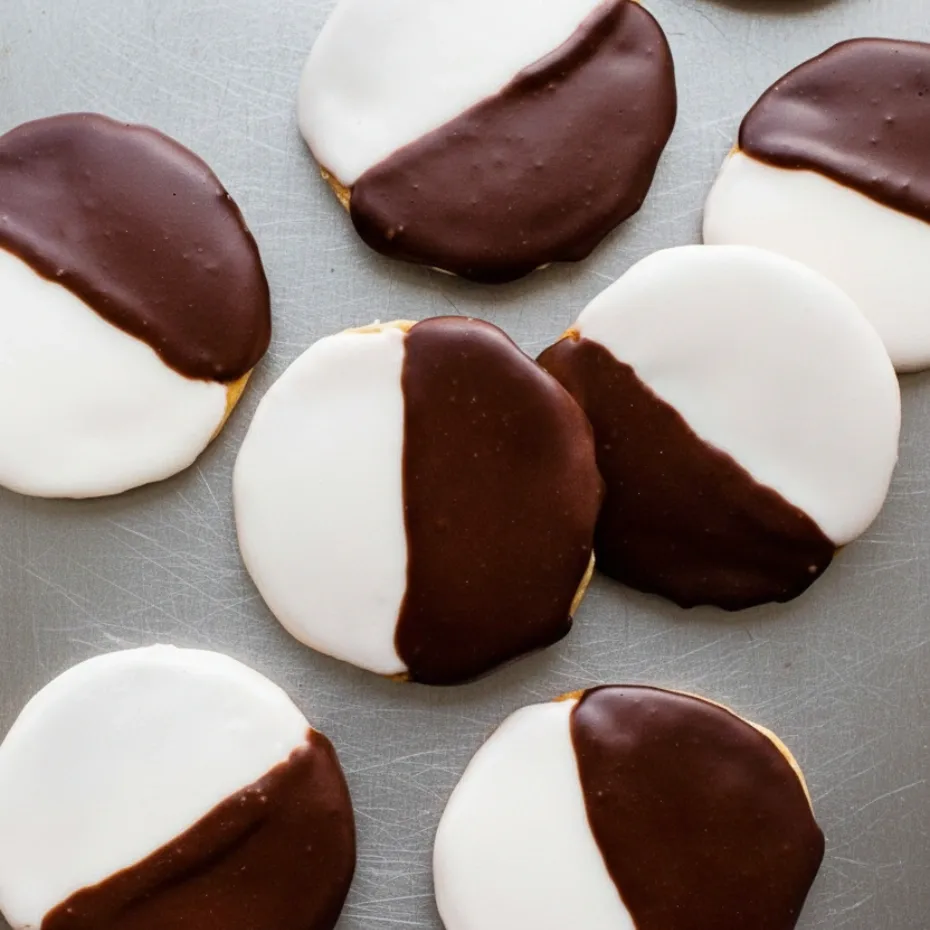
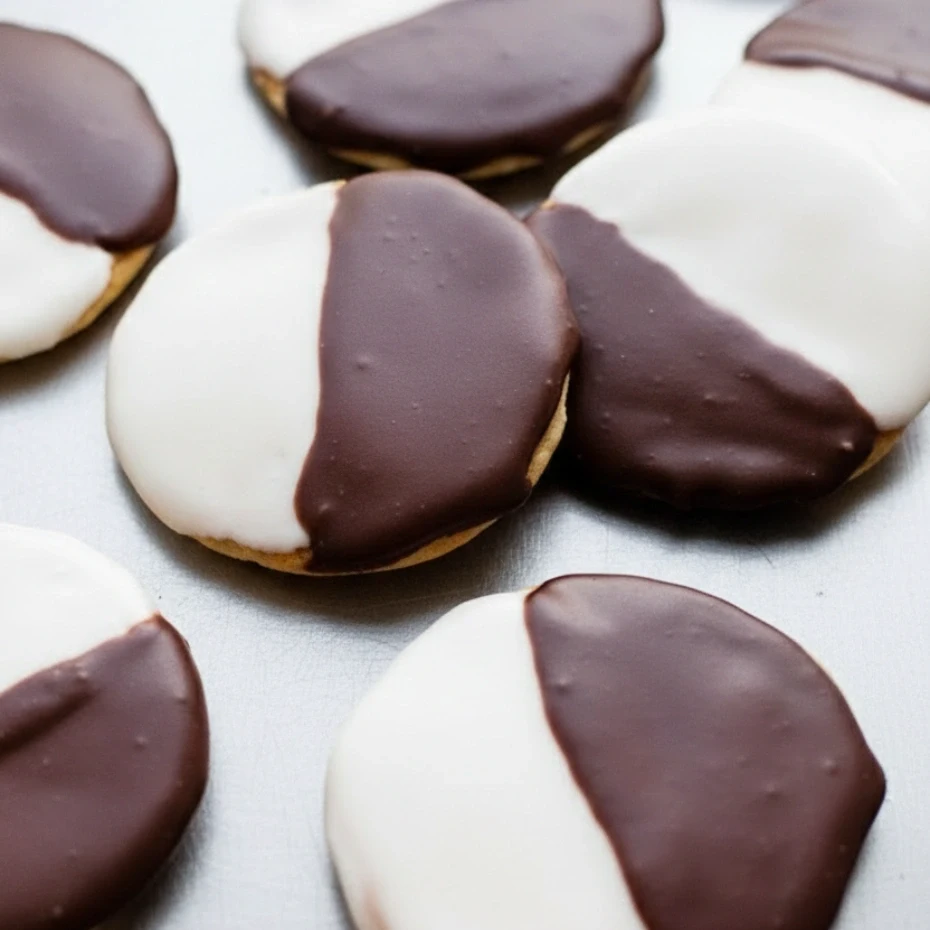
There’s something truly magical about biting into a Black and White Cookie. It’s not just a cookie; it’s a little slice of bakery perfection, a sweet whisper of childhood memories, and a delightful dance of contrasting flavors and textures. Imagine a tender, cake-like cookie base, infused with a hint of lemon zest, providing the most heavenly canvas for two distinct, glossy frostings. One side boasts a smooth, sweet vanilla, while the other offers a rich, decadent chocolate – a perfect harmony of sweet and slightly tangy, soft and creamy. These iconic beauties are not just for special occasions; they’re perfect for brightening up a quiet afternoon coffee, a bustling family gathering, or simply as a comforting treat when you need a little moment of joy. Each bite is a journey through a delectable landscape, promising pure bliss.
Recipe Card will be inserted here
Quick Glance
- ⏱️ Prep Time: 30 minutes
- 🍽️ Servings: 18 cookies
- 💥 Vibe: Soft, Zesty, Iconic
Jump Ahead
- What You’ll Need
- How to Make Black and White Cookies
- Fun Twists & Serving Ideas
- Reviews
- FAQ
- Conclusion
- Recipe Note
What You’ll Need
Gathering your ingredients for these delightful cookies is the first step on your baking adventure! Most of these pantry staples are likely already in your kitchen, waiting to be transformed into something truly special.
For the Cookies:
- 2 ½ cups all-purpose flour
- 1 teaspoon baking powder
- ½ teaspoon baking soda
- ½ teaspoon salt
- ½ cup (1 stick) unsalted butter, softened
- 1 cup granulated sugar
- 2 large eggs
- 1 teaspoon vanilla extract
- ½ teaspoon lemon zest (the secret to that classic tang!)
- ½ cup buttermilk (or use milk with 1 teaspoon lemon juice, let sit for 5 minutes)
For the Icings:
- 4 cups powdered sugar, sifted
- ¼ cup milk (plus more if needed)
- 1 teaspoon vanilla extract
- 3 tablespoons unsweetened cocoa powder
How to Make Black and White Cookies
Let’s dive into creating these iconic beauties! Follow these steps, and you’ll be enjoying your homemade Black and White Cookies in no time.
- Preheat Your Oven & Prep Your Pans: Set your oven to 375°F (190°C). Line two large baking sheets with parchment paper. This helps prevent sticking and makes cleanup a breeze!
- Whisk Dry Ingredients: In a medium bowl, whisk together the flour, baking powder, baking soda, and salt. Set aside.
- Cream Butter and Sugar: In a large bowl, using an electric mixer, cream the softened butter and granulated sugar together until light, fluffy, and pale in color. This usually takes about 2-3 minutes.
- Add Eggs & Flavor: Beat in the eggs one at a time, mixing well after each addition. Stir in the vanilla extract and that lovely lemon zest.
- Alternate Wet & Dry: With the mixer on low speed, gradually add the dry ingredients to the butter mixture, alternating with the buttermilk. Begin and end with the dry ingredients (e.g., flour, buttermilk, flour, buttermilk, flour). Mix just until combined; be careful not to overmix. The dough will be thick.
- Scoop & Shape: Drop heaping tablespoons of dough onto the prepared baking sheets, leaving about 2 inches between each cookie. These cookies spread, so give them room! For that classic flat bottom, you can lightly flatten the tops with a slightly damp finger if desired.
- Bake to Golden Perfection: Bake for 10-12 minutes, or until the edges are lightly golden and the centers are set. The cookies should still be soft.
- Cool Completely: Carefully transfer the baked cookies to a wire rack to cool completely before frosting. This is crucial for your icing to set beautifully!
- Prepare Vanilla Icing: In a bowl, whisk together 2 cups of the sifted powdered sugar, 2 tablespoons of milk, and 1 teaspoon of vanilla extract until smooth and thick but spreadable. Add a tiny bit more milk if it’s too thick, or more powdered sugar if it’s too thin.
- Prepare Chocolate Icing: In a separate bowl, whisk together the remaining 2 cups of sifted powdered sugar, 2 tablespoons of milk, and the cocoa powder until smooth. Adjust consistency as needed.
- Frost Your Masterpieces: Once the cookies are completely cool, gently flip each cookie over so the flat bottom is facing up. With an offset spatula or butter knife, spread vanilla icing on one half of each cookie. Then, clean your spatula and spread chocolate icing on the other half, meeting the vanilla in the middle.
- Let Them Set: Allow the cookies to sit at room temperature for at least 30 minutes, or until the icing has fully set and hardened. Enjoy your stunning creations!
Fun Twists & Serving Ideas
These classic cookies are wonderful as they are, but here are a few ideas to add your own personal touch or create a delightful dessert experience:
- Mini Black & Whites: For smaller bites perfect for a party platter, simply scoop smaller portions of dough. Adjust baking time down by a minute or two.
- Espresso Kick: Add a teaspoon of instant espresso powder to the chocolate icing for a deeper, richer mocha flavor that coffee lovers will adore.
- Citrus Burst: Swap the lemon zest in the cookie dough for orange zest for a bright, sunny twist that complements both vanilla and chocolate beautifully.
- Sprinkle Fun: Before the icing fully sets, add a sprinkle of festive nonpareils or chocolate shavings to the vanilla or chocolate side for an extra pop of color and texture.
- Dessert Platter Star: Arrange Black and White Cookies on a beautiful platter alongside fresh berries, a scoop of vanilla bean ice cream, or a warm cup of coffee or tea for an elegant dessert.
Reviews
Our readers can’t get enough of these timeless treats!
Sarah P. ⭐️⭐️⭐️⭐️⭐️ “These cookies brought me right back to my grandma’s kitchen! The cookie base is so tender, and the icing is just perfect. A true taste of home.”
Mark T. ⭐️⭐️⭐️⭐️⭐️ “I’ve tried so many Black and White cookie recipes, and this one is by far the best. The lemon zest in the cookie really makes it. They disappeared in an hour!”
Jessica L. ⭐️⭐️⭐️⭐️⭐️ “My kids loved decorating these! They’re so much fun to make and even more delicious to eat. A new family favorite for sure.”
FAQ
Got questions? We’ve got answers to help you perfect your Black and White Cookies!
Q: What is the secret to getting a perfectly flat cookie?
A: The dough for Black and White Cookies is thicker than a typical drop cookie dough. After scooping onto the parchment, you can lightly flatten the tops with a damp finger or the back of a spoon. This helps create that iconic flat base for easier frosting.
Q: My icing is too thick/thin. How do I fix it?
A: Icing consistency is key! If it’s too thick, add more milk, a tiny bit at a time (like ½ teaspoon), until it’s spreadable but not runny. If it’s too thin, whisk in more sifted powdered sugar, a tablespoon at a time, until you reach the desired consistency.
Q: Can I make these ahead of time?
A: Absolutely! The unfrosted cookies can be stored in an airtight container at room temperature for up to 3 days, or frozen for up to 1 month. You can also make the icing a day ahead and store it in the fridge, then bring it to room temperature and re-whisk before frosting. Once frosted, the cookies are best enjoyed within 2-3 days.
Q: Why is buttermilk important in this recipe?
A: Buttermilk reacts with the baking soda, creating a tender, slightly tangy crumb that’s characteristic of authentic Black and White Cookies. If you don’t have buttermilk, you can easily make a substitute by adding 1 teaspoon of lemon juice or white vinegar to ½ cup of regular milk and letting it sit for 5 minutes before using.
Conclusion
There’s nothing quite like the satisfaction of baking a batch of Black and White Cookies from scratch. Each one is a small masterpiece, a testament to simple ingredients coming together to create something truly extraordinary. Whether you’re sharing them with loved ones or savoring a quiet moment with a cup of tea, these cookies bring a delightful blend of nostalgia and pure, unadulterated joy. So, roll up your sleeves, gather your ingredients, and let the warmth of your kitchen fill with the sweet aroma of these timeless treats. Happy baking, my friends!
Recipe Note
For the cleanest icing line between the vanilla and chocolate, allow the first half of the icing (e.g., vanilla) to set for 10-15 minutes before applying the second half (chocolate). This prevents the colors from bleeding into each other, creating that beautifully crisp dividing line!
Black and White Cookies
Cook Time: 1hours 15 minutes
Total Time: 2 hours 30 minutes (includes chilling and setting time)
Course: Dessert
Servings: 24 cookies
Calories: 220 kcal per cookie (approximate)
Ingredients
- For the Cookies:
- 2 ½ cups all-purpose flour
- 1 teaspoon baking soda
- ½ teaspoon salt
- 1 cup (2 sticks) unsalted butter, softened
- 1 ½ cups granulated sugar
- 2 large eggs
- 1 teaspoon vanilla extract
- 1 cup buttermilk
- For the Vanilla Glaze:
- 3 cups confectioners’ sugar
- ¼ cup milk (or water)
- 1 teaspoon vanilla extract
- For the Chocolate Glaze:
- 2 cups confectioners’ sugar
- 2 tablespoons unsweetened cocoa powder
- 3 tablespoons milk (or water)
- ½ teaspoon vanilla extract
Instructions
1.Make the Cookie Dough: In a medium bowl, whisk together the flour, baking soda, and salt. Set aside. In a large bowl, cream together the softened butter and granulated sugar until light and fluffy. Beat in the eggs one at a time, then stir in the vanilla extract. Gradually add the dry ingredients to the wet ingredients, alternating with the buttermilk, beginning and ending with the dry ingredients. Mix until just combined, being careful not to overmix. Cover the dough and refrigerate for at least 1 hour.
2. Bake the Cookies: Preheat oven to 375°F (190°C). Line baking sheets with parchment paper. Drop spoonfuls (about 2 tablespoons) of dough onto the prepared baking sheets, leaving about 2 inches between each cookie. Slightly flatten the dough balls with the back of a spoon to create a disc shape (this helps with the classic flat bottom). Bake for 10-12 minutes, or until the edges are lightly golden and the centers are set. Do not overbake; they should remain pale. Let cool on the baking sheet for a few minutes before transferring to a wire rack to cool completely.
3. Prepare the Glazes: While cookies cool, prepare the glazes.
For the Vanilla Glaze: In a medium bowl, whisk together the confectioners’ sugar, milk, and vanilla extract until smooth and thick enough to coat the back of a spoon. If too thick, add more milk a teaspoon at a time; if too thin, add more confectioners’ sugar.
For the Chocolate Glaze: In another medium bowl, whisk together the confectioners’ sugar and cocoa powder. Gradually add the milk and vanilla extract, whisking until smooth. Adjust consistency as needed with more milk or confectioners’ sugar.
4. Glaze the Cookies: Once cookies are completely cool, place them flat side down on a wire rack set over parchment paper (to catch drips). Using an offset spatula or a small knife, spread the vanilla glaze over one half of each cookie, creating a clean line down the middle. Let the vanilla glaze set for about 15-20 minutes. Then, spread the chocolate glaze over the other half of each cookie.
5. Set and Serve: Allow the glazes to set completely at room temperature for at least 1-2 hours before stacking or serving. Store in an airtight container at room temperature for up to 3-4 days.
Chef’s Notes: These iconic New York-style Black and White Cookies feature a soft, cake-like vanilla cookie base half-covered in vanilla glaze and half in chocolate glaze. A perfect balance of flavors and textures, they’re a true classic. The dough needs to be chilled for best results, and the cookies should be completely cool before glazing.