Crispy Danish Butter Cookies – Homemade Holiday Favorite
🍪 Danish Butter Cookies: Buttery, Tender, and Pure Nostalgia in Every Bite

⭐️⭐️⭐️⭐️⭐️ (4.9 from 1,900 fans)
📸 700+ photo shares | ☀️ Updated [October 2025]
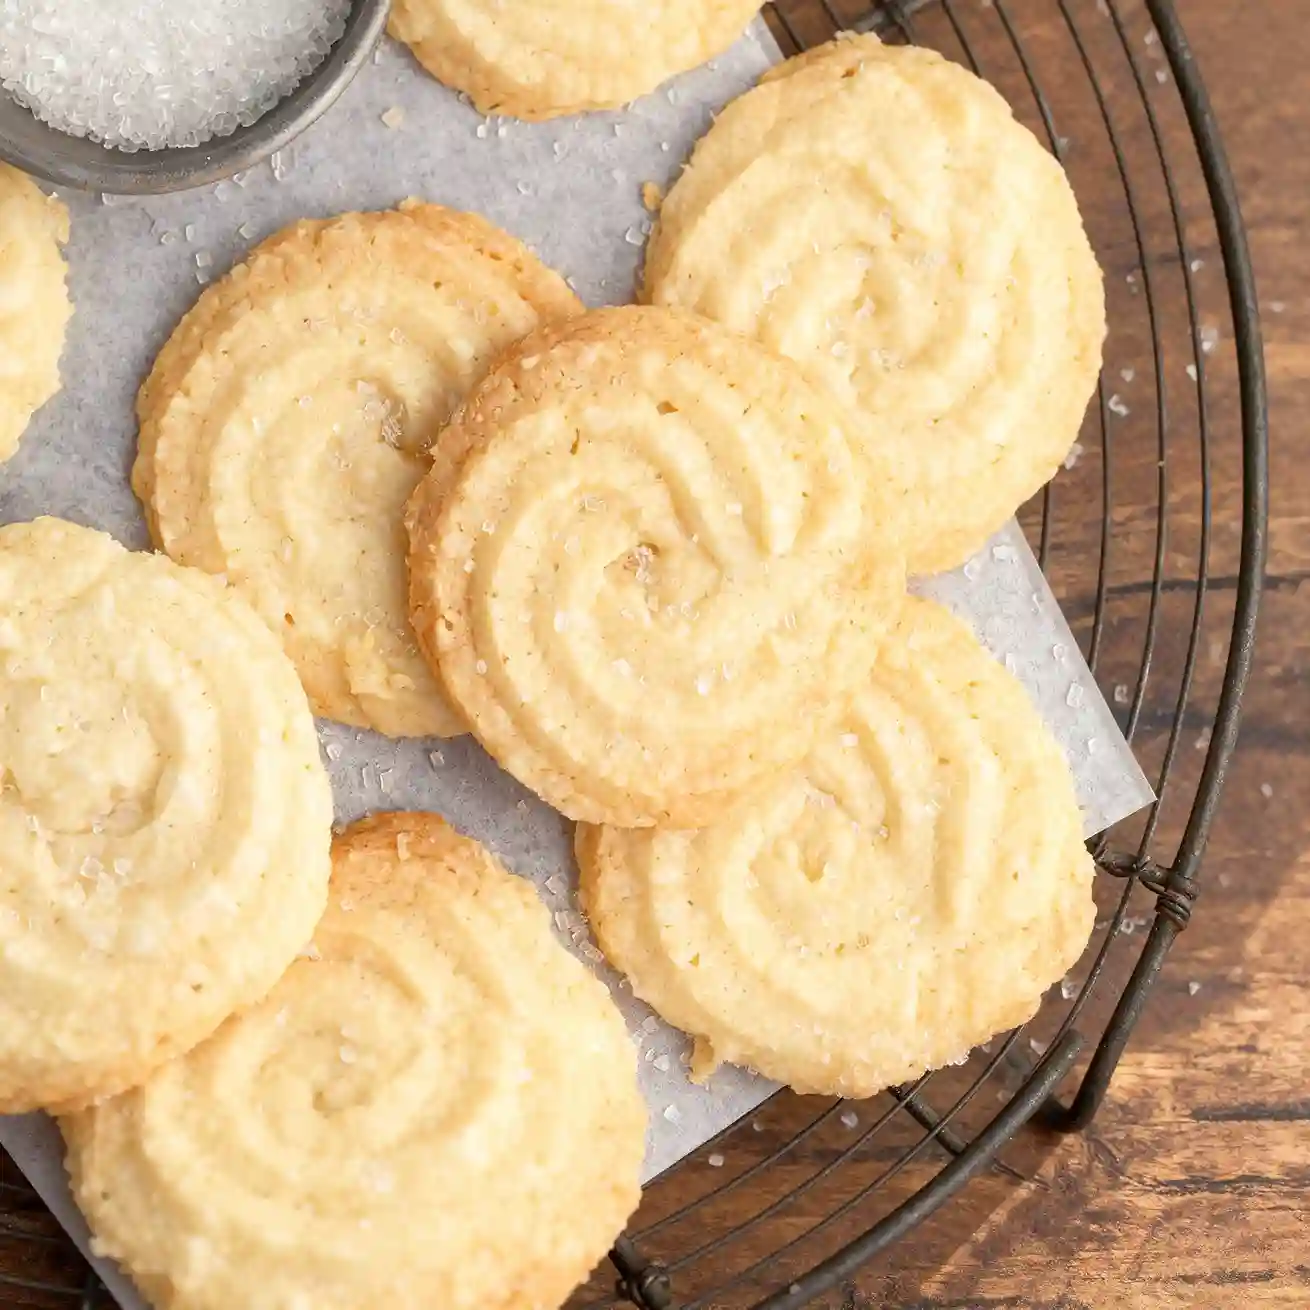
There’s something truly magical about Danish Butter Cookies. The moment that first golden bite melts on your tongue, you’re transported to a place of pure comfort and warmth. With their impossibly tender crumb and rich, buttery aroma, these classic treats are more than just a cookie; they’re a hug in edible form. Perfect for holiday gatherings, a thoughtful homemade gift, or simply a quiet afternoon with a cup of tea, these cookies are a timeless delight that promises to fill your home with the most inviting fragrance and your heart with pure joy.
Recipe Card will be inserted here
Quick Glance
- ⏱️ Prep Time: 20 minutes (plus chilling)
- 🍽️ Servings: 36 cookies
- 💥 Vibe: Buttery, Delicate, Nostalgic
Jump Ahead
- What You’ll Need
- How to Make Danish Butter Cookies
- Fun Twists & Serving Ideas
- Reviews
- FAQ
- Conclusion
What You’ll Need
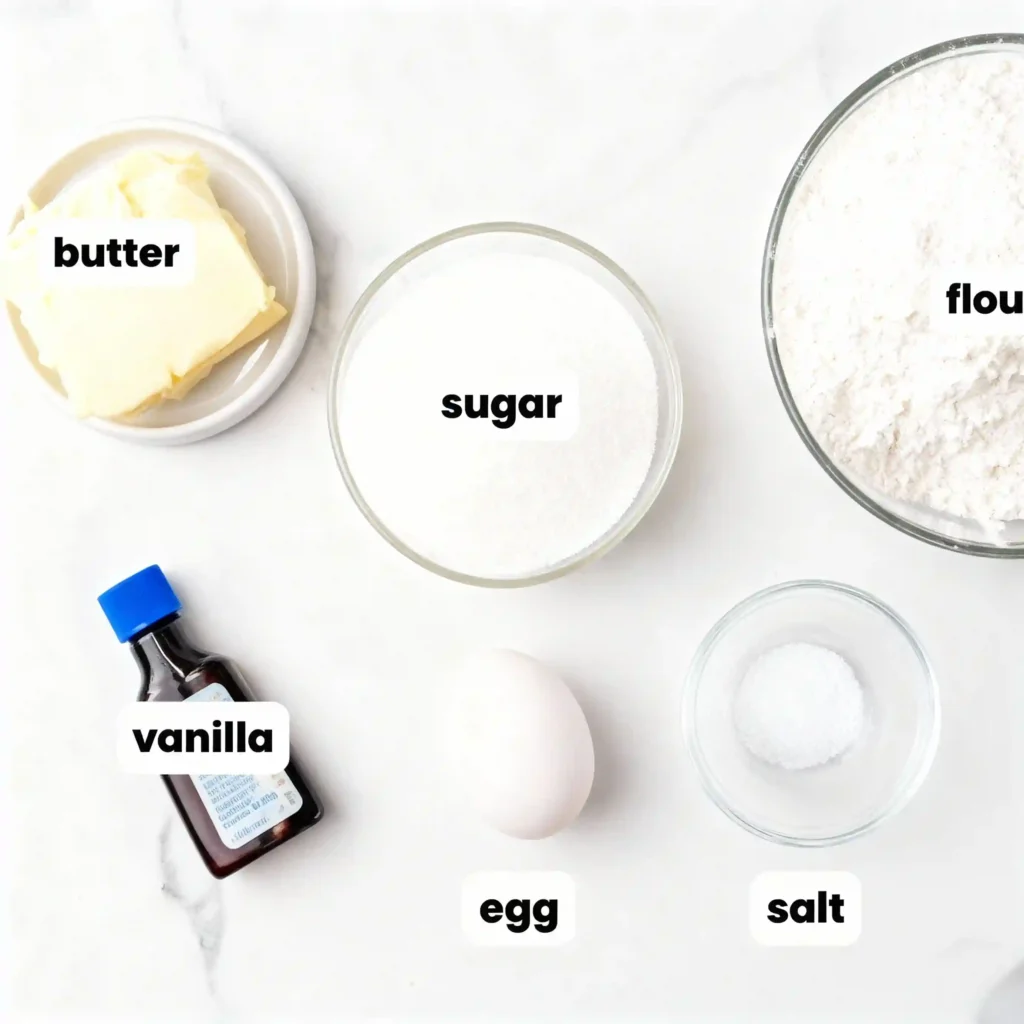
Gathering your ingredients for these beloved Danish Butter Cookies is the first step towards a truly delightful baking experience. Each component plays a vital role in creating that signature melt-in-your-mouth texture and rich flavor.
- 1 cup (2 sticks) unsalted butter, softened
- ¾ cup granulated sugar
- 1 large egg
- 1 teaspoon pure vanilla extract
- 2 ¼ cups all-purpose flour
- ½ teaspoon salt
How to Make Danish Butter Cookies
Creating these delicate cookies is a joyful journey from simple ingredients to a tray of golden perfection. Follow these steps to bake a batch that will impress and delight!
- Cream Butter & Sugar: In a large mixing bowl, beat the softened butter and granulated sugar together until light, fluffy, and pale in color, about 3-4 minutes. Scrape down the sides of the bowl as needed to ensure everything is evenly combined.
- Add Wet Ingredients: Beat in the egg and pure vanilla extract until fully incorporated. Mix until just combined to avoid overworking the dough.
- Combine Dry Ingredients: In a separate medium bowl, whisk together the all-purpose flour and salt. This ensures the salt is evenly distributed throughout the cookies.
- Gradually Add Dry to Wet: Slowly add the dry ingredients to the wet ingredients, mixing on low speed until just combined. Be careful not to overmix; overmixing can develop the gluten too much, resulting in tough cookies.
- Chill the Dough: Gather the dough into a disc, wrap it tightly in plastic wrap, and refrigerate for at least 30 minutes (or up to 2 hours). Chilling is absolutely crucial for easy handling, especially if you’re piping, and it helps prevent the cookies from spreading too much in the oven.
- Preheat & Prep: Preheat your oven to 350°F (175°C). Line two baking sheets with parchment paper or silicone mats to prevent sticking and ensure even baking.
- Shape the Cookies: If piping, transfer the chilled dough to a piping bag fitted with a large star tip. Pipe various traditional shapes (rosettes, S-shapes, swirls) onto the prepared baking sheets, leaving about 1 inch between cookies. If shaping by hand, roll small portions into balls and flatten slightly with a fork, or use a cookie press according to its instructions for uniform shapes.
- Bake to Golden Perfection: Bake for 10-14 minutes, or until the edges are lightly golden. Keep a close eye on them, as baking time will vary depending on your oven and the size of your cookies. You want them to be set but still tender.
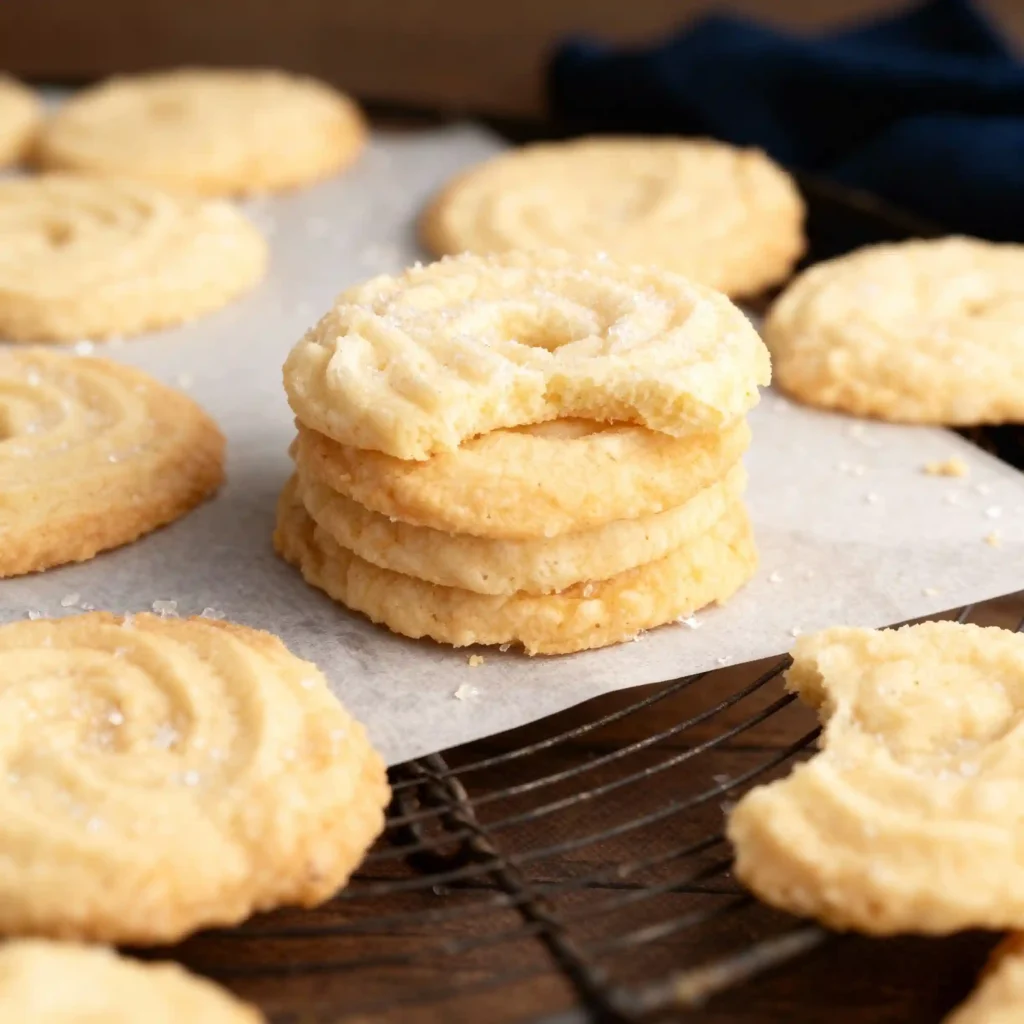
- Cool Completely: Let the cookies cool on the baking sheets for 5 minutes before carefully transferring them to a wire rack to cool completely. This helps them firm up and prevents breakage, ensuring they hold their beautiful shapes.
- Enjoy! Once cooled, these buttery delights are ready to be savored with your favorite cup of tea, coffee, or simply enjoyed on their own.
Fun Twists & Serving Ideas
While these Danish Butter Cookies are perfect in their classic form, a little creativity can transform them into new delightful experiences. Here are a few ideas to inspire you:
- Lemon Zest Brightness: For a refreshing twist, add 1 tablespoon of fresh lemon zest to the butter and sugar mixture. The bright citrus notes beautifully complement the rich butter.
- Chocolate Dipped Decadence: Once your cookies are completely cooled, melt some dark or white chocolate and dip half of each cookie in it. Sprinkle with a touch of flaky sea salt or colorful sprinkles before the chocolate sets for an extra special touch.
- Almond Elegance: Replace half a teaspoon of vanilla extract with almond extract for a delicate, nutty flavor profile that elevates these cookies. For an even prettier presentation, press a slivered almond into the center of each cookie before baking.
- Jam Thumbprints: Before baking, make a small indentation in the center of your round cookies using your thumb or the back of a spoon. Fill the indentations with a tiny dollop of your favorite fruit jam (raspberry or apricot are classic choices) for a burst of fruity flavor.
- Coffee & Tea Companion: Naturally, these cookies are the ultimate companion for a warm cup of coffee, tea, or even a glass of milk. Arrange them on a pretty platter for an elegant afternoon treat.
Reviews
- “These cookies are just like the ones my grandmother used to make! So buttery and tender, they literally melt in your mouth. A new family favorite for sure!” – Sarah L., ⭐️⭐️⭐️⭐️⭐️
- “I was intimidated by piping at first, but this recipe made it so easy. The chilling step is key! My cookies came out perfect and beautiful, and everyone asked for the recipe.” – David P., ⭐️⭐️⭐️⭐️⭐️
- “Finally, a butter cookie recipe that truly delivers. The flavor is incredible, and they have that delicate crumb I’ve always searched for. Thank you for this gem!” – Emily R., ⭐️⭐️⭐️⭐️⭐️
FAQ
- Q: Can I make the dough ahead of time?
- A: Absolutely! The dough can be prepared up to 3 days in advance and stored in the refrigerator, tightly wrapped. You can also freeze the dough for up to 1 month; just thaw it in the fridge overnight before using.
Q: Why are my Danish Butter Cookies spreading too much?A: The most common culprit is warm dough. Ensure your butter isn’t too soft when you start, and always chill the dough adequately before piping or shaping. Overmixing the flour can also contribute to spreading, as it develops gluten which can make cookies flatter.
Q: How should I store these cookies?A: Store cooled Danish Butter Cookies in an airtight container at room temperature for up to 1 week. They also freeze beautifully for up to 2 months; just be sure to layer them with parchment paper to prevent sticking.
Q: Can I use salted butter?A: While unsalted butter gives you more control over the salt content, you can use salted butter. If you do, reduce the added salt in the recipe to a tiny pinch (about ⅛ teaspoon) or omit it entirely, depending on your personal preference and the saltiness of your butter.
Conclusion
There’s an undeniable comfort in baking, and these Danish Butter Cookies embody that spirit perfectly. They’re a testament to how simple ingredients, combined with a little love and care, can create something truly extraordinary. Whether you’re gifting them to a loved one, sharing them with friends, or simply enjoying a quiet moment of indulgence, these cookies are a beautiful reminder of the sweet, simple joys in life. Don’t hesitate to whisk up a batch; your taste buds (and your home, filled with that glorious aroma!) will thank you.
Recipe Note
For the absolute best texture and flavor, always use high-quality unsalted butter. It truly makes all the difference in these buttery delights, contributing to their signature rich taste and delicate crumb.
Danish Butter Cookies
Cook Time: 12-15 minutes cook
Total Time: 45-50 minutes
Course: Dessert
Servings: 3-4 dozen cookies
Calories: Approximately 80-100 calories per cookie (varies with size)
Ingredients
- 1 cup (226g) unsalted butter, softened
- 1 cup (200g) granulated sugar
- 1 large egg
- 1 teaspoon vanilla extract
- 2 ½ cups (300g) all-purpose flour
- ½ teaspoon salt
Instructions
In a large bowl, cream together the softened butter and granulated sugar with an electric mixer until light and fluffy, about 3-5 minutes. Beat in the egg and vanilla extract until well combined. In a separate bowl, whisk together the all-purpose flour and salt. Gradually add the dry ingredients to the wet ingredients, mixing on low speed until just combined and a soft dough forms. Do not overmix. Transfer the dough to a large piping bag fitted with a star tip (or your desired tip). Pipe various shapes onto baking sheets lined with parchment paper, spacing them about 1 inch apart. Alternatively, you can chill the dough for 30 minutes, then roll it into small balls and flatten them slightly with a fork. Preheat your oven to 375°F (190°C). Bake for 12-15 minutes, or until the edges are lightly golden brown. Let the cookies cool on the baking sheets for 5 minutes before transferring them to a wire rack to cool completely. Store in an airtight container at room temperature for up to a week.
Chef’s Notes: These classic Danish butter cookies are known for their rich, buttery flavor and tender, melt-in-your-mouth texture. They are perfect for holiday gift-giving, afternoon tea, or simply enjoying with a cup of coffee. The dough is ideal for piping into various shapes.