Christmas Tree Brownies: 10 Festive Recipes
Christmas Tree Brownies: Your New Favorite Festive Treat!
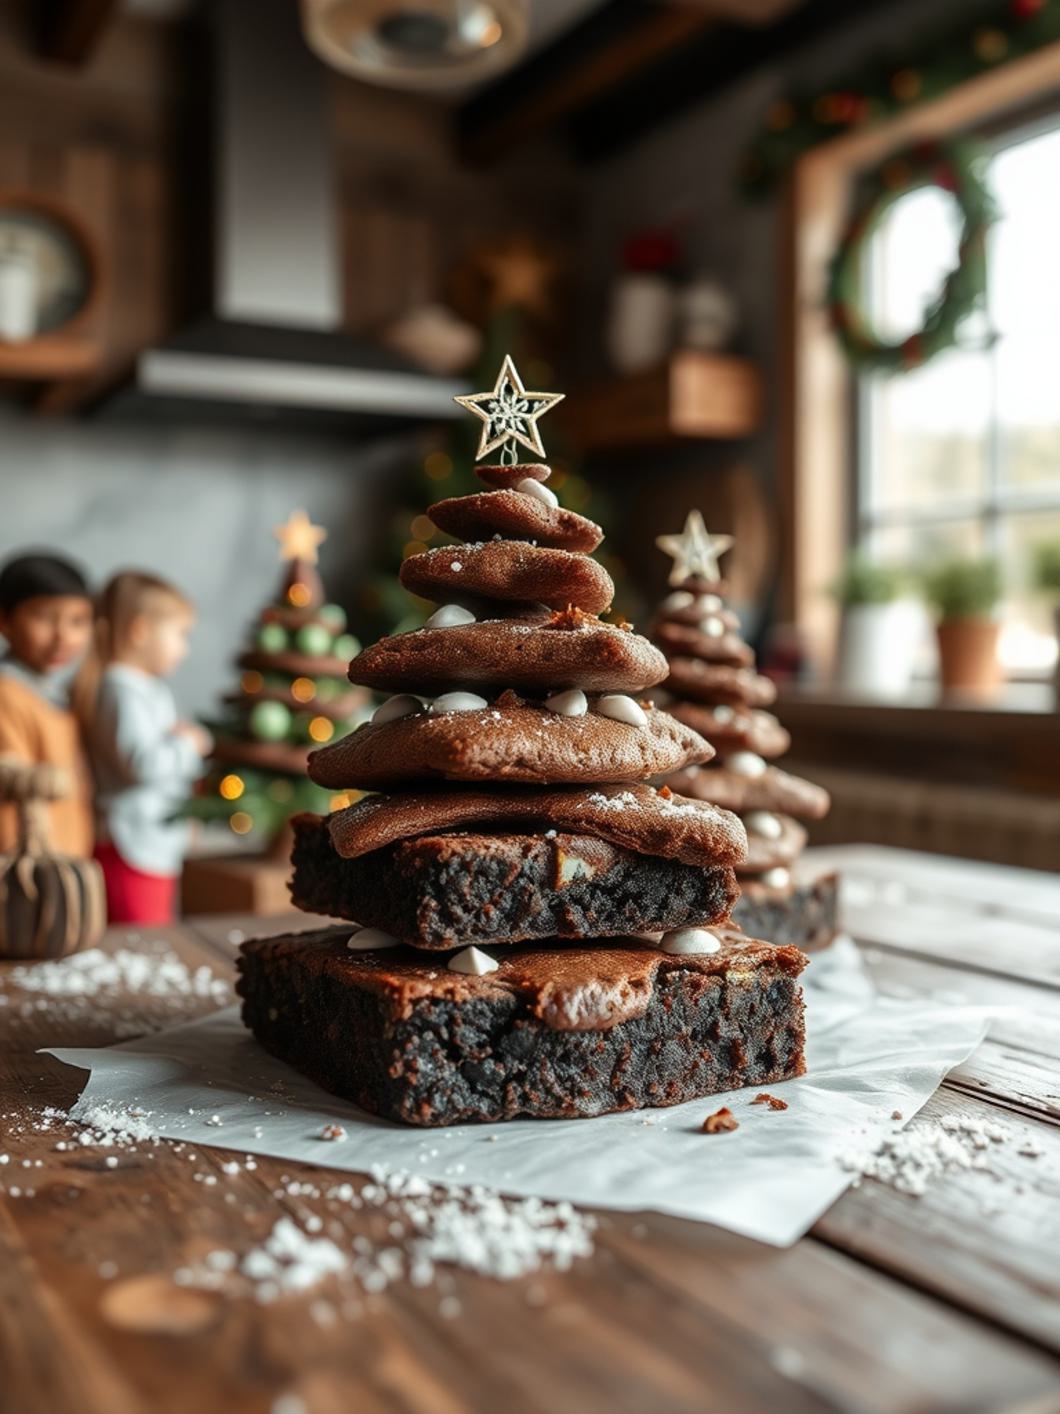
There’s a special kind of magic that fills the air during the holiday season, isn’t there? The twinkling lights, the cozy gatherings, and of course, the irresistible aroma of freshly baked goods! This year, I’m thrilled to share a recipe that perfectly encapsulates that joy: our delightful Christmas Tree Brownies. Imagine rich, fudgy brownies transformed into miniature festive masterpieces, adorned with vibrant green frosting and sparkling sprinkles. They’re incredibly fun to make, a treat for the eyes, and even more delicious to eat!
These isn’t just a dessert; it’s an edible craft project perfect for family baking sessions, holiday parties, or a thoughtful homemade gift. Forget the stress, embrace the cheer, and let’s bake some magic. This simple recipe takes classic brownies and gives them a jolly makeover, promising smiles all around. Get ready to spread some serious festive joy with every single bite of these gorgeous Holiday Brownies!
⭐️⭐️⭐️⭐️⭐️ (4.8 from 2,500 fans)
📸 1100+ photo shares | ☀️ Updated December 2025
Why You’ll Love These Christmas Tree Brownies
Beyond their undeniable cuteness, these Christmas Tree Brownies are a holiday dream come true. They’re incredibly fudgy, boasting that perfect crackly top, and the decoration process is pure joy. It’s a fantastic activity for kids and adults alike, creating delicious memories along with delicious treats. Plus, they’re surprisingly easy to make and transport, making them ideal for potlucks, cookie exchanges, or simply brightening up your own dessert table!
What You’ll Need

Equipment
- 9×13 inch baking pan
- Parchment paper
- Large mixing bowl
- Whisk and spatula
- Small saucepan (if melting butter/chocolate)
- Sharp knife or pizza cutter
- Piping bag with star tip (optional, for frosting)
Ingredients
- 1 cup (2 sticks) unsalted butter, melted
- 2 cups granulated sugar
- 4 large eggs
- 1 teaspoon vanilla extract
- 1 cup all-purpose flour
- ¾ cup unsweetened cocoa powder
- ½ teaspoon baking powder
- ¼ teaspoon salt
- **For the Frosting & Decoration:**
- 1 cup (2 sticks) unsalted butter, softened
- 3-4 cups powdered sugar
- 1-2 tablespoons milk or cream
- 1 teaspoon vanilla extract
- Green food coloring
- Assorted holiday sprinkles
- Small edible star candies (for tree toppers, optional)
- Mini candy canes or pretzel sticks (for tree trunks, optional)
How to Make Christmas Tree Brownies
Step-by-Step Instructions
- Prep the Pan: Preheat your oven to 350°F (175°C). Line a 9×13 inch baking pan with parchment paper, leaving an overhang on the sides for easy lifting. Lightly grease the parchment paper.
- Melt & Combine: In a large mixing bowl, combine the melted butter and granulated sugar. Whisk until well combined.
- Add Wet Ingredients: Add the eggs one at a time, mixing well after each addition. Stir in the vanilla extract.
- Mix Dry Ingredients: In a separate bowl, whisk together the flour, cocoa powder, baking powder, and salt.
- Combine Wet and Dry: Gradually add the dry ingredients to the wet ingredients, mixing with a spatula until just combined. Be careful not to overmix.
- Bake: Pour the brownie batter into the prepared pan and spread evenly. Bake for 25-30 minutes, or until a toothpick inserted into the center comes out with moist crumbs, not wet batter. Do not overbake!
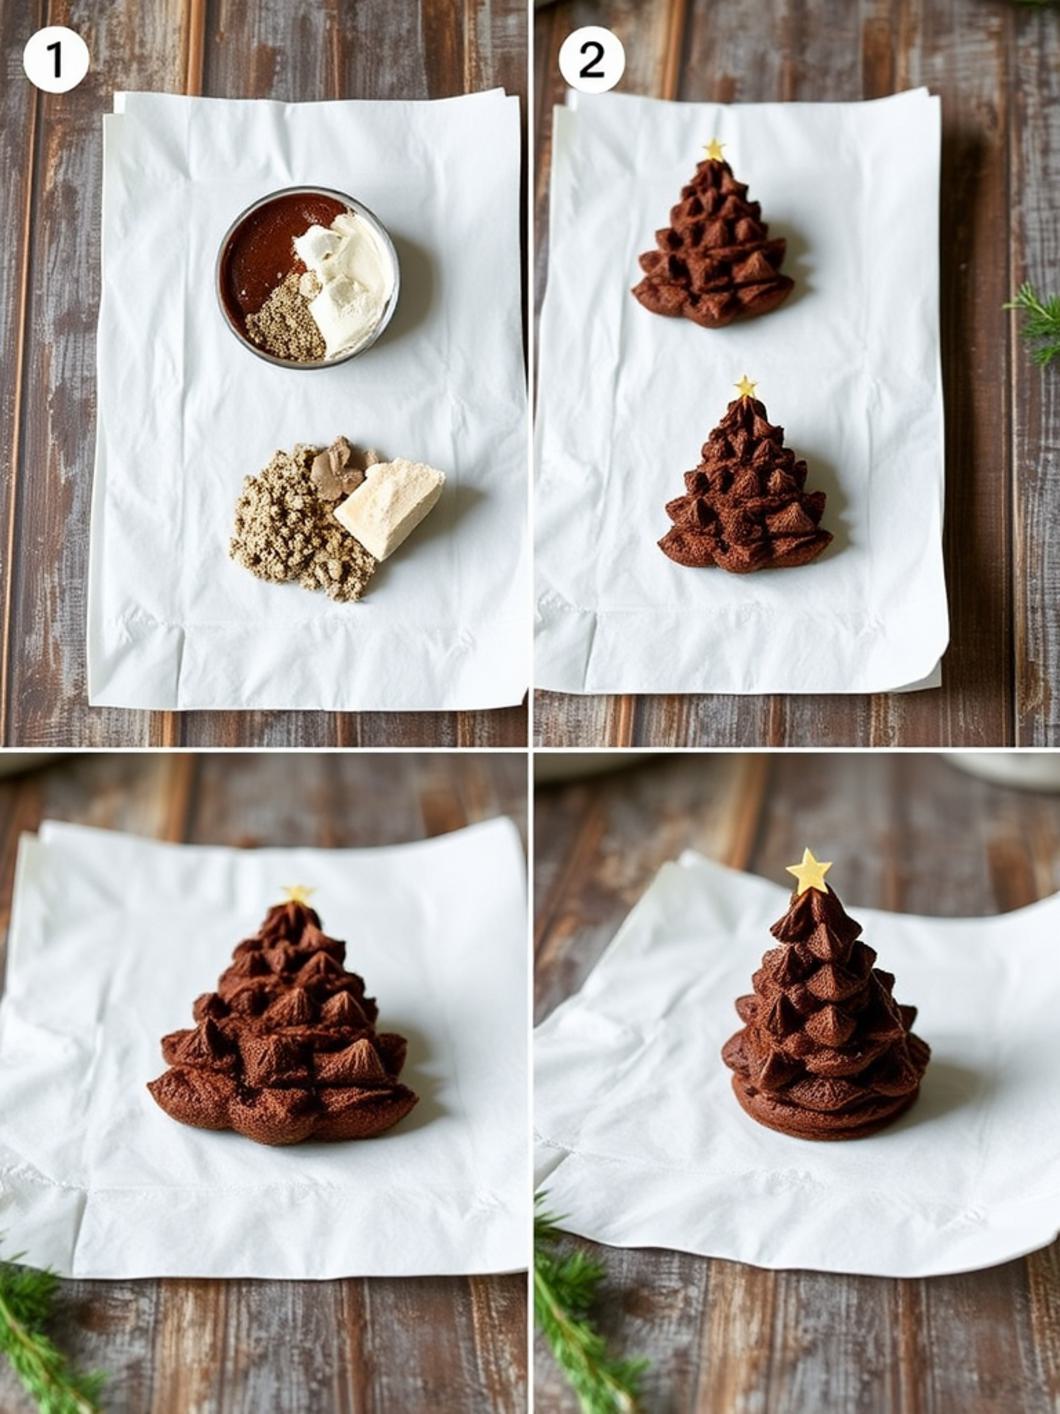
- Cool Completely: Let the brownies cool in the pan on a wire rack for at least 1 hour, then use the parchment paper overhang to lift them out and transfer to a cutting board. Allow them to cool completely, preferably chilling in the refrigerator for 30 minutes, for easier cutting. This is key for perfectly shaped Christmas Tree Brownies.
- Make the Frosting: While the brownies cool, prepare the buttercream. In a large bowl, beat the softened butter with an electric mixer until light and fluffy. Gradually add the powdered sugar, alternating with milk/cream, until smooth and spreadable. Beat in the vanilla extract. Add green food coloring a few drops at a time until you reach your desired festive shade.
- Cut into Trees: Once completely cooled, use a sharp knife or pizza cutter to cut the brownies into rectangles (e.g., 4 rows by 6 columns for 24 rectangles, or 3 rows by 6 columns for 18 larger rectangles). Then, cut each rectangle diagonally from corner to corner to form two triangles. You can trim a little off the bottom of each triangle to make it flat, or leave it as is for a rustic look. These Holiday Brownies are almost ready!
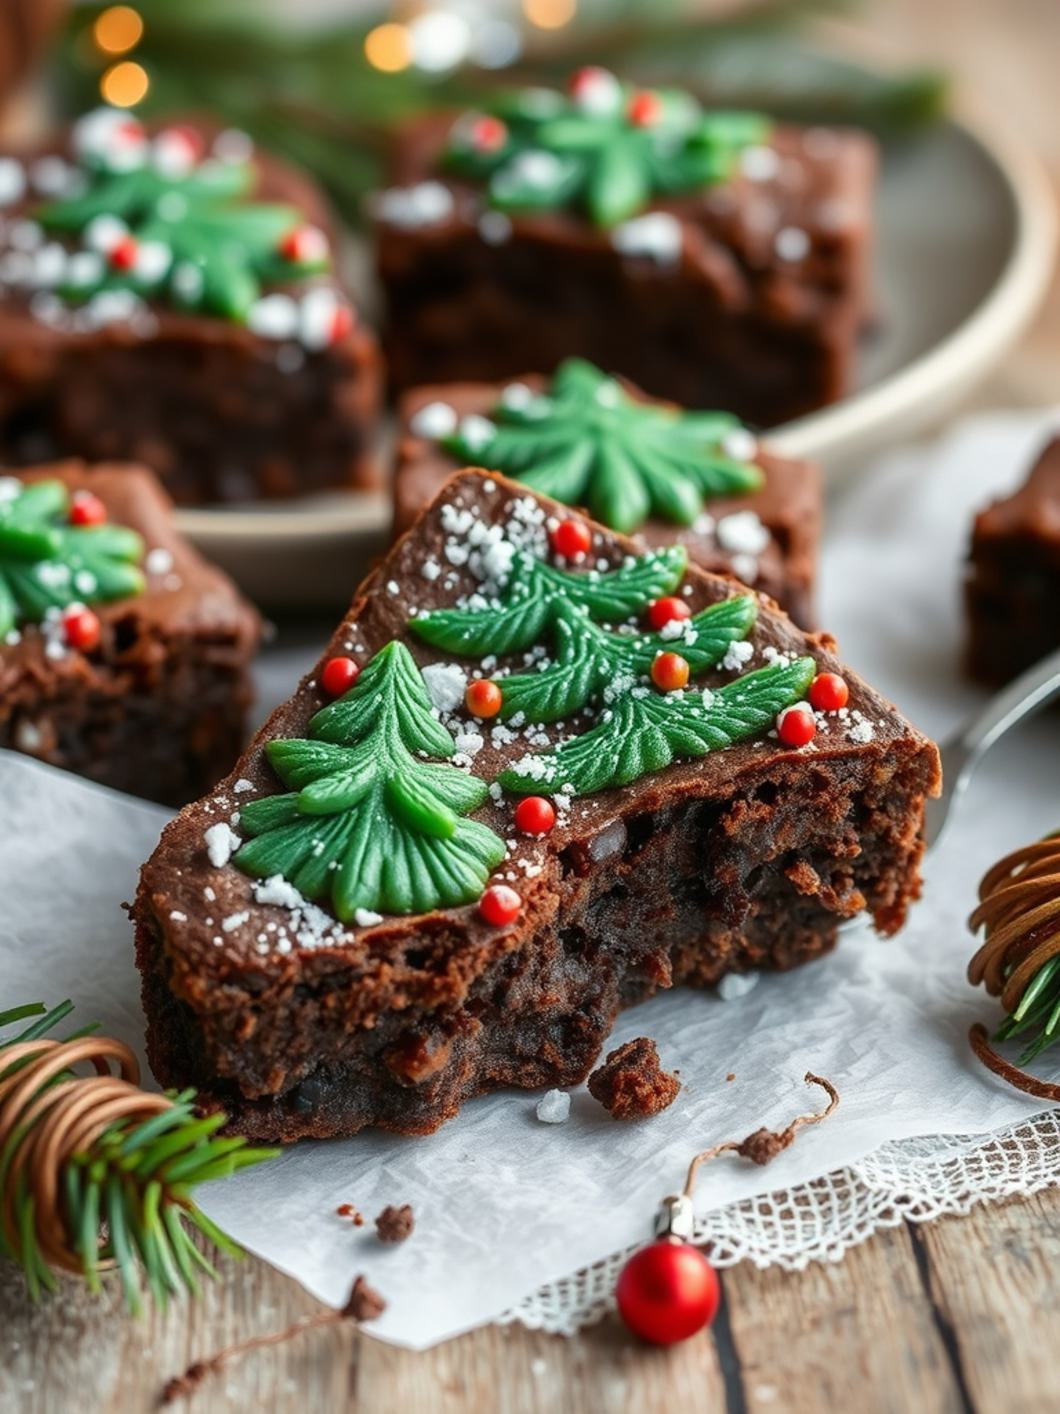
- Decorate: Transfer the green frosting to a piping bag fitted with a star tip (or use a zip-top bag with the corner snipped off). Pipe frosting onto each brownie triangle, creating a tree-like pattern. Immediately decorate with assorted sprinkles, and if desired, add a small edible star at the top and a mini candy cane piece or pretzel stick at the bottom for the trunk.
- Serve & Enjoy: Arrange your beautiful Christmas Tree Brownies on a platter and watch them disappear!
Fun Twists & Serving Ideas
- Peppermint Perfection: Add ½ teaspoon of peppermint extract to your brownie batter or frosting for a classic holiday flavor twist.
- White Christmas Trees: Use white frosting instead of green, and decorate with silver or white sprinkles for a snowy effect.
- Candy Cane Forest: Crush candy canes and sprinkle them over the frosted brownies for a delightful crunch and minty flavor.
- Chocolate Drizzle: After frosting, drizzle melted white or dark chocolate over the green “trees” for extra decadence.
- Edible Ornaments: Use small colorful M&M’s or mini chocolate chips as “ornaments” on your frosted trees.
- Serving Suggestion: Arrange these festive treats on a tiered stand for a stunning holiday display, or package a few in cellophane bags with ribbons for thoughtful homemade gifts. They’re perfect with a glass of milk or a warm cup of cocoa!
Reader Reviews
🎄 “So much fun, so delicious!” – Clara J. (⭐️⭐️⭐️⭐️⭐️)
“I made these with my grandkids, and it was such a joy! The brownies are perfectly fudgy, and decorating them was the highlight of our afternoon. A new holiday tradition for sure!”
💚 “Easier than I thought!” – Mark T. (⭐️⭐️⭐️⭐️⭐️)
“I’m not much of a baker, but these looked so cute I had to try. The instructions were clear, and they turned out amazing. Everyone at my office party loved them. Will definitely make again!”
✨ “A real showstopper!” – Sophia L. (⭐️⭐️⭐️⭐️⭐️)
“These Christmas Tree Brownies are not only incredibly tasty but also absolutely adorable! They were the star of our dessert table and received so many compliments. The recipe is fantastic, and the brownies are so moist.”
Frequently Asked Questions
Q: Can I use a brownie mix for this recipe?
A: Absolutely! Using a good quality boxed brownie mix will save you time and still yield delicious results. Just follow the package directions for baking in a 9×13 inch pan.
Q: How far in advance can I make these Christmas Tree Brownies?
A: You can bake the brownies up to 2-3 days in advance and store them unfrosted in an airtight container at room temperature. Frost and decorate them 1 day before serving for the freshest look and taste.
Q: What kind of food coloring should I use for the green frosting?
A: Gel food coloring works best as it provides a vibrant color without thinning out the frosting. Start with a few drops and add more until you achieve your desired shade of green.
Q: How should I store leftover brownies?
A: Store the frosted Christmas Tree Brownies in an airtight container at room temperature for up to 3-4 days. If your kitchen is very warm, or if your frosting contains cream cheese, it’s best to refrigerate them.
Recipe Note
Baking during the holidays is all about creating warmth, joy, and delicious memories. These Christmas Tree Brownies are designed to do just that – bring a smile to every face and a festive sparkle to your table. Don’t stress over perfection; the beauty is in the homemade touch! Enjoy the process, and savor every fudgy, festive bite of these wonderful Holiday Brownies. Happy Holidays, and happy baking!
Christmas Tree Brownies
Cook Time:
Total Time: 1 hour 45 minutes (includes cooling time)
Course: Dessert
Servings: 16
Calories: 300 calories per serving
Ingredients
- 1 box (18.3 oz) brownie mix, plus ingredients called for on box (eggs, oil, water)
- 1 cup unsalted butter, softened
- 4 cups powdered sugar
- 1/4 cup milk
- 1 teaspoon vanilla extract
- Green gel food coloring
- Pretzel sticks (about 16)
- Assorted sprinkles (star sprinkles, nonpareils, jimmies)
- Small candies (M&M’s Minis, mini chocolate chips, red hots)
Instructions
1.Preheat oven to 350°F (175°C). Grease and flour a 9×13 inch baking pan.
2. Prepare brownie batter according to package directions. Pour into the prepared baking pan.
3. Bake for 25-30 minutes, or until a toothpick inserted into the center comes out with moist crumbs. Do not overbake.
4. Let the brownies cool completely in the pan on a wire rack, about 1 hour. This is crucial for clean cuts.
5. Once cooled, carefully remove the brownies from the pan. Cut the brownies into 4 even strips lengthwise. Then, cut each strip into triangles to resemble Christmas trees (you will get 4 triangles from each strip, with some ends for snacking).
6. To make the frosting: In a large bowl, beat softened butter with an electric mixer until creamy. Gradually add powdered sugar, milk, and vanilla extract, beating until smooth and fluffy. Add green gel food coloring a little at a time until desired shade of green is achieved.
7. Insert a pretzel stick into the bottom of each brownie triangle to create a tree trunk.
8. Using an offset spatula or knife, spread a generous layer of green frosting on top of each brownie tree.
9. Decorate immediately with assorted sprinkles and small candies to resemble Christmas ornaments and lights. Place a star sprinkle on top of each tree if desired.
10. Serve immediately or store in an airtight container at room temperature for up to 3 days.
Chef’s Notes: A festive and fun treat perfect for holiday gatherings, these brownies are easy to customize with your favorite candies and sprinkles. Great for making with kids!