Best Homemade Marshmallows – Light, Airy & Delicious
☁️ Homemade Marshmallows: Pillowy Clouds of Sweet Bliss
⭐️⭐️⭐️⭐️⭐️ (4.9 from 1,230 fans)
📸 700+ photo shares | ☀️ Updated [October 2025]
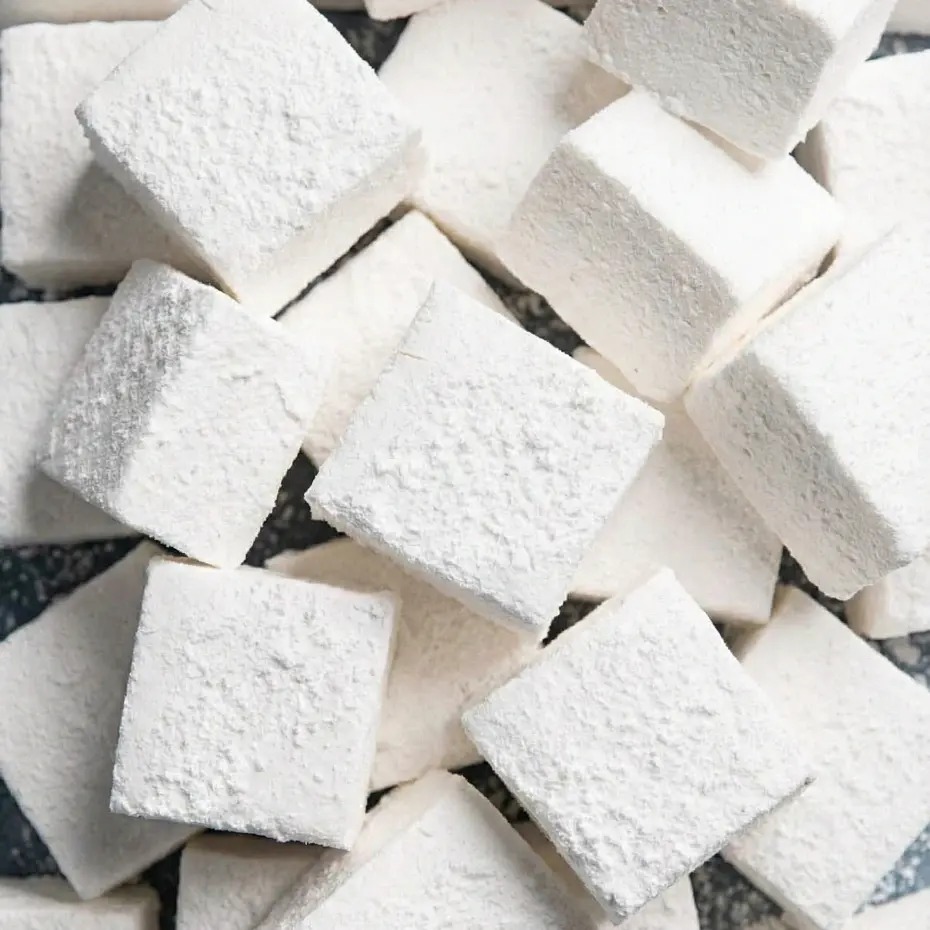
There’s something utterly magical about a homemade marshmallow. Forget those store-bought, stiff little cubes! We’re talking about airy, impossibly soft, melt-in-your-mouth clouds of pure vanilla-scented joy. Imagine sinking your teeth into a plump, tender square, gently yielding with every bite, leaving a delicate sweetness that lingers just perfectly. These aren’t just a treat; they’re an experience – perfect for elevating your hot cocoa on a chilly evening, sharing around a crackling bonfire, or simply indulging in a moment of sweet serenity. Once you taste the difference, you’ll never look back!
Recipe Card will be inserted here
Quick Glance
- ⏱️ Prep Time: 30 minutes (plus 4 hours setting)
- 🍽️ Servings: 36 (1-inch cubes)
- 💥 Vibe: Fluffy, Sweet, Dreamy
Jump Ahead
- What You’ll Need
- How to Make Homemade Marshmallows
- Fun Twists & Serving Ideas
- Reviews
- FAQ
- Conclusion
- Recipe Note
What You’ll Need
Creating these delightful morsels requires just a few simple ingredients and a little love. Gather these essentials, and you’ll be well on your way to marshmallow mastery.
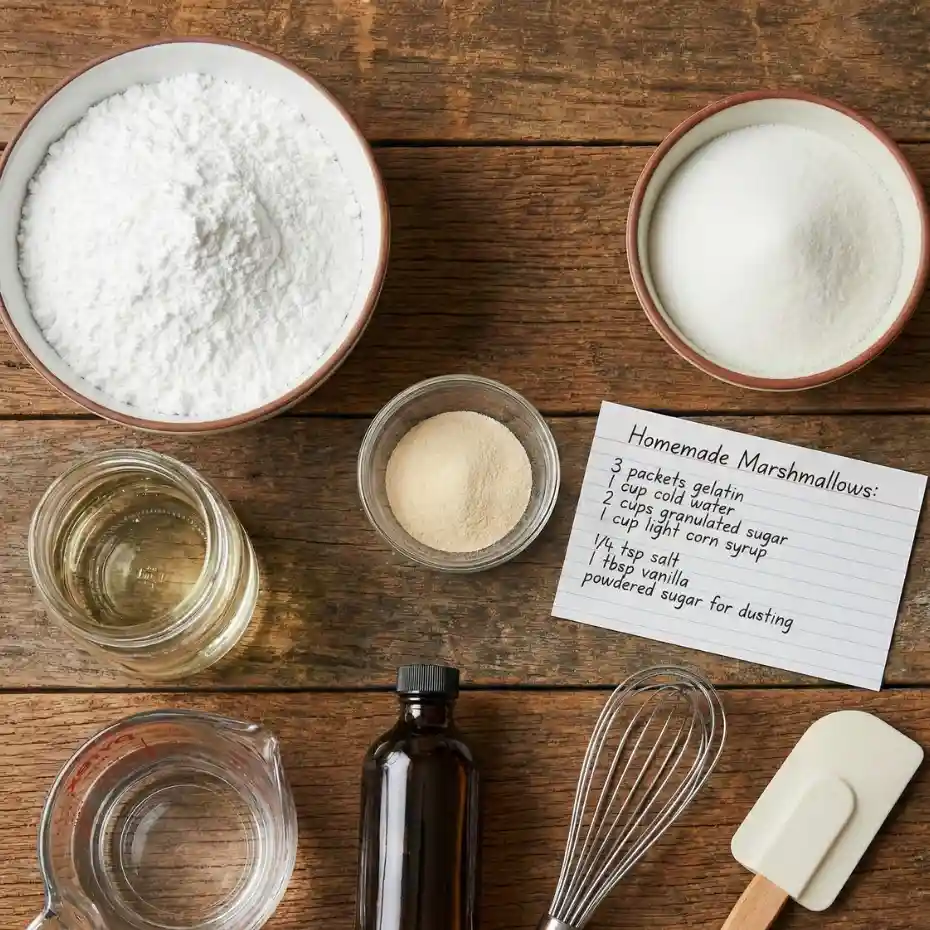
- 3 packages (0.25 oz each) unflavored gelatin
- ½ cup cold water (for gelatin)
- 1 ½ cups granulated sugar
- ¾ cup light corn syrup
- ½ cup water (for syrup)
- ¼ teaspoon salt
- 1 tablespoon pure vanilla extract
- ½ cup powdered sugar, for dusting
- ½ cup cornstarch, for dusting
- Non-stick cooking spray
How to Make Homemade Marshmallows
Get ready to transform simple ingredients into something truly extraordinary. Follow these steps carefully, and you’ll be rewarded with the best marshmallows you’ve ever tasted!
- Prepare Your Pan: Lightly grease a 9×13 inch baking pan with non-stick spray. In a small bowl, whisk together the powdered sugar and cornstarch. Heavily dust the prepared pan with about half of this mixture, making sure to coat the bottom and sides thoroughly. Tap out any excess.
- Bloom the Gelatin: In the bowl of a stand mixer fitted with the whisk attachment, pour the ½ cup cold water. Sprinkle the unflavored gelatin evenly over the water. Let it sit for 5-10 minutes to bloom and soften while you prepare the syrup.
- Make the Syrup: In a medium saucepan, combine the granulated sugar, light corn syrup, ½ cup water, and salt. Cook over medium-high heat, stirring occasionally, until the sugar dissolves. Once dissolved, stop stirring. Bring the mixture to a rolling boil and cook until it reaches 240°F (115°C) on a candy thermometer (soft-ball stage).
- Combine and Whip: Carefully remove the hot syrup from the heat. With the mixer on low speed, slowly and steadily pour the hot syrup down the side of the mixer bowl into the bloomed gelatin. Once all the syrup is added, increase the mixer speed to high.
- Whip Until Fluffy: Beat the mixture on high speed for about 10-15 minutes, or until it becomes very thick, glossy, and has nearly tripled in volume. It should resemble a fluffy, stiff meringue.
- Add Vanilla: Reduce the speed to low and pour in the vanilla extract. Mix just until combined, about 30 seconds.
- Set the Marshmallows: Immediately pour the warm marshmallow mixture into your prepared pan. Use an offset spatula or lightly greased hands to gently spread it evenly.
- Dust and Set: Dust the top of the marshmallow mixture generously with the remaining powdered sugar and cornstarch mixture. Let it sit uncovered at room temperature for at least 4 hours, or preferably overnight, until firm to the touch.
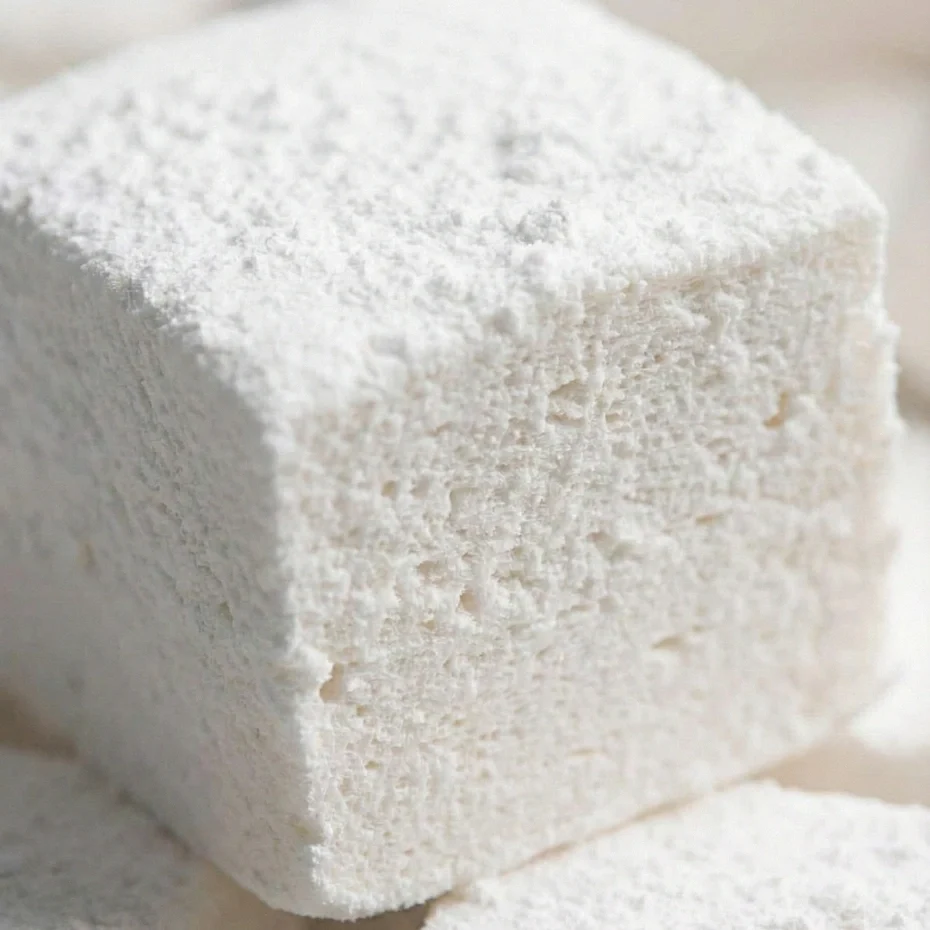
- Cut and Serve: Once set, lightly dust a large cutting board with more powdered sugar/cornstarch mixture. Invert the marshmallow slab onto the board. Using a lightly greased pizza cutter or sharp knife, cut the marshmallow into desired squares or shapes. Toss the cut sides of each marshmallow in any remaining dusting mixture to prevent sticking. Enjoy!
Fun Twists & Serving Ideas
Once you’ve mastered the basic marshmallow, the sky’s the limit for creative deliciousness!
- Chocolate Swirl: Before pouring into the pan, gently fold in a few tablespoons of melted dark chocolate for a stunning marbled effect.
- Peppermint Bliss: Add ½ teaspoon peppermint extract instead of vanilla, and sprinkle crushed candy canes over the top before setting for a festive treat.
- Coffee Infusion: Substitute 2 tablespoons of the water in the syrup with strong brewed coffee for a sophisticated, mocha-flavored marshmallow.
- Citrus Zest: Grate in the zest of an orange or lemon along with the vanilla for a bright, refreshing flavor.
- Toasted Coconut: Sprinkle toasted coconut flakes over the top before setting, or press them into the sides of freshly cut marshmallows.
- Serving Ideas: Beyond hot chocolate, try them in s’mores, floating on a bowl of warm pudding, or even as a delightful edible gift!
Reviews
These marshmallows are a true fan favorite!
Emma R. ⭐️⭐️⭐️⭐️⭐️
“I can’t believe how easy these were to make! The texture is absolutely divine, so much better than anything from the store. My kids devoured them in hot cocoa. A total game-changer!”
David S. ⭐️⭐️⭐️⭐️⭐️
“I was intimidated at first, but the instructions were so clear. The result was incredibly light and fluffy marshmallows. I made a batch with espresso for my coffee and it was heavenly. Will definitely be making these again!”
Chloe P. ⭐️⭐️⭐️⭐️
“So much fun to make! They came out perfect, though a little sticky when cutting. Next time I’ll use more dusting powder. The taste is pure joy. Highly recommend!”
FAQ
Got questions? We’ve got answers to help you on your marshmallow journey!
Q: My marshmallows are too sticky, what went wrong?
A: Stickiness is often due to not enough dusting powder, or not allowing them to set long enough. Be generous with your powdered sugar and cornstarch mixture, and ensure they set for at least 4 hours, or ideally overnight.
Q: Can I use honey or maple syrup instead of corn syrup?
A: While corn syrup helps prevent crystallization and gives the marshmallows their classic texture, you can experiment with honey or maple syrup. Be aware that the flavor and texture might be slightly different. For best results, stick to light corn syrup.
Q: How long do homemade marshmallows last?
A: When stored in an airtight container at room temperature, homemade marshmallows can last for up to 2 weeks. Make sure they are well-dusted to prevent sticking together.
Q: Do I really need a candy thermometer?
A: Yes, a candy thermometer is highly recommended for this recipe. Achieving the correct syrup temperature (240°F/115°C) is crucial for the perfect marshmallow texture. Without it, you risk a too-soft or too-firm result.
Conclusion
There’s truly nothing quite like the satisfaction of creating something so utterly delightful from scratch, especially when it brings such simple, pure joy. These homemade marshmallows are more than just a sweet treat; they’re a little hug in every bite, a testament to the magic that happens in your own kitchen. Don’t be shy – dive in and experience the warmth, the sweetness, and the pure, unadulterated pleasure of crafting these heavenly pillows. Your taste buds (and your loved ones!) will thank you for it.
Recipe Note
For the cleanest cuts, lightly grease your knife or pizza cutter with a neutral oil (like vegetable oil) and wipe it clean between cuts. This will prevent the marshmallow from sticking and tearing, giving you beautifully neat squares every time.
Homemade Marshmallows
Cook Time: N/A (Chill time: 4 hours)
Total Time: 4 hours 40 minutes
Course: Dessert, Candy
Servings: 30
Calories: 75
Ingredients
- 3 packets (1/4 oz each) unflavored gelatin (such as Knox)
- 1 cup cold water, divided
- 2 cups granulated sugar
- 2/3 cup light corn syrup
- 1 teaspoon vanilla extract
- 1/2 cup powdered sugar, plus more for dusting
- 1/4 cup cornstarch, plus more for dusting
- Non-stick cooking spray
Instructions
1️⃣ Prepare Pan
Line a 9×13-inch pan with parchment paper and dust generously with powdered sugar.
2️⃣ Bloom the Gelatin
Add ½ cup cold water to the bowl of a mixer. Sprinkle gelatin on top and let sit to bloom.
3️⃣ Make Sugar Syrup
In a saucepan, combine:
-
1 ½ cups sugar
-
1 cup corn syrup
-
½ cup water
-
¼ tsp salt
Heat on medium-high until it reaches 240°F (soft-ball stage).
4️⃣ Whip It
Carefully pour the hot syrup into the mixer bowl with gelatin.
Beat on high speed for 10–12 minutes until thick, white, and fluffy.
5️⃣ Add Flavor
Beat in vanilla extract.
6️⃣ Spread in Pan
Transfer marshmallow mixture to prepared pan. Smooth the top with a greased spatula.
7️⃣ Set
Let rest 4 hours or overnight at room temperature.
8️⃣ Cut & Coat
Dust the top with powdered sugar.
Turn out onto a cutting board and cut into squares. Toss each marshmallow in powdered sugar to prevent sticking.
Chef’s Notes: Achieving the correct syrup temperature is crucial for the texture of the marshmallows. A stand mixer is highly recommended for whipping, as the mixture gets very thick and heavy. Don’t skimp on the powdered sugar and cornstarch dusting to prevent sticking!