Homemade Garlic Herb Sourdough Bread – Bakery-Style Loaf
🥖 Garlic Herb Sourdough Bread: A Crusty, Aromatic Hug for Your Soul

⭐️⭐️⭐️⭐️⭐️ (4.9 from 1,900 fans)
📸 700+ photo shares | ☀️ Updated October 2025
Oh, the aroma! There’s truly nothing quite like the comforting scent of freshly baked bread filling your home, and when that bread is a gorgeous loaf of Garlic Herb Sourdough, it’s an experience that transcends mere baking. Imagine a golden-brown crust, perfectly chewy interior, and every bite bursting with the warm, earthy notes of roasted garlic and fragrant herbs. This isn’t just bread; it’s a sensory journey, a testament to slow living, and an absolute showstopper on any table. Perfect for cozy Sunday dinners, an elegant addition to a charcuterie board, or simply sliced thick and dipped into your favorite olive oil. Get ready to fall in love with the magic of homemade sourdough, elevated!
Recipe Card will be inserted here
Quick Glance
⏱️ Prep Time: 30 minutes (active), plus proofing
🍽️ Servings: 1 large loaf
💥 Vibe: Aromatic, Crusty, Comforting
Jump Ahead
- What You’ll Need
- How to Make Garlic Herb Sourdough Bread
- Fun Twists & Serving Ideas
- Reviews
- FAQ
- Conclusion
- Recipe Note
What You’ll Need
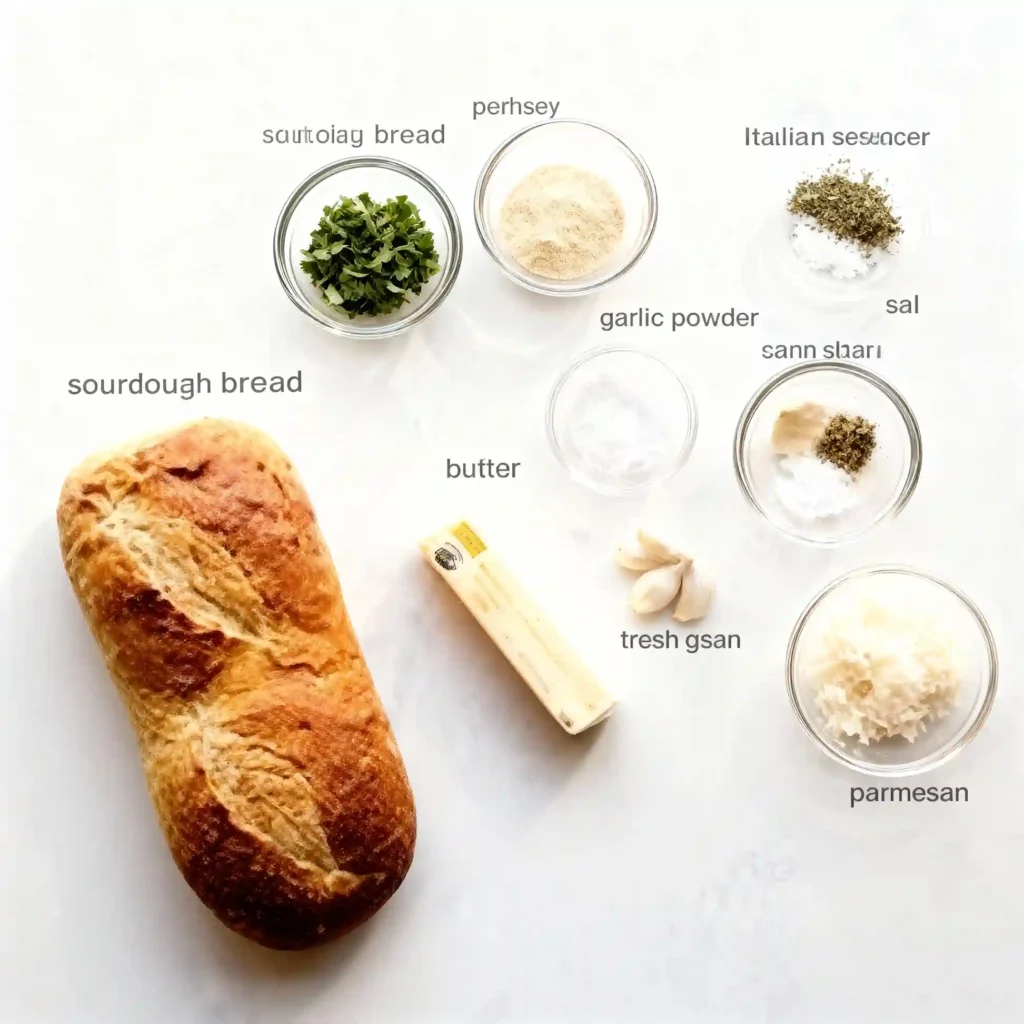
Gathering your ingredients is the first step to culinary joy! For this beautiful loaf, we’ll be using simple, wholesome ingredients, elevated by the star power of fresh garlic and aromatic herbs. Be sure your sourdough starter is bubbly and active – that’s our secret to incredible flavor and texture!
- 100g active sourdough starter (fed 4-12 hours prior)
- 350g warm water (around 95-100°F / 35-38°C)
- 500g bread flour (or unbleached all-purpose flour)
- 10g fine sea salt
- 4-6 cloves fresh garlic, minced
- 2 tablespoons fresh mixed herbs, finely chopped (rosemary, thyme, oregano work wonderfully)
- 1 tablespoon olive oil (for brushing)
- Extra flour for dusting
How to Make Garlic Herb Sourdough Bread
Let’s get our hands a little floury and bring this incredible bread to life! This process celebrates the art of sourdough, so embrace the journey and enjoy watching your loaf transform.
- Mix & Autolyse: In a large bowl, combine the active sourdough starter and warm water. Stir until the starter is mostly dissolved. Add the flour and mix with a spoon or your hands until no dry spots remain. It will be a shaggy dough. Cover the bowl with a damp towel or plastic wrap and let it rest for 30-60 minutes. This is called autolyse and helps develop gluten.
- Add Salt, Garlic & Herbs: After the autolyse, sprinkle the salt, minced garlic, and chopped fresh herbs over the dough. Using wet hands, gently incorporate them by folding the dough over itself for a few minutes until evenly distributed.
- Bulk Fermentation (Stretch & Folds): Cover the bowl again. Over the next 3-4 hours (at room temperature, around 72-78°F / 22-25°C), perform a series of “stretch and folds” every 30-45 minutes. To do this, grab a portion of the dough, gently stretch it upwards, and fold it back over itself. Rotate the bowl and repeat 3-4 times for each set. This builds strength in the dough.
- Pre-Shape: After bulk fermentation, gently scrape the dough onto a lightly floured surface. Gently shape it into a loose ball, using a bench scraper to create tension on the surface. Let it rest, uncovered, for 20-30 minutes.
- Final Shape: Lightly flour your work surface again. Gently flatten the dough and perform your final shaping. You can do a letter fold or a simple boule shape, creating plenty of surface tension.
- Cold Proof: Carefully transfer the shaped dough into a floured banneton or a bowl lined with a floured kitchen towel, seam-side up. Cover with plastic wrap and refrigerate for 12-18 hours. This slow cold proof develops deeper flavor and makes the dough easier to handle.
- Preheat & Bake: About 45 minutes before baking, place your Dutch oven (with the lid on) into your oven and preheat to 475°F (245°C).
- Score & Bake Covered: Carefully remove the hot Dutch oven from the oven. Gently invert your cold dough into the Dutch oven. Brush the top with a little olive oil. Using a sharp lame or razor blade, score the top of your loaf. Cover with the lid and bake for 20 minutes.
- Bake Uncovered: Remove the lid from the Dutch oven and continue to bake for another 25-35 minutes, or until the crust is a deep golden brown and sounds hollow when tapped on the bottom.
- Cool: Carefully remove the loaf from the Dutch oven and transfer it to a wire rack to cool completely for at least 1-2 hours before slicing. This is crucial for the crumb to set!
Fun Twists & Serving Ideas
This Garlic Herb Sourdough is already a star, but why not play around with it and make it even more magnificent?
- Cheesy Garlic Herb Sourdough: During step 2, fold in 1/2 cup of grated Parmesan or shredded mozzarella along with the garlic and herbs for an extra layer of savory goodness.
- Spicy Kick: Want to add a little zing? Incorporate 1/2 teaspoon of red pepper flakes with your garlic and herbs for a subtle, delightful heat.
- Everything Bagel Twist: Just before baking (step 8), sprinkle a generous amount of everything bagel seasoning on top of the loaf for a unique textural and flavorful crunch.
- Serving Perfection: This bread is truly versatile! Serve it alongside a hearty lentil soup, mop up the last bit of sauce from a rich pasta dish, or slice it thin for incredible bruschetta with fresh tomatoes and basil.
- Crouton Heaven: Got leftovers (if that’s even possible)? Cube the stale bread, toss with olive oil, salt, pepper, and a pinch more herbs, then toast in the oven until crispy for the best homemade croutons!
Reviews
“Absolutely Divine!” – Sarah L. ⭐⭐⭐⭐⭐
“I’ve made a lot of sourdough, but adding the fresh garlic and herbs took it to a whole new level! My kitchen smelled incredible, and the bread was perfect with our Sunday roast. My family devoured it!”
“My New Go-To Sourdough!” – Mark T. ⭐⭐⭐⭐⭐
“I was a bit intimidated by adding ingredients to my sourdough, but this recipe made it so easy. The instructions were clear, and the result was a beautifully fragrant and crusty loaf. Highly recommend!”
“So Flavorful!” – Chloe P. ⭐⭐⭐⭐⭐
“The mix of rosemary and garlic in this bread is just heavenly. It felt like a special treat to bake and eat. It freezes well too, so I always have a slice ready for a quick snack.”
FAQ
Q: Can I use dried herbs instead of fresh?
A: Yes, you can! Use about 1 teaspoon of dried herbs for every tablespoon of fresh herbs recommended. Keep in mind the flavor will be more concentrated, so adjust to your preference.
Q: How do I store leftover Garlic Herb Sourdough Bread?
A: Store at room temperature in a paper bag or a breathable bread bag for 2-3 days. For longer storage, slice the cooled bread and freeze in an airtight bag for up to 2-3 months. Thaw or toast slices as needed.
Q: What if my sourdough starter isn’t very active?
A: An active starter is key! If your starter isn’t bubbly and doubling in size after being fed, give it another feeding or two until it’s vibrant. A sluggish starter will lead to a dense loaf.
Q: Can I make this without a Dutch oven?
A: While a Dutch oven provides the best results for sourdough’s crust and rise, you can bake it on a baking stone or heavy baking sheet. To create steam, place a pan of hot water on the bottom rack of your oven during the first part of baking.
Conclusion
Baking this Garlic Herb Sourdough Bread is more than just following a recipe; it’s an act of love, a delicious adventure, and a heartwarming experience for everyone who gets to enjoy a slice. The simple act of creating something so profoundly satisfying from scratch is truly one of life’s greatest pleasures. So, roll up your sleeves, embrace the beautiful process, and prepare to fill your home with the most incredible aromas. You’re not just baking bread; you’re creating memories, one delicious, crusty, garlicky, herby bite at a time. Happy baking!
Recipe Note
For the most vibrant flavor, always opt for fresh garlic and herbs. The difference in aroma and taste is truly remarkable and will make your sourdough sing!
Garlic Herb Sourdough Bread
Cook Time: N/A
Total Time: 24 hours (includes bulk fermentation and cold proof)
Course: Bread
Servings: 10-12 slices
Calories: 190-230 kcal per slice (estimate)
Ingredients
- 100g active sourdough starter (fed 4-8 hours prior)
- 350g warm water (approx. 90-95°F / 32-35°C)
- 500g strong bread flour
- 10g fine sea salt
- 4-5 cloves fresh garlic, minced
- 2-3 tablespoons fresh mixed herbs (e.g., rosemary, thyme, oregano, parsley), finely chopped
- 1 tablespoon olive oil (optional, for mixing with garlic/herbs)
Instructions
1.Autolyse (1 hour): In a large bowl, combine 350g warm water and 500g bread flour. Mix until no dry spots remain. Cover the bowl and let it rest for 1 hour at room temperature.
2. Add Starter & Salt: After autolyse, add 100g active sourdough starter and 10g sea salt to the dough. Mix thoroughly, kneading gently in the bowl for 5-10 minutes until the salt is fully incorporated and the dough starts to come together.
3. Incorporate Garlic & Herbs: In a small bowl, mix the minced garlic and chopped fresh herbs with 1 tablespoon of olive oil (optional, helps distribute). Flatten the dough slightly, spread the garlic-herb mixture over it, and gently fold it in multiple times until evenly distributed.
4. Bulk Fermentation (3-5 hours): Cover the bowl and let the dough rest at room temperature (72-78°F / 22-25°C). Perform a series of “stretch and folds” every 30-45 minutes for the first 2-3 hours. To do this, wet your hand, grab one side of the dough, stretch it up, and fold it over itself. Rotate the bowl and repeat 3-4 times. The dough should become noticeably stronger and more elastic. The total bulk fermentation time will depend on your room temperature and starter activity. Look for the dough to increase in volume by about 30-50%.
5. Preshape (30 minutes): Gently turn the dough out onto a lightly floured surface. Gently shape it into a round (boule) or oval (batard) by tucking the edges under to create surface tension. Let it rest, uncovered, for 20-30 minutes.
6. Final Shape: Lightly flour your work surface. Gently flatten the preshaped dough. For a boule, fold the top down, then the sides in, and finally roll the dough from the top down, sealing the seam. Create tension on the surface by dragging it towards you. For a batard, perform a similar series of folds to create an oval.
7. Cold Proof (12-18 hours): Place the shaped dough, seam-side up, into a floured banneton or a bowl lined with a floured tea towel. Cover with a plastic bag or shower cap and refrigerate for 12-18 hours. This slows fermentation, develops flavor, and makes the dough easier to score.
8. Bake (45 minutes): Preheat your oven to 450°F (232°C) with a Dutch oven inside for at least 30 minutes. Carefully remove the hot Dutch oven. Gently invert the cold dough from the banneton into the hot Dutch oven. Score the top of the dough with a sharp razor blade or knife (e.g., a single slash or a pattern).
9. Covered Bake: Cover the Dutch oven and bake for 30 minutes.
10. Uncovered Bake: Remove the lid and bake for another 15-20 minutes, or until the crust is deeply golden brown and the internal temperature reaches 200-210°F (93-99°C). 11. Cool: Carefully remove the bread from the Dutch oven and transfer it to a wire rack to cool completely for at least 1-2 hours before slicing. Slicing too early can result in a gummy texture.
Chef’s Notes: For best results, use a well-fed, active sourdough starter. The cold proofing step develops deep flavor, improves crust, and makes the dough easier to handle. Adjust the amount of garlic and herbs to your preference.