Butterfinger Poke Cake: 1 Butterfinger Poke Cake!
Butterfinger Poke Cake: A Crispy, Creamy Dream!
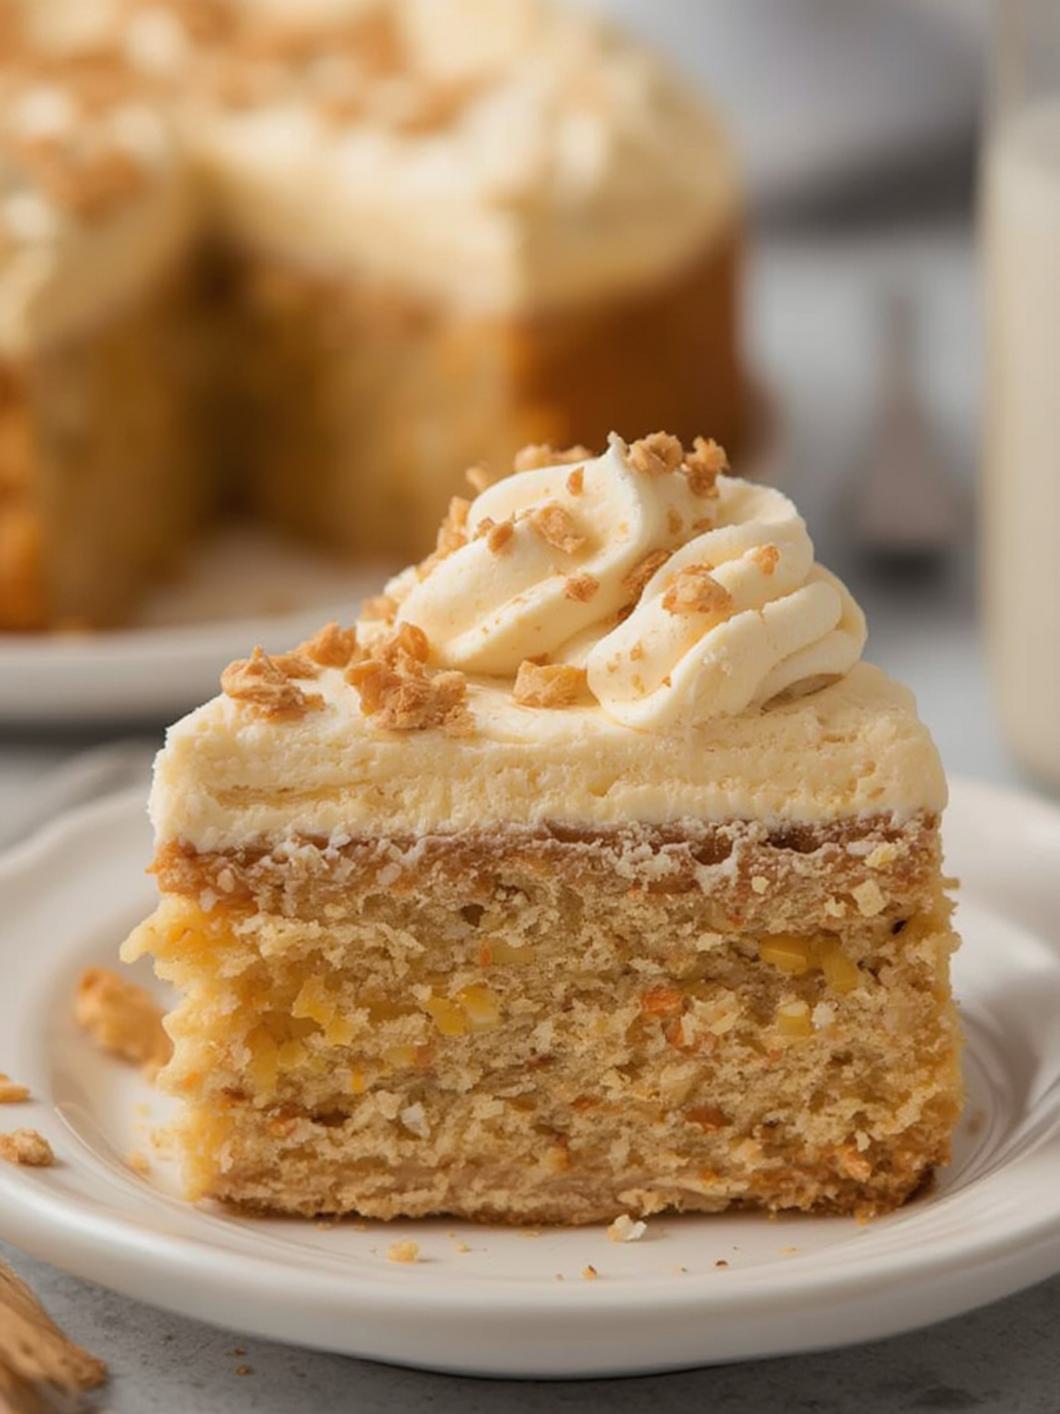
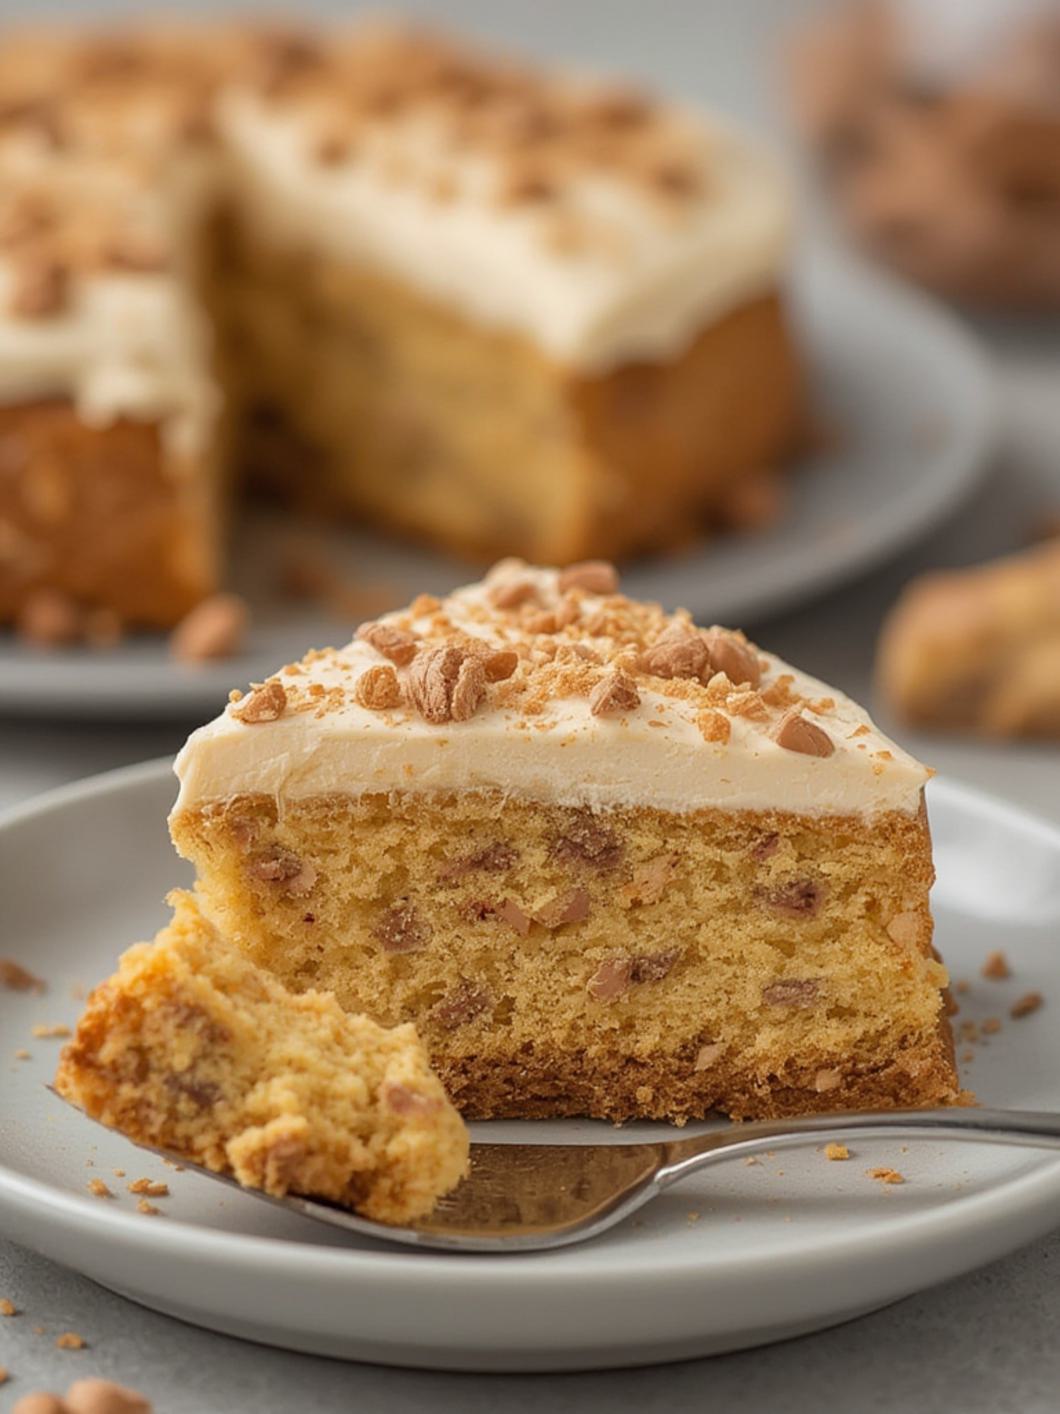
Oh, my sweet tooth friends, prepare yourselves for a dessert that’s pure magic in every single bite! Today, we’re diving headfirst into the glorious world of the Butterfinger Poke Cake – a confection so outrageously delicious, it’ll have you doing a happy dance in your kitchen. Imagine a moist, tender cake infused with a sweet, creamy filling, all crowned with billows of fluffy whipped topping and an avalanche of your favorite crispy, peanut-buttery Butterfinger candy. It’s truly a celebration in cake form, and remarkably simple to make!
⭐️⭐️⭐️⭐️⭐️ (4.8 from 2,500 fans)
📸 1100+ photo shares | ☀️ Updated [December 2025]
Introduction: The Ultimate Candy Bar Dessert
There’s something incredibly nostalgic and comforting about a poke cake. It feels homemade, yet always impresses. But when you marry that simple, satisfying concept with the unmistakable crunch and flavor of a Butterfinger candy bar? You get pure dessert alchemy. This Butterfinger Poke Cake isn’t just a cake; it’s an experience. It’s the perfect treat for potlucks, birthday parties, or simply when you need a little (or a lot!) of joy in your life. The combination of moist cake, creamy sweetness, and that iconic Butterfinger crunch makes it utterly irresistible.
Why You’ll Love This Recipe
Seriously Easy: Uses a boxed cake mix as its base, simplifying the process immensely.
Crowd-Pleaser: Who doesn’t love Butterfinger? This cake is a guaranteed hit at any gathering.
Make-Ahead Friendly: It actually gets better as it chills, making it perfect for preparing in advance.
Texture Heaven: Combines soft cake, creamy filling, and crispy candy for an explosion of textures.
Pure Indulgence: Rich, sweet, and utterly satisfying without being overly complicated.
What You’ll Need
Ingredients List
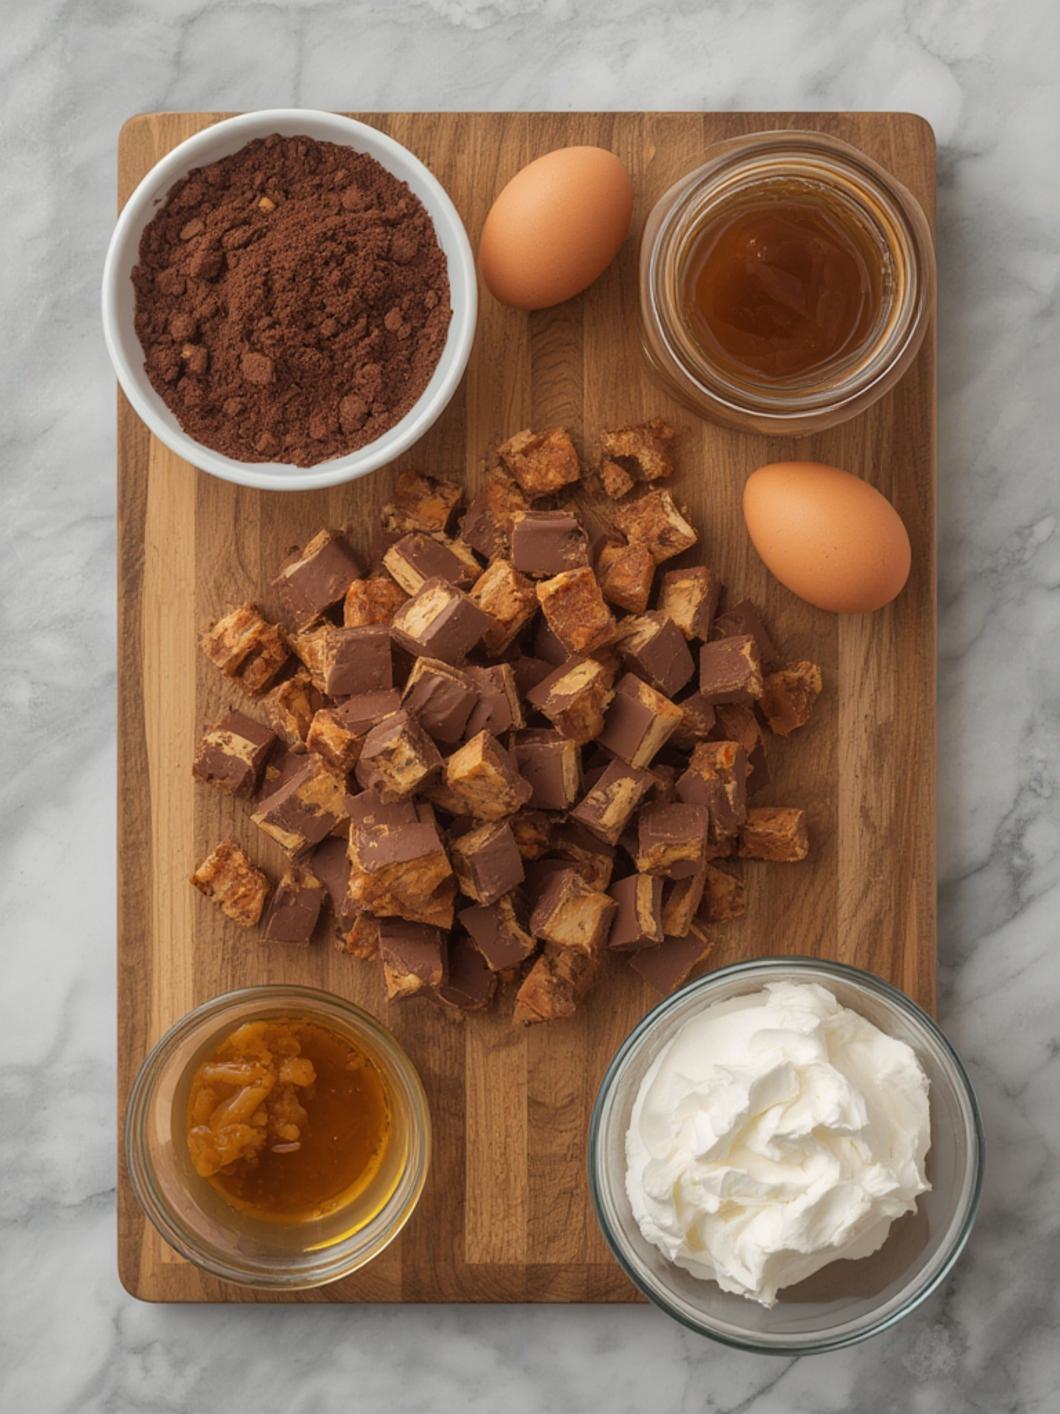
1 box (15.25 oz) yellow or chocolate cake mix (plus ingredients listed on box: eggs, oil, water)
1 (14 oz) can sweetened condensed milk
1 (12 oz) container frozen whipped topping, thawed (like Cool Whip)
6-8 regular size Butterfinger candy bars (about 8 oz total), crushed
Optional: Caramel sauce for drizzling
Equipment
9×13 inch baking pan
Mixing bowls
Electric mixer (optional, but helpful for cake batter)
Wooden spoon or skewer (for poking holes)
How to Make Butterfinger Poke Cake
Step-by-Step Instructions
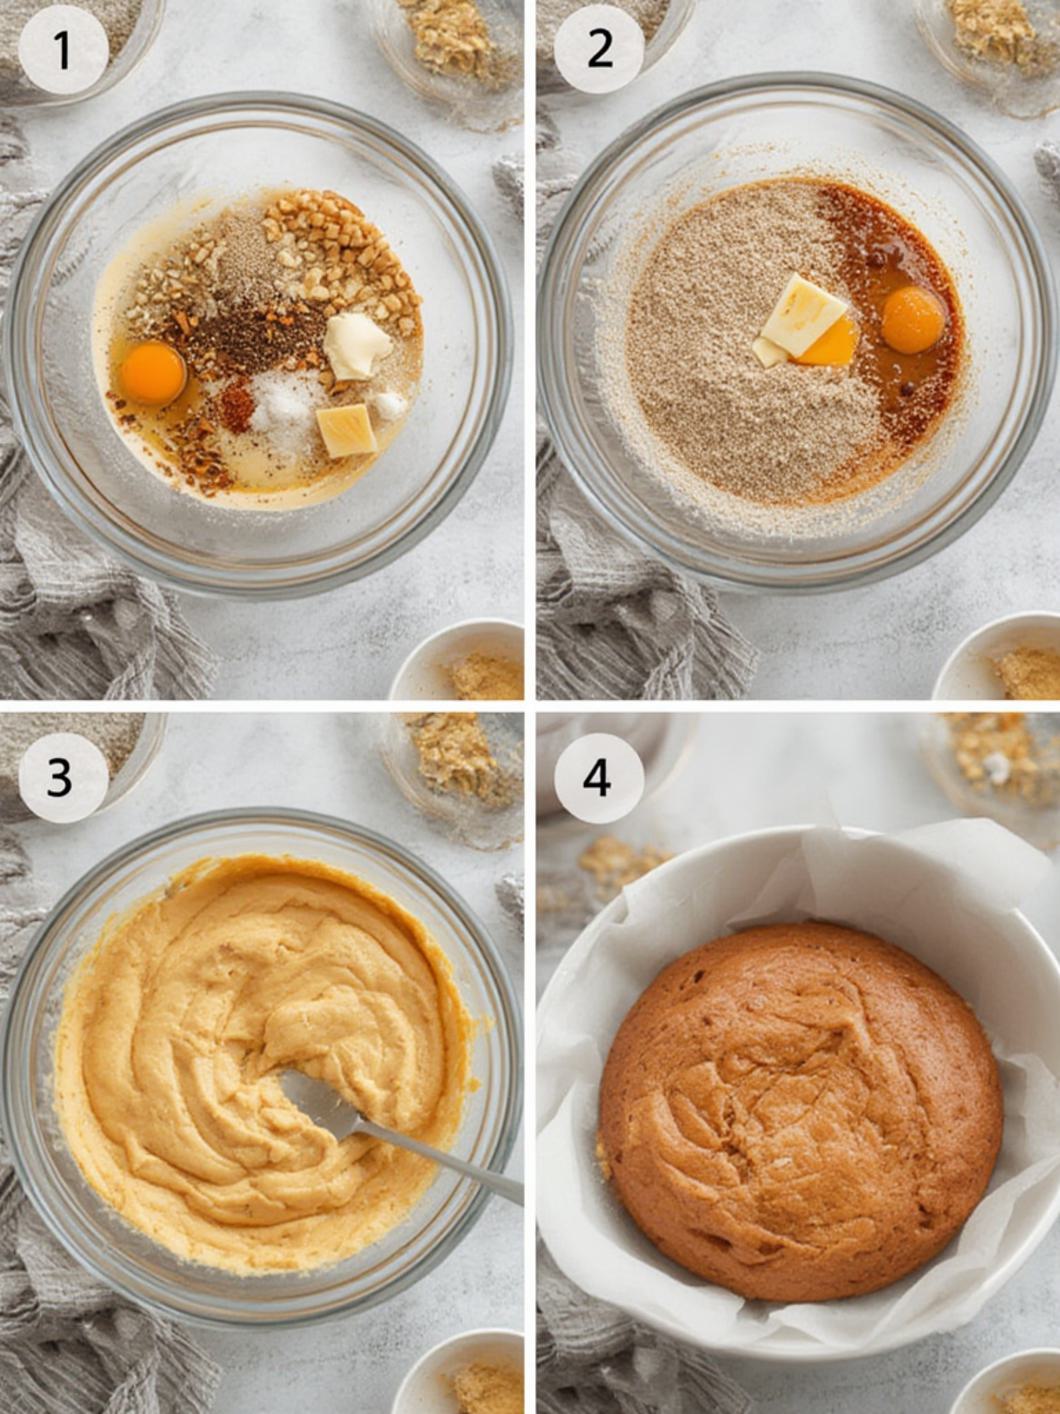
1. Prepare the Cake: Preheat your oven to the temperature specified on the cake mix box. Grease and flour a 9×13 inch baking pan. Prepare the cake batter according to the package directions, then pour it into the prepared pan.
2. Bake and Poke: Bake the cake as directed on the box, until a toothpick inserted into the center comes out clean. Remove the cake from the oven and let it cool for about 5-10 minutes. While still warm, use the handle of a wooden spoon or a skewer to poke holes evenly all over the top of the cake, about 1 inch apart. Don’t go all the way to the bottom.
3. Sweetened Milk Soak: Evenly pour the can of sweetened condensed milk over the warm, poked cake, allowing it to seep into all the holes.
4. Chill Time: Place the cake in the refrigerator for at least 1-2 hours (or longer), allowing it to cool completely and for the condensed milk to fully absorb and set. This is crucial for that creamy texture!
5. Crush the Butterfingers: While the cake chills, unwrap your Butterfinger candy bars. Place them in a large zip-top bag and use a rolling pin or the flat side of a meat tenderizer to crush them into small pieces. You want a mix of fine crumbs and slightly larger chunks for texture.
6. Assemble & Decorate: Once the cake is completely chilled, spread the thawed whipped topping evenly over the top of the cake. Generously sprinkle the crushed Butterfinger pieces all over the whipped topping. If desired, drizzle with caramel sauce for an extra touch of decadence.
7. Final Chill & Serve: Return the Butterfinger Poke Cake to the refrigerator for at least 30 minutes to set the toppings, then slice and serve!
Fun Twists & Serving Ideas
Variations
Chocolate Lover’s Dream: Use a devil’s food cake mix and chocolate sweetened condensed milk (if you can find it, or simply use regular). Add some chocolate syrup drizzle on top!
Peanut Butter Explosion: Swirl in some melted peanut butter with your whipped topping, or sprinkle peanut butter chips along with the Butterfingers.
Coffee Infusion: Add a teaspoon of instant espresso powder to your cake batter for a subtle coffee note that complements chocolate and peanut butter beautifully.
Different Candy Bar: Not a Butterfinger fan? Try crushed Heath bars, Snickers, or even Reese’s Peanut Butter Cups!
Serving Suggestions
This cake is a showstopper on its own, but you can elevate it even further!
Ice Cream Dream: Serve a slice warm with a scoop of vanilla bean or chocolate ice cream.
Coffee Companion: Enjoy with a hot cup of coffee or a cold glass of milk for the ultimate comfort food experience.
Dessert Bar: Cut into smaller squares and feature on a dessert bar with other treats for a party.
Tips for Success
Don’t Overbake: An overbaked cake will be dry, which means it won’t absorb the condensed milk as well. Follow package directions closely.
Poke While Warm: Poking the holes while the cake is still warm (but not piping hot) allows the condensed milk to seep in more effectively.
Chill Time is Key: Do not rush the chilling step after pouring the condensed milk. This allows the cake to fully absorb the liquid and develop its signature moist, creamy texture.
Crush Evenly: For the best presentation and eating experience, aim for a mix of fine crumbs and small chunks of Butterfinger.
Storage & Make-Ahead
This cake stores beautifully! Keep any leftovers covered tightly with plastic wrap or in an airtight container in the refrigerator for up to 3-4 days. It’s actually one of those desserts that tastes even better the next day as the flavors meld and the cake becomes even more moist.
Reader Reviews
Sarah M. ⭐️⭐️⭐️⭐️⭐️
“This Butterfinger Poke Cake is dangerously good! I made it for a family gathering and there wasn’t a single crumb left. The Butterfinger crunch combined with the creamy cake is just divine. Super easy recipe, thank you!”
David P. ⭐️⭐️⭐️⭐️⭐️
“As a huge Butterfinger fan, I knew I had to try this, and it did not disappoint! The cake was so moist and the topping was perfect. My kids absolutely devoured it. This is going into my permanent recipe rotation!”
Jessica L. ⭐️⭐️⭐️⭐️⭐️
“I’ve made a few poke cakes before, but this one is by far my favorite. The balance of sweet and salty from the Butterfinger is just right. And it looks so impressive for how little effort it actually takes. Highly recommend!”
Frequently Asked Questions
Q: Can I use homemade whipped cream instead of frozen whipped topping?
A: Yes, you can! Just be aware that homemade whipped cream is less stable and may not hold up as long. If using, I recommend adding it closer to serving time.
Q: What kind of cake mix works best?
A: A yellow or chocolate cake mix is classic for this recipe. A French vanilla or even a spice cake mix could also be an interesting twist!
Q: Can I freeze Butterfinger Poke Cake?
A: Yes, you can! Wrap individual slices or the whole cake (if unfrosted, or very carefully if frosted) tightly in plastic wrap and then foil. It can be frozen for up to 1 month. Thaw in the refrigerator overnight before serving.
Q: How far in advance can I make this cake?
A: This cake is fantastic made a day in advance! The flavors meld and the cake becomes even more moist. Just add the crushed Butterfingers on top closer to serving if you want them to retain maximum crispness, though they’ll still be delicious even if they soften slightly.
There you have it, folks – a dessert that truly hits every sweet spot! This Butterfinger Poke Cake is more than just a recipe; it’s a reason to celebrate. The crispy, peanut-buttery goodness of the Butterfinger combined with the unbelievably moist and creamy cake base creates an experience you won’t soon forget. So grab your ingredients, get poking, and prepare to delight everyone who tries a slice! Happy baking!
Butterfinger Poke Cake
Cook Time: 35 minutes
Total Time: 55 minutes
Course: Dessert
Servings: 12-16
Calories: 550 calories per serving (estimated)
Ingredients
- 1 box (15.25 oz) yellow or chocolate cake mix (plus ingredients called for on box: eggs, oil, water)
- 1 can (14 oz) sweetened condensed milk
- 1/2 cup caramel ice cream topping
- 1 container (8 oz) frozen whipped topping, thawed (e.g., Cool Whip)
- 6-8 regular size Butterfinger candy bars (about 10.7 oz total), crushed
Instructions
-
Bake Cake
Preheat oven as directed on cake box. Prepare and bake cake according to package instructions in a 9×13-inch pan. Cool slightly. -
Poke Cake
Using the handle of a wooden spoon or a skewer, poke holes all over the cake. -
Make Filling
In a bowl, beat cream cheese until smooth. Fold in sweetened condensed milk and whipped topping until creamy. -
Add Filling
Pour filling over the cake, making sure it seeps into the holes. Spread evenly. -
Top Cake
Sprinkle crushed Butterfinger pieces over the top. Drizzle with chocolate syrup if desired. -
Chill
Refrigerate at least 2 hours before serving to allow filling to set.
Chef’s Notes: This indulgent poke cake is best served chilled. For an even richer dessert, drizzle with extra chocolate or caramel syrup just before serving. Ensure the cake is completely cooled and has absorbed the condensed milk mixture before adding the whipped topping.