Easy Red Velvet Cheesecake – Soft, Creamy & Layered
Red Velvet Cheesecake: The Ultimate Decadent Dessert Sensation
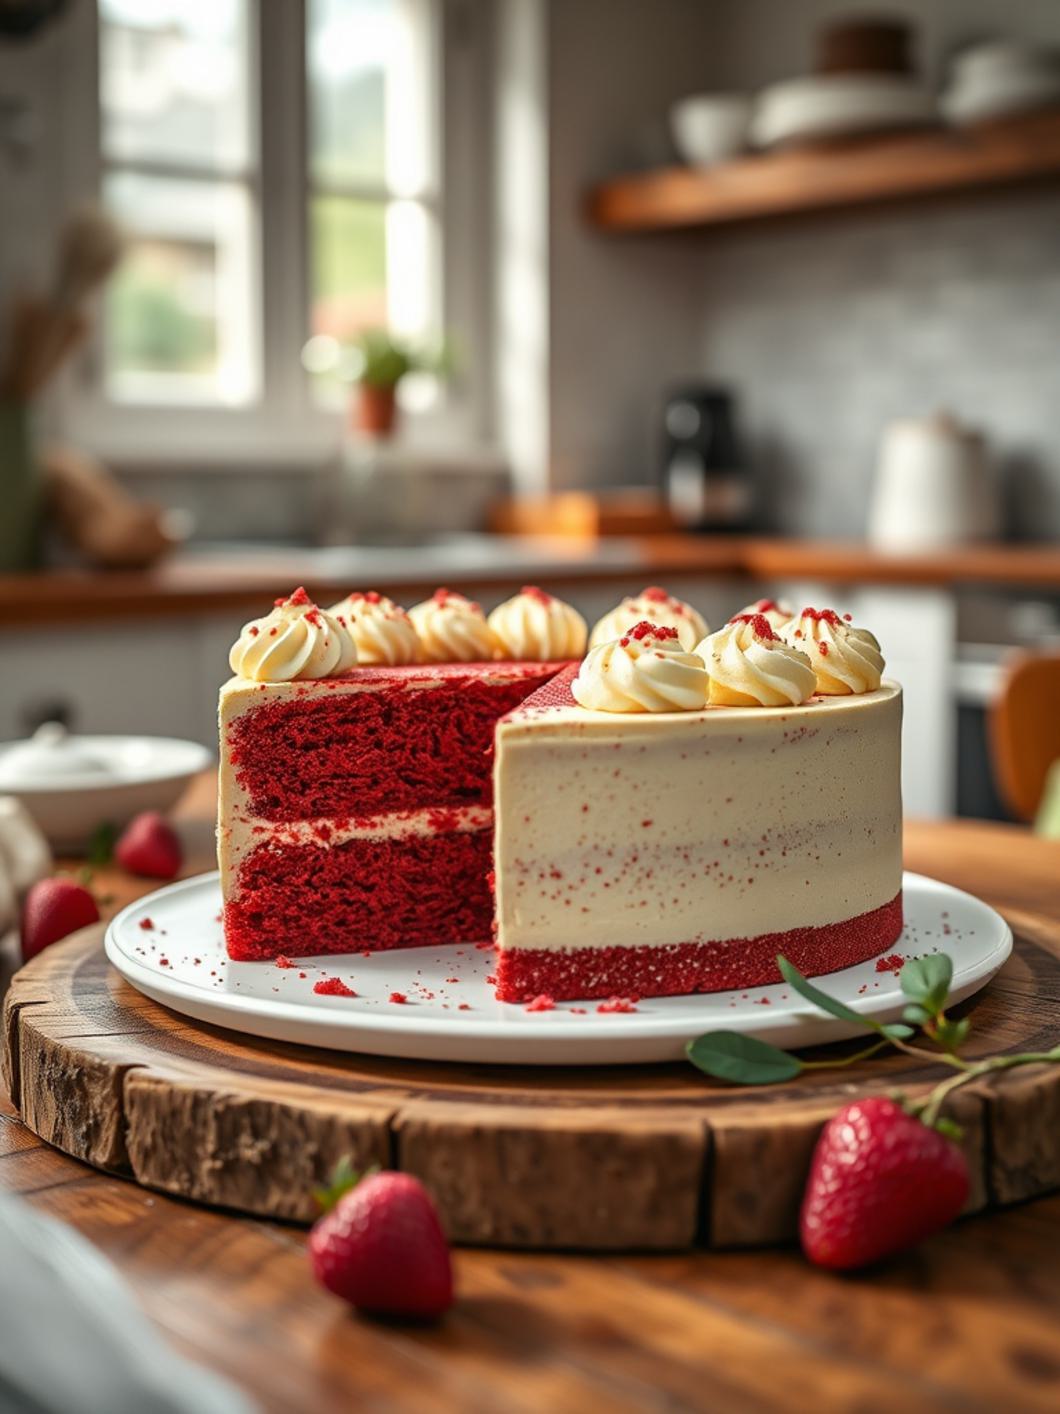
Prepare to be swept away by a dessert that’s not just a treat, but an experience! Our Red Velvet Cheesecake is the epitome of elegance and indulgence, a show-stopping creation that marries the rich, cocoa-infused allure of classic Red Velvet Cake with the creamy, dreamy texture of a perfect cheesecake. It’s the kind of dessert that makes hearts flutter and taste buds sing, ideal for celebrations, holidays, or simply transforming an ordinary day into something extraordinary.
Imagine a velvety smooth, vibrant red cheesecake layer, subtly tangy and deeply chocolatey, resting on a crisp, cocoa graham cracker crust. Then, picture it crowned with a cloud of luscious cream cheese frosting, making every slice a work of art. This isn’t just a recipe; it’s an invitation to create magic in your kitchen. Get ready to bake a dessert that will earn you rave reviews and requests for encores!
⭐️⭐️⭐️⭐️⭐️ (4.8 from 2,500 fans)
📸 1100+ photo shares | ☀️ Updated December 2025
Why You’ll Fall in Love with This Red Velvet Cheesecake
This isn’t just any cheesecake; it’s a celebration of flavor and texture. The deep, rich red color, thanks to a touch of cocoa and food coloring, creates a stunning visual that perfectly foreshadows the decadent taste. Each bite delivers a harmonious blend of creamy, tangy cheesecake with a subtle hint of chocolate, complemented by the slightly crunchy cocoa crust. It’s surprisingly easy to make, and the “wow” factor is off the charts, making it perfect for impressing guests or indulging your own sweet cravings. If you’re looking for a dessert that truly stands out, this Red Velvet Cheesecake is your answer.
What You’ll Need
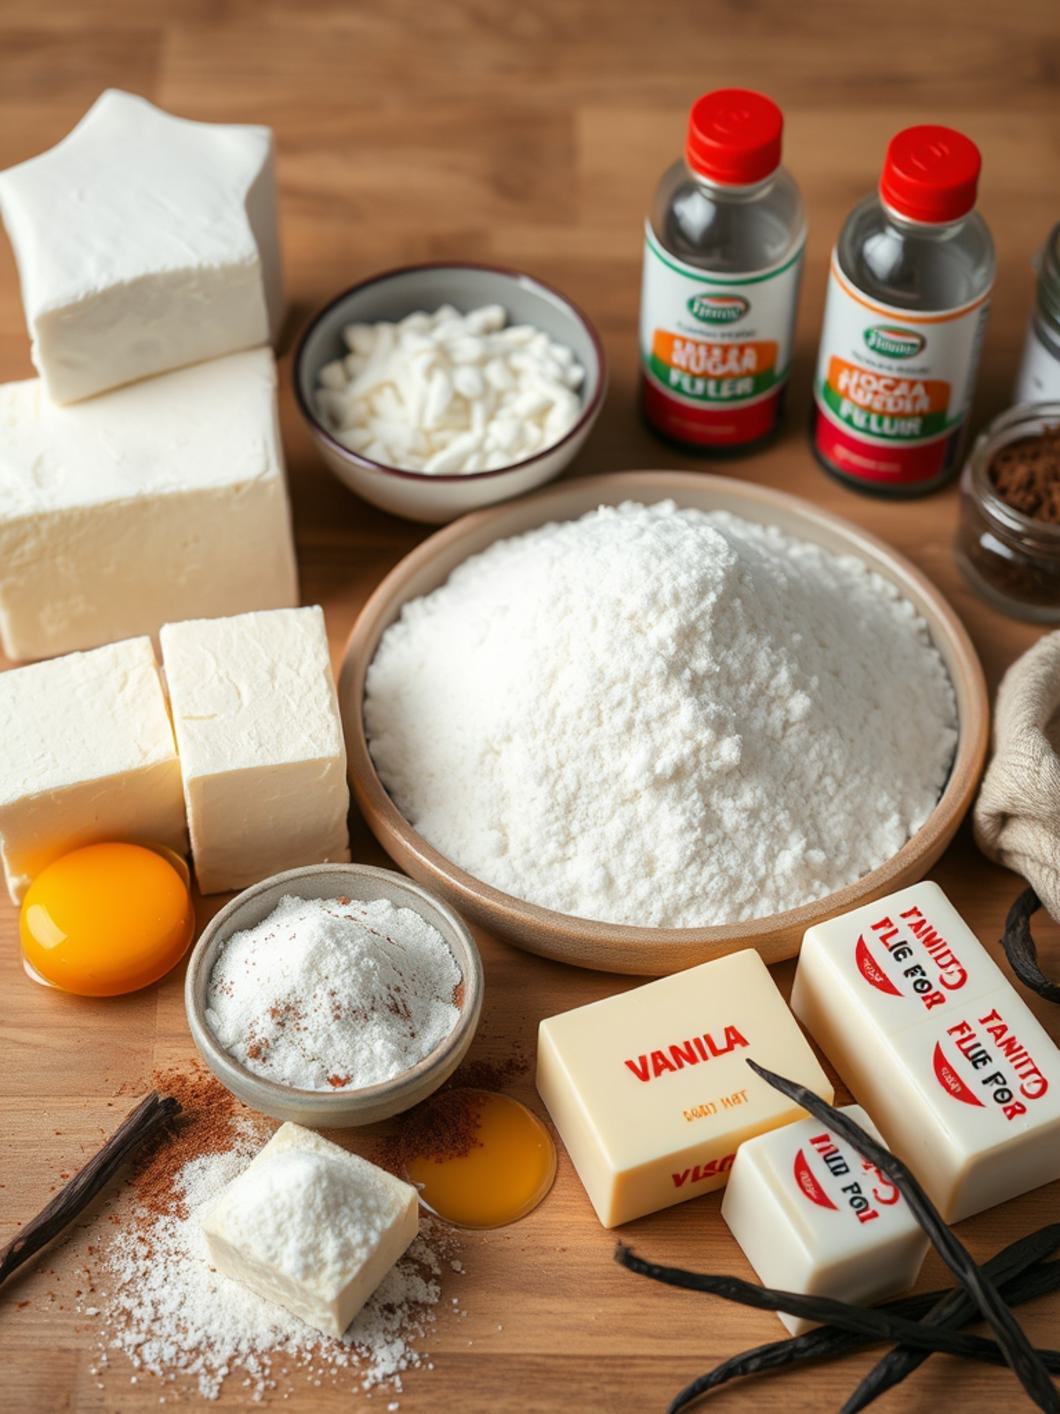
For the Cocoa Graham Cracker Crust:
- 1 ½ cups graham cracker crumbs (about 10-12 full graham crackers)
- ¼ cup unsweetened cocoa powder
- ¼ cup granulated sugar
- ½ cup (1 stick) unsalted butter, melted
For the Red Velvet Cheesecake Filling:
- 3 (8-ounce) packages cream cheese, softened
- 1 ½ cups granulated sugar
- 4 large eggs
- ¾ cup sour cream
- 2 tablespoons unsweetened cocoa powder
- 1 teaspoon vanilla extract
- 1 tablespoon white vinegar (the secret to classic red velvet tang!)
- 1 teaspoon red gel food coloring (or more, for desired vibrancy)
- ¼ teaspoon salt
For the Cream Cheese Frosting Topping:
- 1 (8-ounce) package cream cheese, softened
- ½ cup (1 stick) unsalted butter, softened
- 3-4 cups powdered sugar, sifted
- 1 teaspoon vanilla extract
- 2-3 tablespoons milk or cream (as needed for consistency)
How to Make Red Velvet Cheesecake
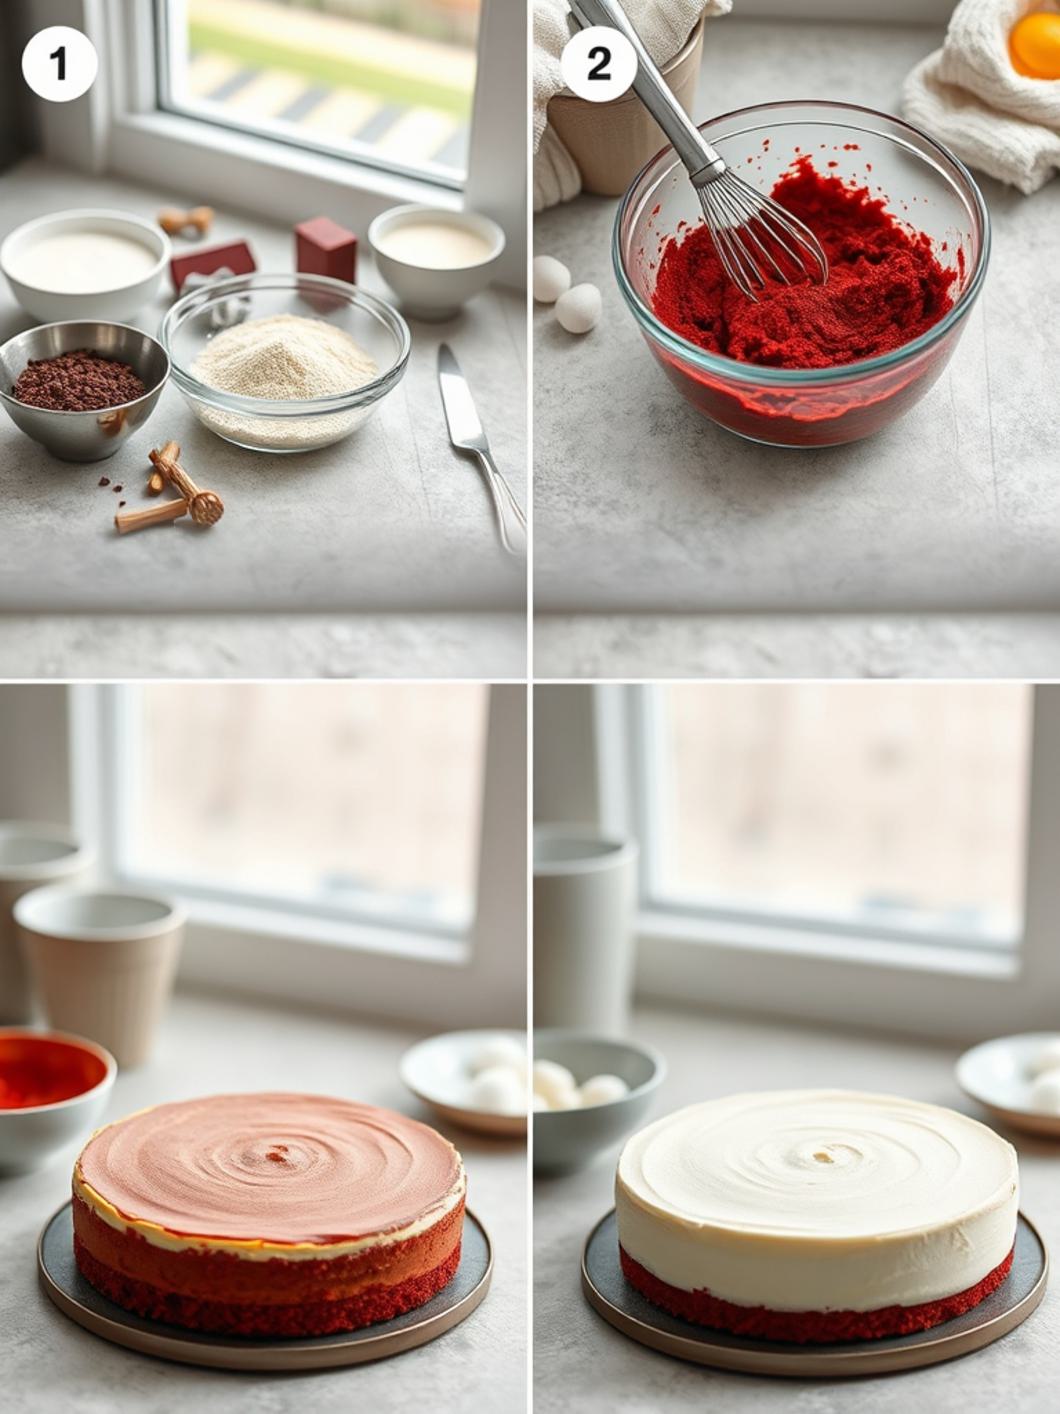
Step 1: Prepare the Crust
- Preheat oven to 350°F (175°C). Lightly grease a 9-inch springform pan.
- In a medium bowl, combine graham cracker crumbs, cocoa powder, and sugar. Pour in the melted butter and mix until well combined and crumbly.
- Press the mixture evenly into the bottom of the prepared springform pan. Bake for 8-10 minutes, then remove from oven and let cool slightly while you prepare the filling. Reduce oven temperature to 325°F (160°C).
Step 2: Make the Red Velvet Cheesecake Filling
- In a large mixing bowl, beat the softened cream cheese and granulated sugar together with an electric mixer on medium speed until smooth and creamy, about 2-3 minutes. Scrape down the sides of the bowl.
- Add the eggs, one at a time, beating well after each addition until just combined. Do not overmix.
- Stir in the sour cream, cocoa powder, vanilla extract, white vinegar, red gel food coloring, and salt. Mix on low speed until the color is evenly distributed and the filling is smooth. Be careful not to incorporate too much air. This rich Red Velvet Cheesecake filling is truly special!
Step 3: Bake the Cheesecake
- Wrap the bottom of the springform pan tightly with heavy-duty aluminum foil to prevent water from seeping in (if using a water bath).
- Pour the cheesecake filling over the cooled crust.
- Place the springform pan into a larger roasting pan. Carefully pour hot water into the roasting pan until it comes about halfway up the sides of the springform pan. This water bath technique helps to prevent cracks and ensures an extra creamy texture, much like a traditional Red Velvet Cake.
- Bake for 60-75 minutes, or until the edges are set but the center still jiggles slightly when gently shaken.
- Turn off the oven, crack the oven door slightly, and let the cheesecake cool in the water bath for 1 hour. This slow cooling also helps prevent cracking.
- Remove the cheesecake from the water bath and roasting pan. Let it cool completely on a wire rack at room temperature.
- Once cool, cover the cheesecake with plastic wrap and refrigerate for at least 4 hours, or preferably overnight, for best setting.
Step 4: Prepare the Cream Cheese Frosting Topping
- In a medium bowl, beat the softened cream cheese and softened butter together until smooth and creamy.
- Gradually add the sifted powdered sugar, 1 cup at a time, beating until fully incorporated.
- Stir in the vanilla extract. If the frosting is too thick, add milk or cream one tablespoon at a time until you reach your desired consistency.
Step 5: Assemble and Serve
- Once the cheesecake is thoroughly chilled, carefully remove the sides of the springform pan.
- Spread the cream cheese frosting evenly over the top of the Red Velvet Cheesecake.
- Garnish with chocolate shavings, fresh berries, or extra red velvet cake crumbs if desired. Slice and serve!
Pro Tips for Red Velvet Cheesecake Perfection
- Room Temperature Ingredients: Ensure your cream cheese, eggs, sour cream, and butter are all at room temperature for a smooth, lump-free filling and frosting.
- Don’t Overmix: Overmixing adds too much air to the batter, which can cause the cheesecake to puff up and then crack as it cools. Mix until just combined at each stage.
- Water Bath is Key: While optional for some, a water bath is highly recommended for cheesecakes. It provides a moist, even baking environment, preventing cracks and ensuring a silky-smooth texture.
- Slow Cooling: Don’t rush the cooling process! Allowing the cheesecake to cool gradually in the oven and then at room temperature before chilling helps prevent major cracks.
- Chill Thoroughly: A fully chilled cheesecake is a firm, delicious cheesecake. Give it ample time in the refrigerator (4 hours minimum, overnight is best) before slicing.
Fun Twists & Serving Ideas
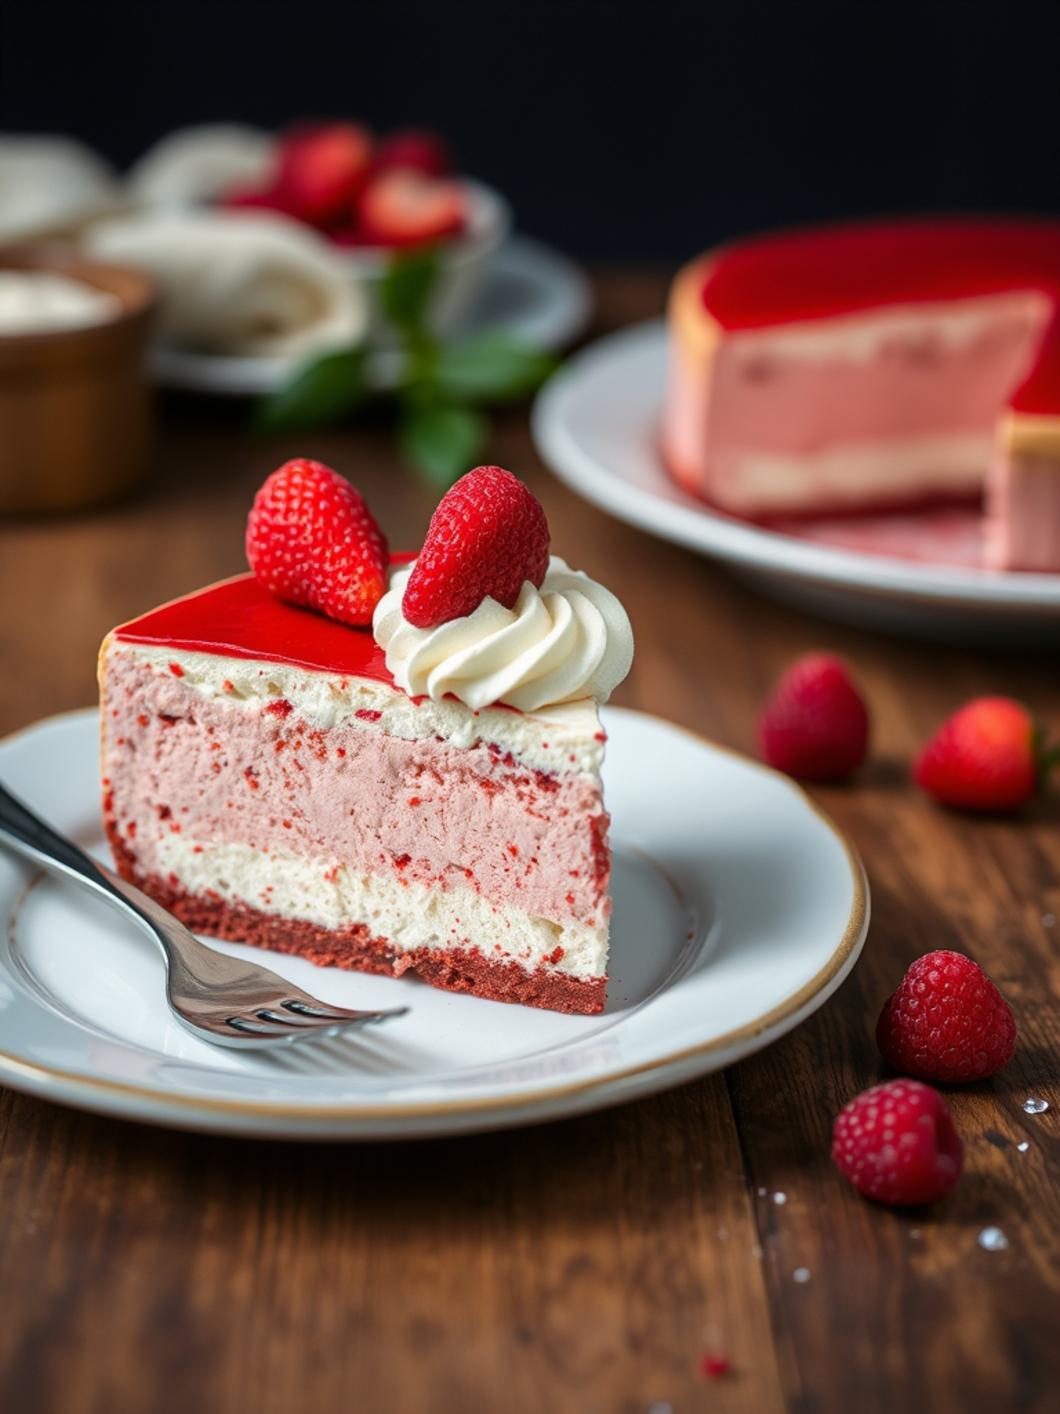
- Chocolate Drizzle: A simple ganache or melted chocolate drizzle adds another layer of decadence.
- Berry Bliss: Garnish with fresh raspberries or strawberries for a beautiful color contrast and a touch of tartness.
- Mini Cheesecakes: Use a muffin tin with paper liners to create individual Red Velvet Cheesecake bites for easy serving at parties.
- Oreo Crust: Swap out the graham crackers for crushed Oreo cookies (remove cream filling) for an even richer chocolate base.
- White Chocolate Shavings: Sprinkle white chocolate shavings over the frosting for an elegant finish.
What Our Fans Are Saying
Chef_Laura (⭐️⭐️⭐️⭐️⭐️): “This Red Velvet Cheesecake recipe is an absolute masterpiece! The flavor balance is perfect, and the texture is heavenly. It was a huge hit at my last dinner party, everyone asked for the recipe. Five stars without a doubt!”
SweetToothSam (⭐️⭐️⭐️⭐️⭐️): “I’ve tried many red velvet recipes, but this cheesecake takes the cake! So vibrant, so creamy, and the frosting is to die for. My new go-to for special occasions. Thank you for sharing this gem!”
BakingBeginner (⭐️⭐️⭐️⭐️): “First time making a cheesecake, and this recipe was so well-explained! It turned out beautiful with only a tiny crack, which I covered with frosting. Tastes amazing, though I might use a little less food coloring next time for a slightly subtler red. Highly recommend!”
FAQs About Red Velvet Cheesecake
Q: Why did my cheesecake crack?
A: Cracking is common and usually due to rapid temperature changes or overmixing. Ensure your ingredients are room temperature, don’t overmix the batter, and allow the cheesecake to cool slowly in the oven before transferring to the counter and then the fridge.
Q: Can I make this cheesecake ahead of time?
A: Absolutely! Cheesecake is an excellent make-ahead dessert. You can bake and chill the cheesecake (without the topping) up to 2-3 days in advance. Add the cream cheese frosting just before serving.
Q: What kind of red food coloring should I use?
A: Gel food coloring is highly recommended for vibrant, rich colors without adding extra liquid. “Super Red” or “Burgundy” gel colors work best for a deep red velvet hue.
Q: How do I store leftover cheesecake?
A: Store leftover Red Velvet Cheesecake tightly covered in the refrigerator for up to 5 days. It can also be frozen for up to 1 month; wrap individual slices or the whole cheesecake (without frosting, or with frozen frosting) tightly in plastic wrap and then foil.
Conclusion
And there you have it – your guide to creating the most show-stopping, palate-pleasing Red Velvet Cheesecake! This dessert is more than just a recipe; it’s a testament to the joy of baking and the delight of sharing something truly special. The luscious creaminess, the subtle cocoa notes, and that unmistakable vibrant red make it an unforgettable experience. Whether you’re celebrating a milestone or simply indulging in a moment of pure bliss, this Red Velvet Cake inspired cheesecake is guaranteed to impress. Dive in, create, and savor every magnificent bite!
Recipe Note: For best results, use full-fat cream cheese and high-quality ingredients. Always allow the cheesecake to chill thoroughly for perfect slices and optimal flavor.
Red Velvet Cheesecake
Cook Time: N/A
Total Time: 8-10 hours (includes chilling time)
Course: Dessert
Servings: 12-14
Calories: 550
Ingredients
- 1 ½ cups graham cracker crumbs
- ¼ cup granulated sugar (for crust)
- 6 tablespoons unsalted butter, melted (for crust)
- 3 (8-ounce) packages cream cheese, softened
- 1 ½ cups granulated sugar (for cheesecake)
- 4 large eggs
- 1 tablespoon vanilla extract
- 2 tablespoons unsweetened cocoa powder
- 1 teaspoon red food coloring (liquid or gel)
- ½ cup sour cream
- 1 (8-ounce) package cream cheese, softened (for frosting)
- ½ cup (1 stick) unsalted butter, softened (for frosting)
- 3-4 cups powdered sugar (for frosting)
- 1 teaspoon vanilla extract (for frosting)
- 1-2 tablespoons milk or cream (optional, for frosting consistency)
Instructions
1️⃣ Make the Crust
-
Preheat oven to 325°F / 165°C.
-
Line and lightly grease a 9-inch springform pan.
-
Mix crumbs, sugar, and melted butter.
-
Press firmly into bottom (and slightly up sides).
-
Bake 8–10 minutes. Let cool slightly.
2️⃣ Make the Filling
-
Beat cream cheese until completely smooth.
-
Add sugar & cocoa; beat creamy.
-
Mix in sour cream and vanilla.
-
Add red food coloring until deep red.
-
Add eggs one at a time, gently mixing (don’t overbeat).
3️⃣ Bake
-
Pour batter over crust.
-
Wrap pan in foil and place in a water bath (optional for no cracks).
-
Bake 60–75 minutes, until edges are set and center slightly wobbly.
4️⃣ Cool Slowly
-
Turn oven off, crack door, let sit 1 hour.
-
Cool fully at room temp.
-
Chill at least 6 hours (overnight best).
5️⃣ Serve
Slice and top with whipped cream, chocolate shavings, or cream cheese frosting swirls.
Chef’s Notes: Ensure all cold ingredients like cream cheese, eggs, and sour cream are at room temperature for a smooth, lump-free batter. Do not overmix the cheesecake filling after adding eggs, as this can incorporate too much air and lead to cracks. Using a water bath (bain-marie) is highly recommended for a creamier texture and to prevent cracking during baking. Chill the cheesecake thoroughly for the best texture and easy slicing.