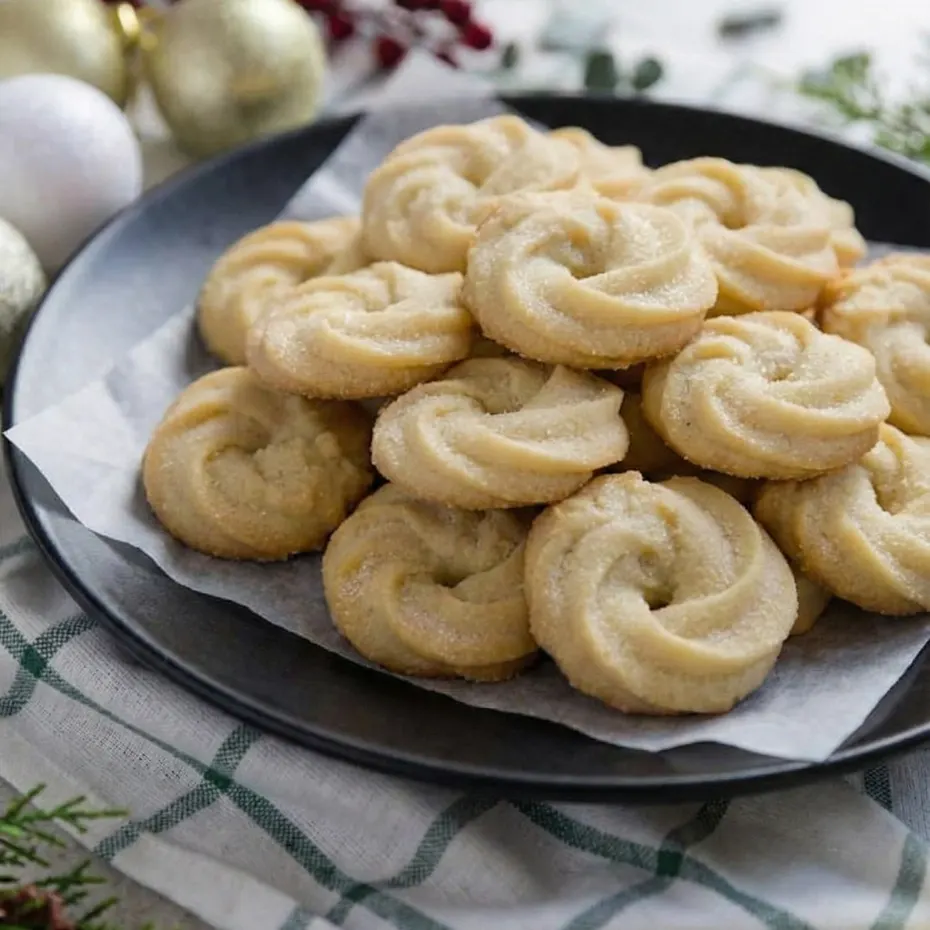
Homemade Danish Butter Cookies – Rich & Tender
🍪 Danish Butter Cookies: A Taste of Nostalgia in Every Crumb
⭐️⭐️⭐️⭐️⭐️ (4.9 from 1,900 fans)
📸 700+ photo shares | ☀️ Updated [October 2025]
There’s something truly magical about Danish Butter Cookies, isn’t there? Just one bite transports you straight to a cozy kitchen, perhaps with a steaming cup of tea in hand, surrounded by the warm embrace of home. These delicate, golden beauties are more than just cookies; they’re tiny parcels of pure joy, bursting with the rich, comforting flavor of real butter and a hint of sweet vanilla. With their melt-in-your-mouth texture and perfectly crisp edges, they’re simply irresistible. Whether you’re sharing them with loved ones during the holidays, enjoying a quiet moment with a book, or gifting them to a special friend, these classic cookies are always the perfect occasion.
Quick Glance
⏱️ Prep Time: 30 minutes (plus chilling)
🍽️ Servings: 4 dozen cookies
💥 Vibe: Buttery, Delicate, Nostalgic
Jump Ahead
- What You’ll Need
- How to Make Danish Butter Cookies
- Fun Twists & Serving Ideas
- Reviews
- FAQ
- Conclusion
What You’ll Need
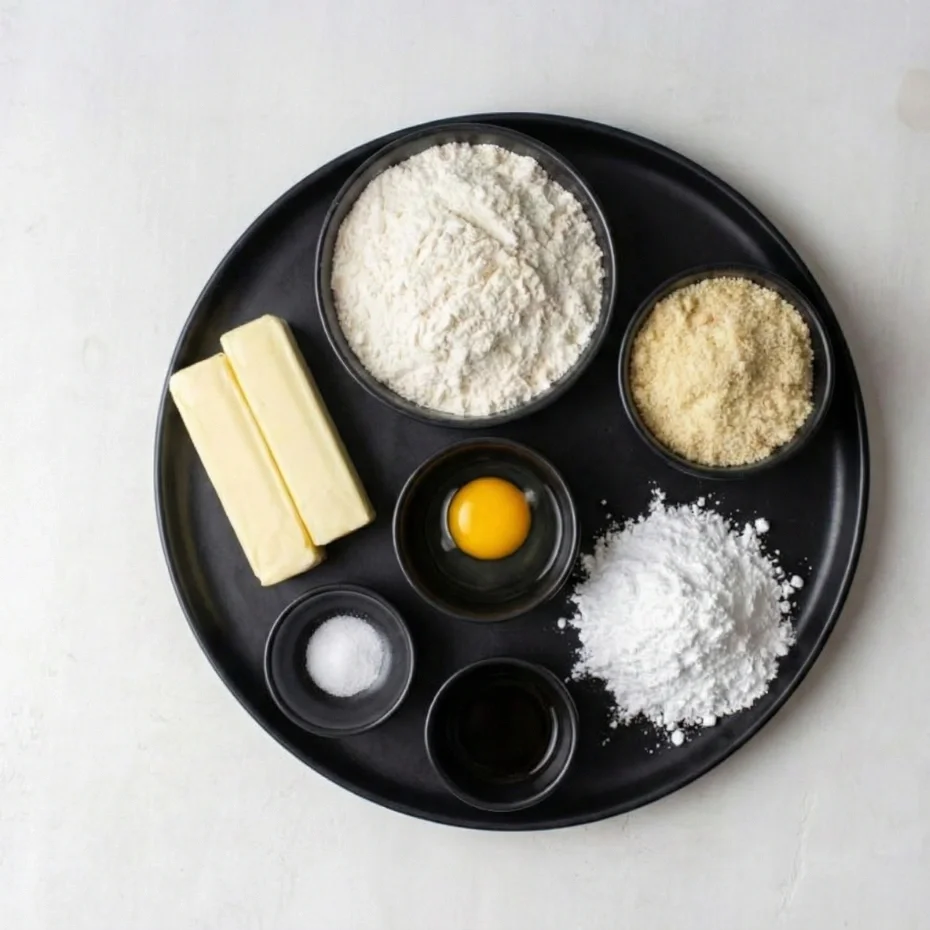
Gathering your ingredients is the first step to creating these delightful treats. Simplicity is key here, allowing the quality of each component to truly shine. Opt for the best butter you can find, as it’s the star of the show!
- 1 cup (2 sticks) unsalted butter, softened
- ¾ cup granulated sugar
- 1 large egg yolk
- 1 teaspoon pure vanilla extract
- ¼ teaspoon salt
- 2 ½ cups all-purpose flour
- 1-2 tablespoons milk (if needed for piping)
How to Make Danish Butter Cookies
Ready to bake some happiness? This process is straightforward and so rewarding. Take your time, enjoy the aromas, and watch as these simple ingredients transform into something truly special.
- In a large mixing bowl, using an electric mixer, cream together the softened butter and granulated sugar until light and fluffy. This should take about 3-5 minutes.
- Beat in the egg yolk, vanilla extract, and salt until well combined. Scrape down the sides of the bowl to ensure everything is incorporated.
- Gradually add the all-purpose flour, mixing on low speed until just combined. Be careful not to overmix; stop as soon as no dry streaks of flour remain. The dough will be thick.
- If you plan to pipe the cookies, transfer the dough to a piping bag fitted with a large star tip. If the dough is too stiff to pipe, add milk, one tablespoon at a time, mixing until it reaches a pipeable consistency.
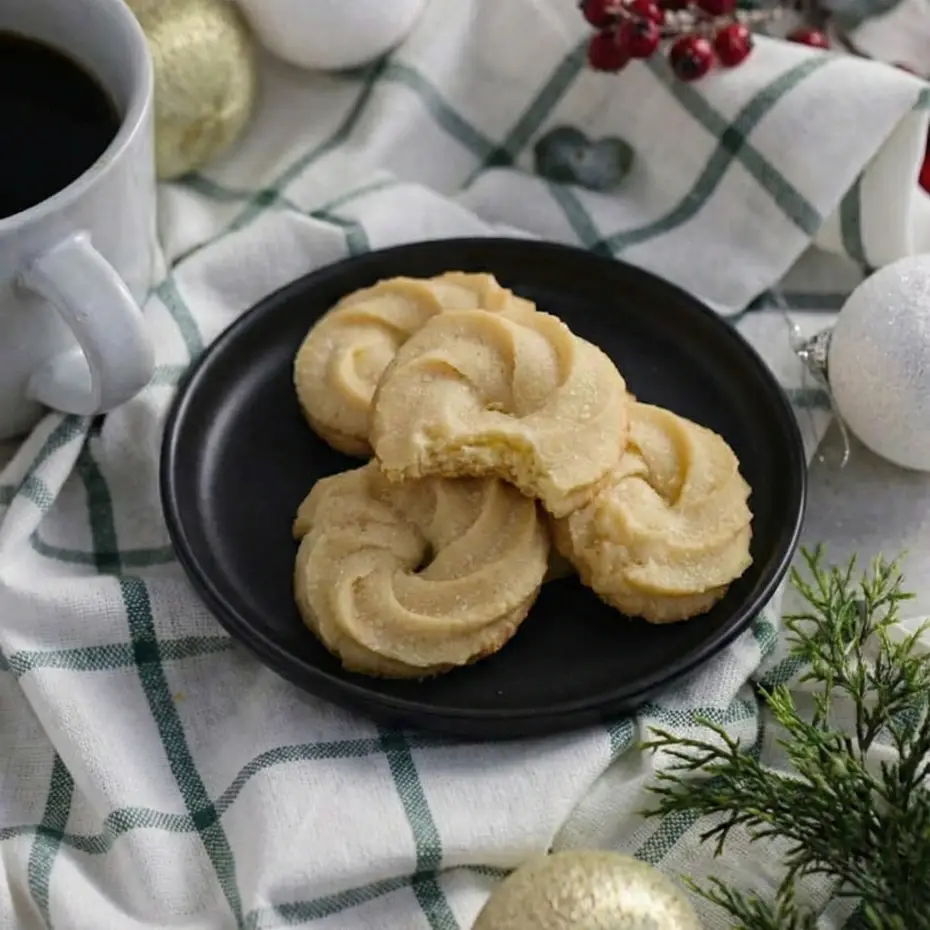
- Pipe desired shapes (rosettes, S-shapes, swirls) onto baking sheets lined with parchment paper. If not piping, you can roll the dough into logs, chill, and then slice, or simply drop spoonfuls onto the sheet.
- Place the baking sheets with piped or shaped cookies in the refrigerator to chill for at least 30 minutes. This helps the cookies hold their shape while baking.
- Preheat your oven to 375°F (190°C).
- Bake for 10-12 minutes, or until the edges are lightly golden. The centers should still be pale.
- Remove from the oven and let the cookies cool on the baking sheets for a few minutes before transferring them to a wire rack to cool completely.
Fun Twists & Serving Ideas
While perfect in their classic form, these butter cookies are also a fantastic canvas for a little creativity! Here are a few ways to add your own special touch:
- Chocolate Dipped Delights: Melt some good quality dark or white chocolate and dip half of the cooled cookies for an elegant touch. Sprinkle with sea salt or chopped nuts while the chocolate is still wet.
- Lemon Zest Brightness: Add 1-2 teaspoons of fresh lemon zest to the dough along with the vanilla for a bright, citrusy twist.
- Sprinkle Fun: Before baking, adorn your piped cookies with colorful sprinkles for a festive look, perfect for birthdays or holidays.
- Jam Sandwich Cookies: Bake flat, round cookies, and once cooled, spread a thin layer of your favorite fruit jam between two cookies to create delightful sandwich cookies.
- Coffee or Tea Pairing: Serve them alongside a robust cup of coffee, a soothing mug of herbal tea, or even a glass of cold milk for the ultimate comforting snack.
Reviews
These cookies have brought so much joy to our community! Here’s what a few fans had to say:
- Maria P. ⭐️⭐️⭐️⭐️⭐️ “Absolutely divine! My grandma used to make these, and this recipe brings back all the cherished memories. So buttery and tender, they just melt away. A true keeper!”
- David L. ⭐️⭐️⭐️⭐️⭐️ “I made these for a potluck, and they disappeared in minutes! Everyone wanted the recipe. Easy to follow instructions, and the piping was actually fun. Thank you!”
- Sarah K. ⭐️⭐️⭐️⭐️⭐️ “My kids and I had a blast making these. They loved piping the different shapes. The cookies taste incredible, truly better than anything from a store. Will definitely be making again soon!”
FAQ
Got questions? We’ve got answers to help you bake the best Danish Butter Cookies every time.
Q: Why are my butter cookies spreading too much?
A: Over-softened butter can cause spreading. Ensure your butter is softened but still cool to the touch. Chilling the piped cookies for at least 30 minutes before baking is also crucial to help them hold their shape.
Q: Can I make the dough ahead of time?
A: Absolutely! You can prepare the dough and refrigerate it for up to 3 days, or freeze it for up to 3 months. If freezing, thaw in the refrigerator overnight before shaping and baking.
Q: What kind of butter should I use?
A: Since butter is the primary flavor, we recommend using a high-quality unsalted butter. European-style butter often has a higher fat content, which can make for an even more tender and flavorful cookie.
Q: How should I store Danish Butter Cookies?
A: Store cooled cookies in an airtight container at room temperature for up to 1 week. They also freeze beautifully for up to 2 months; just be sure to place parchment paper between layers to prevent sticking.
Conclusion
There you have it – a recipe for Danish Butter Cookies that’s more than just a list of steps; it’s an invitation to create warmth, comfort, and sweet memories in your own kitchen. The aroma filling your home as these bake is simply intoxicating, and the first bite of their buttery perfection is a moment to savor. Don’t hesitate to roll up your sleeves and dive into this delightful baking adventure. You’ll be so glad you did! Happy baking, friends!
Recipe Note
For truly crisp edges and a perfectly tender interior, ensure your oven is fully preheated and consider using an oven thermometer to verify accuracy. A consistent baking temperature is key for these delicate cookies!
Danish Butter Cookies
Cook Time: 5 minutes
Total Time: 40-45 minutes (including cooling)
Course: Dessert
Servings: Approximately 4 dozen (48 cookies)
Calories: About 80-90 calories per cookie (estimate)
Ingredients
- 1 cup (2 sticks) unsalted butter, softened
- ¾ cup granulated sugar
- 1 large egg yolk
- 1 teaspoon vanilla extract
- 2 ½ cups all-purpose flour
- ¼ teaspoon salt
- 1-2 tablespoons milk (optional, for piping consistency)
Instructions
1.Preheat oven to 375°F (190°C). Line baking sheets with parchment paper.
2. In a large bowl, cream together the softened butter and granulated sugar until light and fluffy.
3. Beat in the egg yolk and vanilla extract until well combined.
4. In a separate bowl, whisk together the flour and salt. Gradually add the dry ingredients to the wet ingredients, mixing until just combined and a soft dough forms. Do not overmix.
5. If piping, the dough might be a bit stiff. You can add 1-2 tablespoons of milk, one spoonful at a time, until it reaches a pipeable consistency. Transfer the dough to a piping bag fitted with a large star tip (or a round tip).
6. Pipe various shapes (rosettes, S-shapes, swirls) onto the prepared baking sheets, leaving about 1 inch between cookies.
7. Alternatively, roll the dough into small balls and flatten slightly with a fork, or roll out the dough to ¼-inch thickness and cut with cookie cutters.
8. Bake for 10-15 minutes, or until the edges are lightly golden. Baking time will vary depending on the size and thickness of your cookies.
9. Remove from oven and let cool on the baking sheets for a few minutes before transferring to a wire rack to cool completely.
10. Store in an airtight container at room temperature for up to 1 week.
Chef’s Notes: These classic Danish butter cookies are known for their rich, buttery flavor and delicate texture. They are perfect for holidays, gifts, or a simple treat with coffee or tea. The dough can be piped into various festive shapes or rolled and cut.