Halloween Brownies – Spooky, Fudgy & Fun Chocolate Treats for Parties
🎃 Halloween Brownies: Fudgy, Festive, and Frightfully Delicious

⭐️⭐️⭐️⭐️⭐️ (4.9 from 1,900 fans)
📸 700+ photo shares | ☀️ Updated October 2025
Oh, the magic of autumn! As the leaves turn brilliant shades of crimson and gold, and a gentle crispness fills the air, our kitchens beckon for something warm, comforting, and just a little bit spooky. And what better way to celebrate the most whimsical holiday of the year than with a batch of these absolutely divine Halloween Brownies? Imagine sinking your teeth into a rich, deeply chocolatey square, its fudgy texture melting on your tongue, all while playful candy eyes gaze back at you. These aren’t just brownies; they’re tiny canvases of edible joy, bursting with decadent flavor and bringing a smile to every ghoulish grin. Perfect for your next Halloween party, a cozy movie night, or simply to add a touch of festive fun to an ordinary Tuesday.
Recipe Card will be inserted here
Quick Glance
- ⏱️ Prep Time: 25 minutes
- 🍽️ Servings: 16-24 squares
- 💥 Vibe: Fudgy, Spooky, Celebratory
Jump Ahead
What You’ll Need
Gathering your ingredients is the first step to creating these enchanting treats. Most of these are likely staples in your pantry, but the festive decorations are where the real fun begins!
- 1 cup (2 sticks) unsalted butter, melted
- 2 cups granulated sugar
- 4 large eggs
- 1 teaspoon vanilla extract
- 1 cup all-purpose flour
- ¾ cup unsweetened cocoa powder
- ½ teaspoon baking powder
- ¼ teaspoon salt
- 1 cup chocolate chips (milk or semi-sweet)
- Assorted Halloween sprinkles, candy eyes, orange and black frosting/candy melts for decoration
How to Make Halloween Brownies
Crafting these brownies is a delightful process, each step bringing you closer to a pan of chocolatey bliss. Let’s get baking!
- Preheat your oven to 350°F (175°C). Line a 9×13 inch baking pan with parchment paper, leaving an overhang on the sides for easy lifting.
- In a large mixing bowl, combine the melted butter and granulated sugar. Whisk them together until smooth and well incorporated, about 1 minute.
- Add the eggs one at a time, beating well after each addition. Stir in the vanilla extract until everything is beautifully blended.
- In a separate medium bowl, whisk together the flour, cocoa powder, baking powder, and salt. This ensures all your dry ingredients are evenly distributed.
- Gradually add the dry ingredients to the wet ingredients, mixing just until no streaks of flour remain. Be careful not to overmix; we want fudgy brownies, not tough ones!
- Fold in the chocolate chips, adding an extra burst of chocolatey goodness to every bite.
- Pour the brownie batter into your prepared baking pan, spreading it evenly with a spatula.
- Bake for 25-30 minutes, or until a toothpick inserted into the center comes out with moist crumbs attached, but not wet batter.
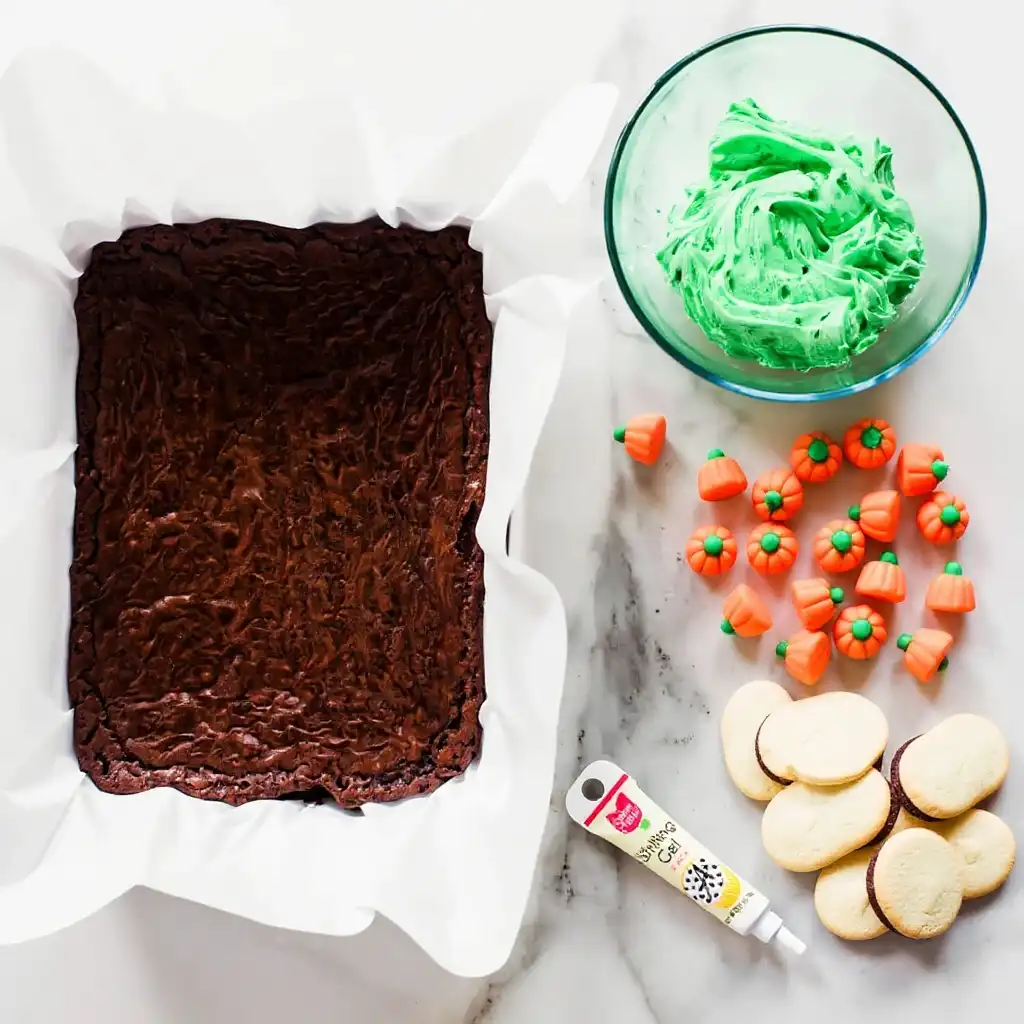
- Let the brownies cool completely in the pan on a wire rack before you even think about decorating. Patience is a virtue, especially for perfectly set brownies!
- Once cooled, lift the brownies out of the pan using the parchment paper overhang. Now for the fun part: decorate them! Use your orange and black frosting to create spooky designs, press on candy eyes, and scatter festive sprinkles. Get creative and let your inner goblin shine!
- Slice into squares and serve your frightfully delightful Halloween Brownies!
Fun Twists & Serving Ideas
These brownies are fantastic on their own, but a few simple additions can elevate them to new levels of festive fun!
- Pumpkin Spice Swirl: Before baking, dollop spoonfuls of pumpkin puree mixed with a pinch of pumpkin spice onto the batter, then swirl gently with a knife for a seasonal twist.
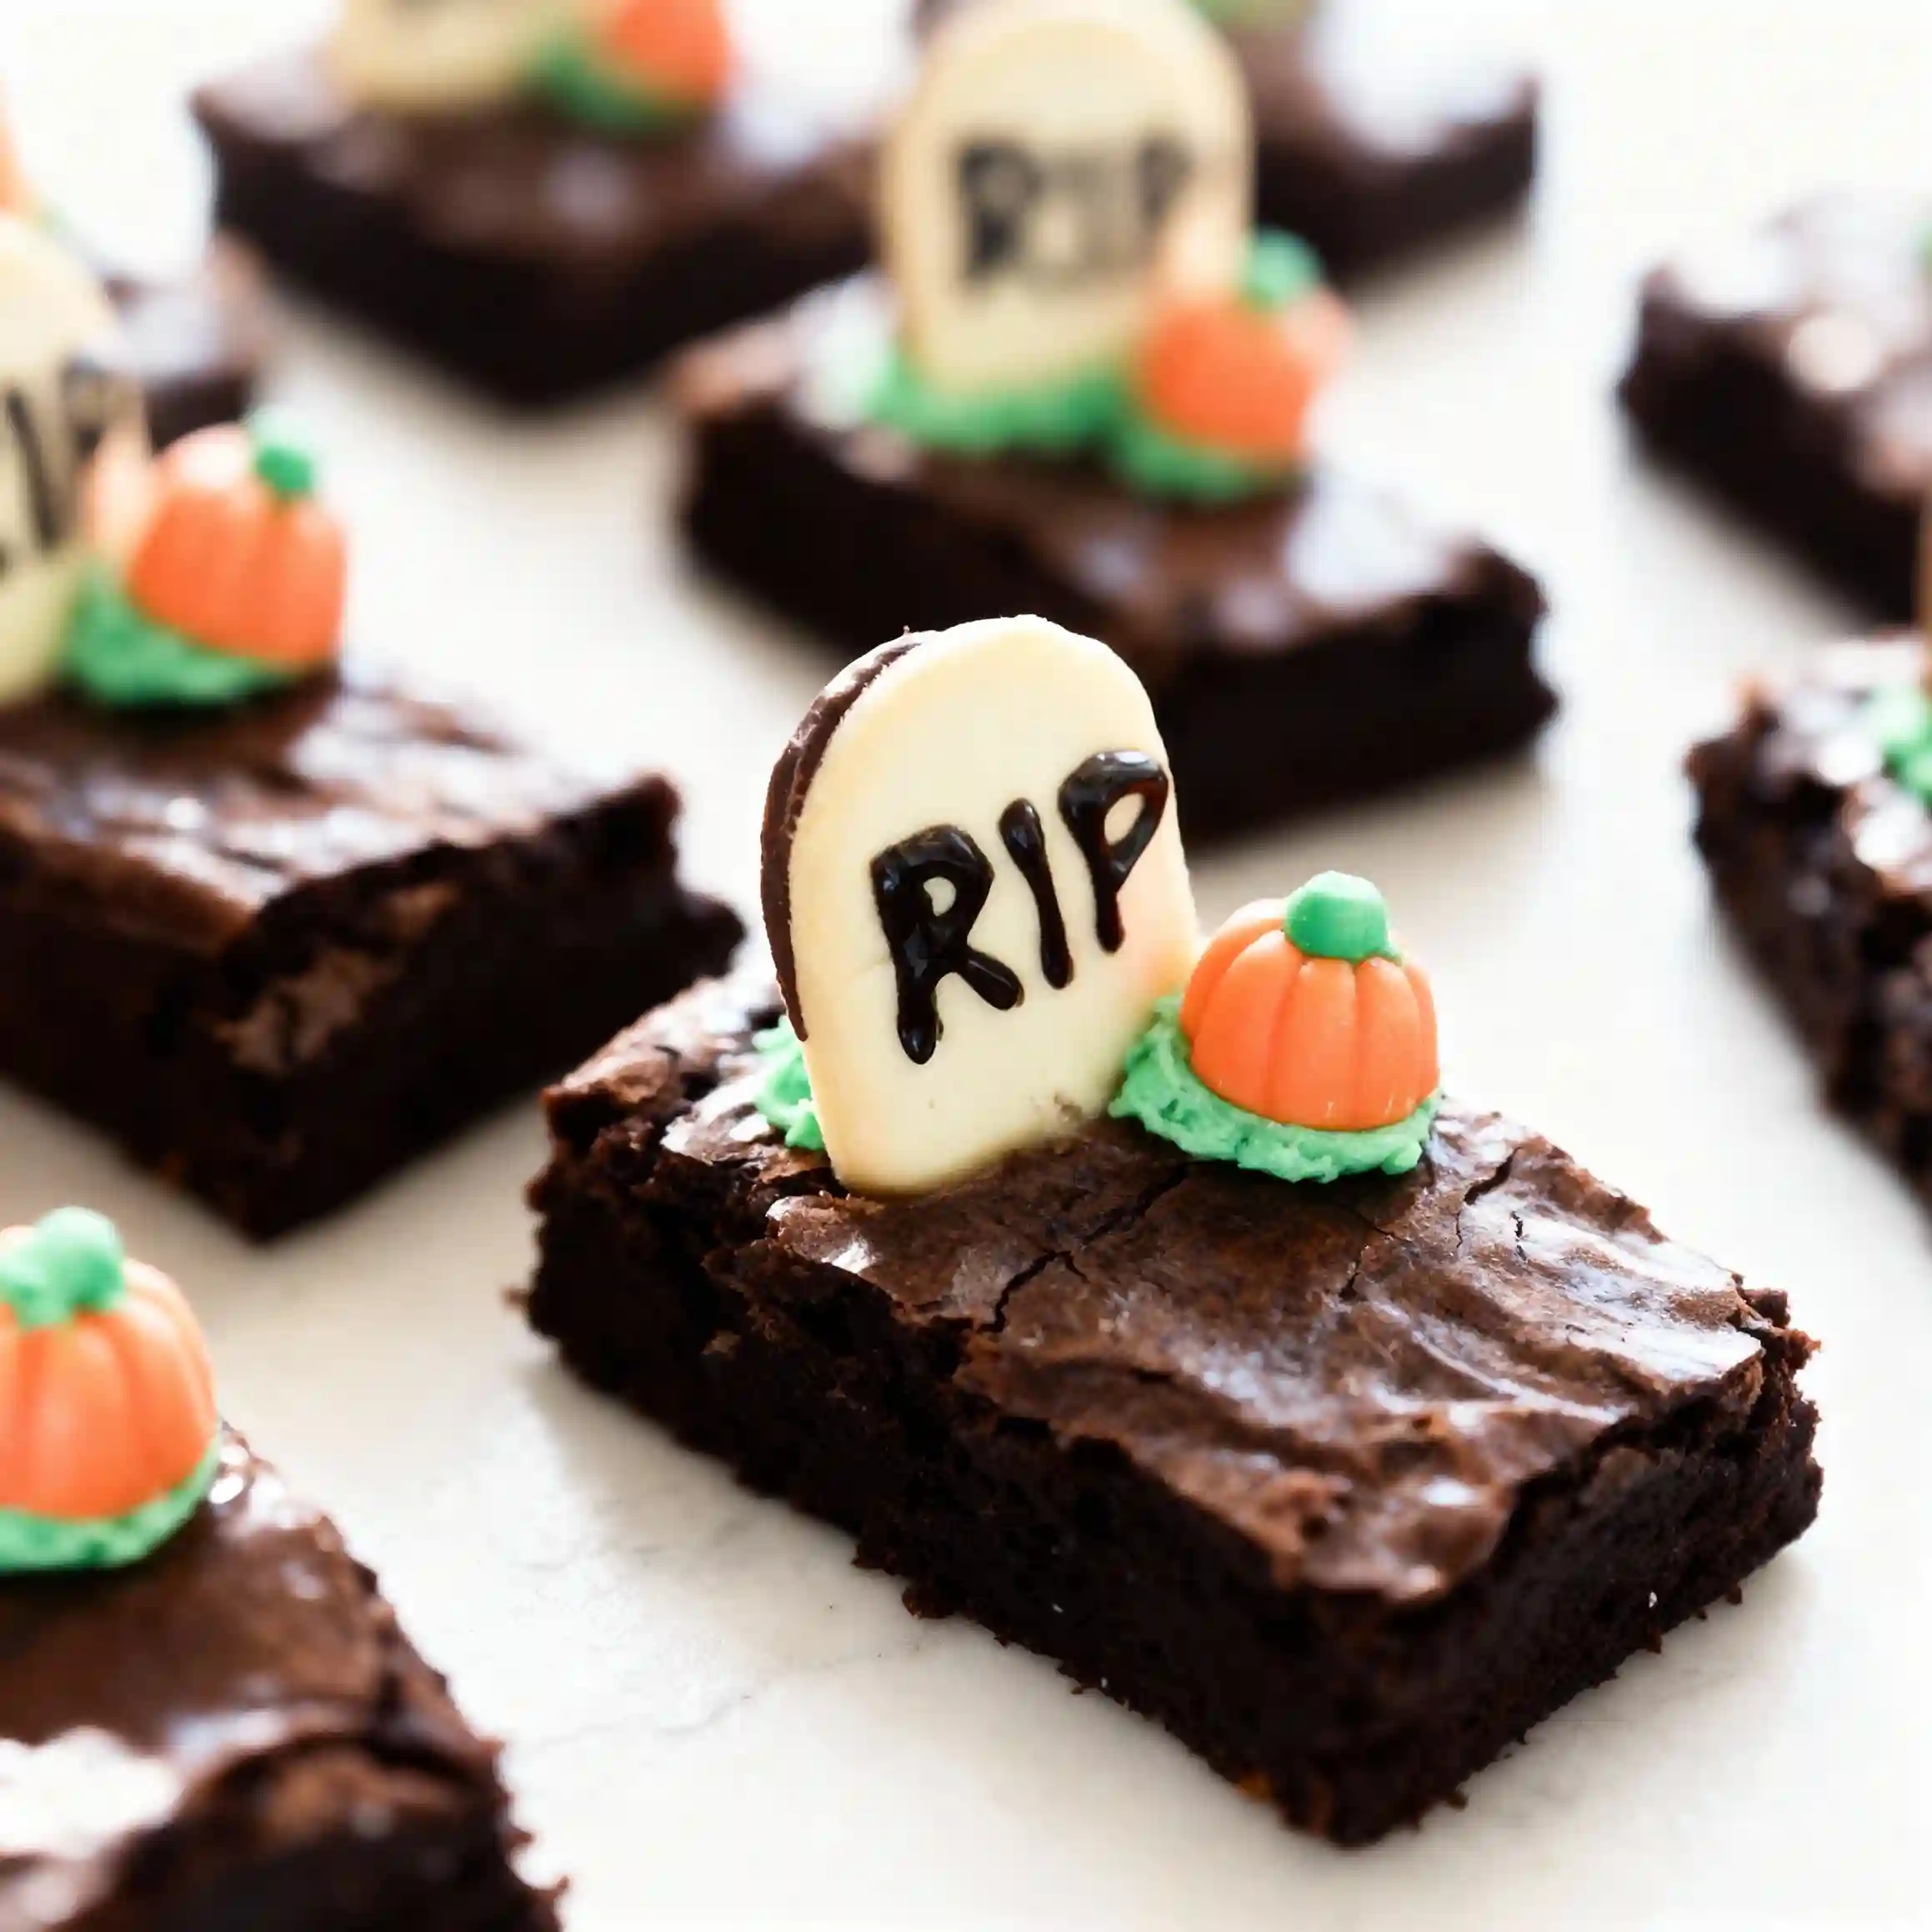
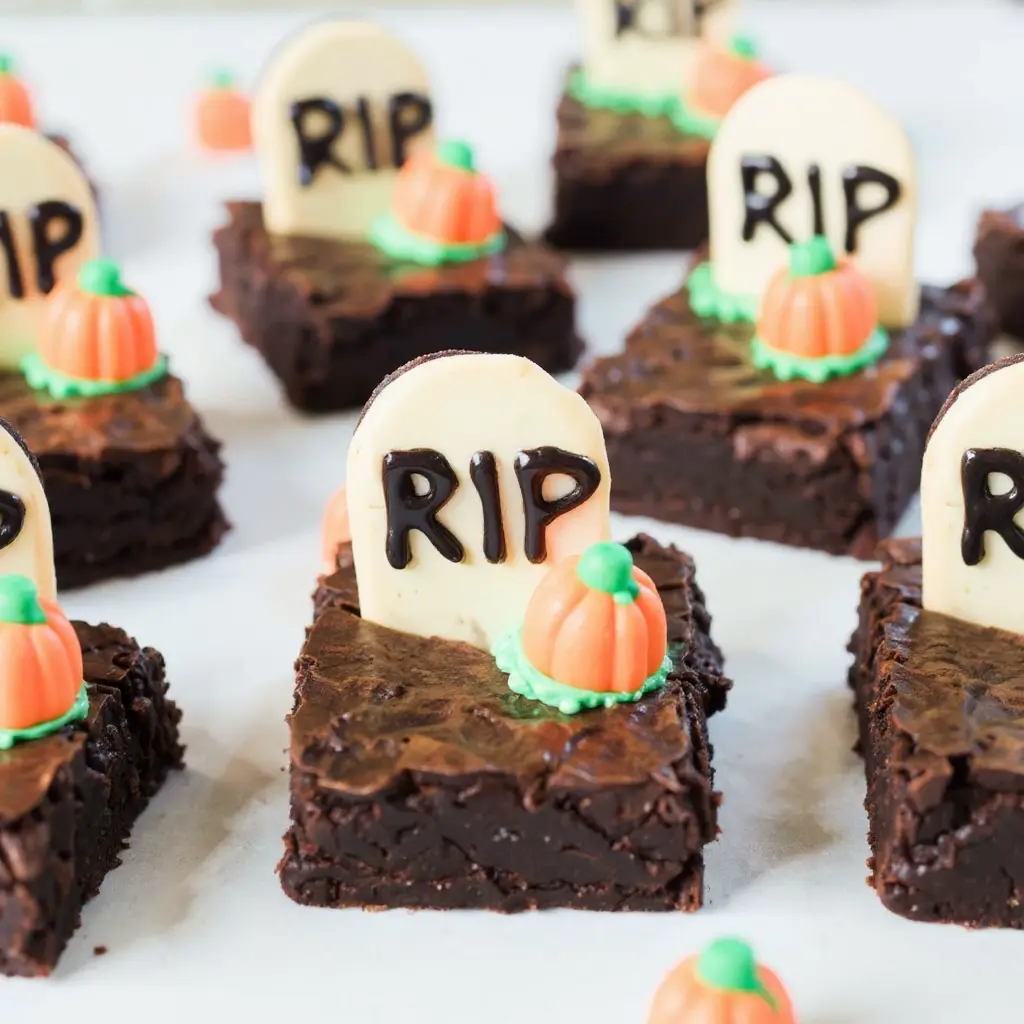
- Grave-Dirt Topping: Crush chocolate sandwich cookies and sprinkle generously over cooled brownies to create a “dirt” effect. Stick Milano cookies upright for tombstones, and pipe “RIP” with black icing!
- Candy Corn Delight: Fold a handful of chopped candy corn into the batter just before baking for a chewy, sweet surprise in every bite.
- Spiderweb Design: After the brownies are cooled, spread a thin layer of white or orange frosting. Pipe concentric circles of black frosting on top, then drag a toothpick from the center outwards to create a spooky spiderweb effect.
Reviews
These brownies have brought so much joy to our community! Here’s what some fans are saying:
- “Absolutely genius! These were the star of our Halloween potluck. So fudgy and the kids adored decorating them. Five stars!” – Sarah J. ⭐️⭐️⭐️⭐️⭐️
- “My new go-to Halloween treat! The recipe is straightforward and the results are consistently amazing. The flavor is so rich.” – Mark P. ⭐️⭐️⭐️⭐️⭐️
- “Simple to make and so much fun! I loved how moist they stayed even a few days later. Perfect for a cozy autumn evening.” – Emily R. ⭐️⭐️⭐️⭐️⭐️
FAQ
Got questions? We’ve got answers to help you bake the most bewitching brownies!
Q: Can I make these brownies ahead of time?
A: Absolutely! These brownies actually get even fudgier and more flavorful the next day. Store them in an airtight container at room temperature for up to 3-4 days.
Q: What kind of cocoa powder should I use?
A: Unsweetened natural cocoa powder works wonderfully for a classic chocolate flavor. If you prefer a darker, more intense brownie, you can use Dutch-processed cocoa powder.
Q: How do I get clean cuts when slicing brownies?
A: For perfectly neat squares, make sure the brownies are completely cooled. For extra-clean cuts, chill them in the refrigerator for 30 minutes before slicing, and wipe your knife clean between each cut.
Q: Can I freeze Halloween Brownies?
A: Yes! Bake and cool the brownies completely, then slice them into individual squares (before decorating, if using delicate toppings). Wrap each square tightly in plastic wrap, then place them in an airtight freezer-safe bag or container for up to 2-3 months. Thaw at room temperature when ready to enjoy.
Conclusion
There’s something truly magical about bringing a little bit of holiday spirit into your kitchen, and these Halloween Brownies do just that. They’re a celebration of flavor, a canvas for creativity, and a heartwarming treat that brings smiles to faces young and old. So go ahead, gather your ingredients, turn on some festive tunes, and let the aroma of warm chocolate fill your home. You’re not just baking brownies; you’re crafting memories and spreading a little bit of sugary joy. Happy baking, my friends, and may your Halloween be deliciously delightful!
Recipe Note
For an extra rich and intense chocolate flavor, consider using a combination of semi-sweet chocolate and a small amount of bittersweet chocolate for your chocolate chips. This adds depth without making them overly sweet.
Halloween Brownies
Cook Time: 30-35 minutes cook
Total Time: 1 hour 30 minutes
Course: Dessert
Servings: 16
Calories: 300 per serving (approximate)
Ingredients
- 1 cup (2 sticks) unsalted butter, melted
- 2 cups granulated sugar
- 4 large eggs
- 1 teaspoon vanilla extract
- 1 cup all-purpose flour
- ¾ cup unsweetened cocoa powder
- ½ teaspoon salt
- Optional: 1 cup chocolate chips (milk, semi-sweet, or dark)
- For Decoration: Store-bought or homemade frosting (orange, black, purple, green), candy eyes, Halloween sprinkles, gummy worms, mini candy corn, edible glitter, spider rings, etc.
Instructions
- Preheat oven to 350°F (175°C). Grease and flour a 9×13 inch baking pan, or line with parchment paper leaving an overhang on the sides for easy lifting.
2. In a large bowl, combine the melted butter and granulated sugar. Whisk until well combined.
3. Add the eggs one at a time, whisking well after each addition. Stir in the vanilla extract.
4. In a separate bowl, whisk together the flour, cocoa powder, and salt. Gradually add the dry ingredients to the wet ingredients, mixing until just combined. Do not overmix.
5. If using, fold in the chocolate chips.
6. Pour the batter evenly into the prepared baking pan.
7. Bake for 30-35 minutes, or until a toothpick inserted into the center comes out with moist crumbs (not wet batter).
8. Let the brownies cool completely in the pan on a wire rack. This is crucial before decorating.
9. Once cooled, lift the brownies out of the pan using the parchment paper overhang. Frost with your desired Halloween-themed frostings and decorate with candy eyes, sprinkles, gummy worms, candy corn, or any other spooky toppers you like. Cut into squares and serve.
Chef’s Notes: These fudgy brownies are a perfect base for all your spooky decorating ideas! Get creative with different colors of frosting, candy eyes, sprinkles, and even plastic spider rings for a fun Halloween treat. Ensure brownies are completely cool before frosting.